Linux assigns a priority value to each running process, which determines how much CPU time it receives compared to others. The nice command allows you to start a process with a defined priority to control system load and prevent resource-heavy tasks from impacting critical workloads.
This guide will explain how the Linux nice command works, how process niceness affects scheduling, and how to use it effectively.

Process "Niceness" Explained
Niceness determines the CPU priority of a process relative to other running processes. It influences how the Linux scheduler distributes CPU time when multiple processes compete for the processor. Modern Linux systems use the Completely Fair Scheduler (CFS).
Niceness values range from -20 to 19:
- Lower values assign higher priority and allow a process to receive more CPU time.
- Higher values reduce priority and cause a process to yield CPU time to others.
Processes start with a niceness value of 0 by default. Only the superuser assigns negative values, because when a process priority increases, it directly affects system responsiveness and fairness.
Niceness affects CPU scheduling only. It does not control memory usage, disk input/output, or network bandwidth. Therefore, when you adjust niceness, it helps when multiple processes compete for CPU time, but it does not resolve performance issues caused by other resource limits.
Linux nice Command Syntax
The basic nice command syntax follows this structure:
nice [OPTION] [COMMAND [ARG]...]The syntax consists of:
[OPTION]. Defines the niceness adjustment applied when the process starts. If no option is provided,niceincreases the niceness value by 10, which lowers the process CPU priority.[COMMAND]. The program or executable to run. If omitted,nicelaunches a new shell with the specified niceness, and any commands run inside that shell inherit the same priority.[ARG]. One or more arguments passed to the command. These arguments do not affect how priority is applied.
Niceness values set with nice apply only to the launched process and any child processes it creates. They do not affect other running processes on the system.
Linux nice Command Options
The nice command supports several options that control how niceness is applied when you launch a process.
The following table lists the most commonly used nice options:
| Option | Description |
|---|---|
-n, --adjustment=N | Sets the niceness value to N. Is positive (lower priority) or negative (higher priority). Only the superuser can use negative values. |
--help | Displays a help message that shows all available nice options. |
--version | Shows the nice version. |
How to Check Process Niceness
Linux provides several tools that display niceness values that allow you to see which processes are prioritized and which yield CPU time to others.
The most common tools for checking niceness are ps, top, htop, and atop. The following sections explain how to use each tool to view process niceness and interpret the results correctly.
ps
The ps command displays a snapshot of running processes with detailed information, which includes niceness. It is useful when you need a static view of process priorities or want to include it in scripts.
The following syntax shows how to see niceness with ps:
ps -eo pid,comm,nice,niFor example, to view the niceness of a specific process, pipe the ps output to grep:
ps -eo pid,comm,nice,ni | grep sleep
This output shows the process ID, command name, and niceness values for the matching process.
In this example, the sleep process is running with a niceness of 10, which indicates a lower CPU priority compared to processes running at the default niceness of 0.
While ps displays niceness values, it does not distinguish kernel threads from user processes by default. Therefore, unfiltered output often shows kernel worker threads first, which commonly run with a niceness of -20. When you filter or target specific processes, like with grep sleep, it helps show meaningful niceness values.
The ps command provides a snapshot at a single point in time, so the output does not update automatically. This makes it well-suited for scripts, audits, and one-time checks rather than real-time monitoring.
top
The top command provides a real-time, interactive view of running processes, such as their niceness. Because top refreshes automatically, the process list changes constantly, which makes the output difficult to follow. The Space key pauses the display, which makes it easier to review the output.
Use the following command:
top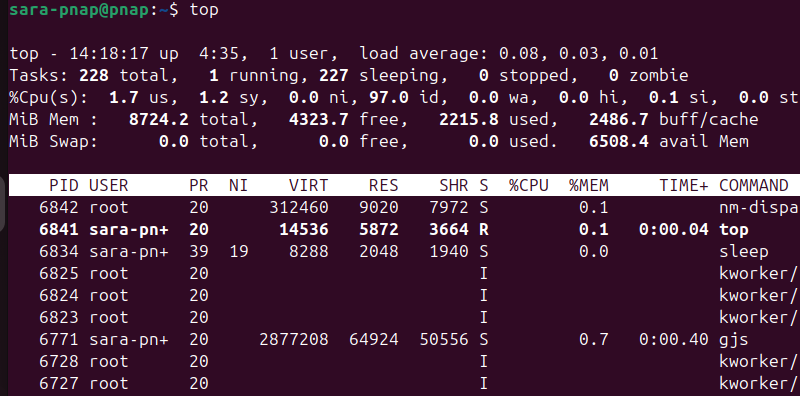
Niceness appears in the NI column. If the column is not visible, press f, enable NI, then return to the main view.
In the example output, the sleep process shows an NI value of 19, which confirms it is running with a very low CPU priority. Most user processes run with a default niceness of 0, while kernel threads often appear with negative niceness values. The PR column reflects the scheduler priority derived from the niceness value.
The top command displays both kernel threads and user processes and does not separate them by default. Pause the display or sort by the NI column to isolate processes with altered niceness and make priority differences easier to interpret.
htop
The htop command shows a live, interactive list of running processes and their scheduling attributes, including niceness. It is intended for live monitoring and makes process priorities easier to read than ps or top.
Use this command:
htop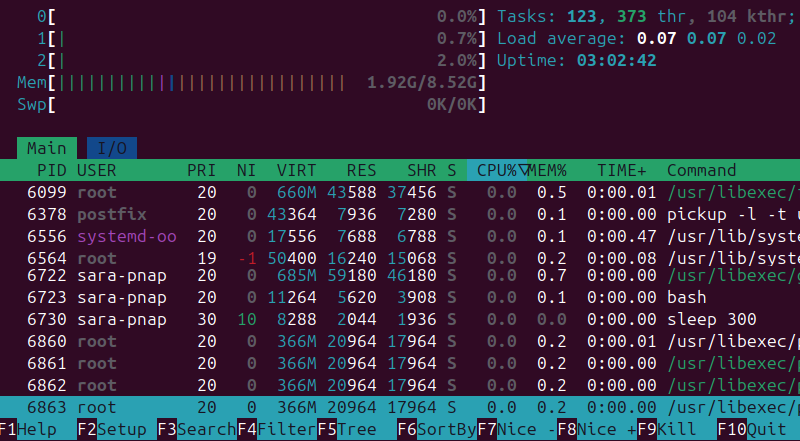
Niceness is displayed in the NI column. If the column is missing, press F2 to open Setup, go to Columns, add NI, then return to the process list.
In the example output, a low-priority process such as sleep appears with a niceness value of 10, while standard user processes remain at 0. Larger niceness values correspond to lower CPU priority. Because htop refreshes continuously, any changes to process niceness are visible immediately.
The display includes both kernel threads and user processes without separating them. Kernel threads often show negative niceness values, which dominate the list unless you apply sorting or filtering.
atop
The atop command provides a detailed, real-time view of overall system activity and records historical performance data for later analysis. It focuses on how the scheduler allocates CPU time over time rather than exposing individual priority fields directly.
Use the following command:
atop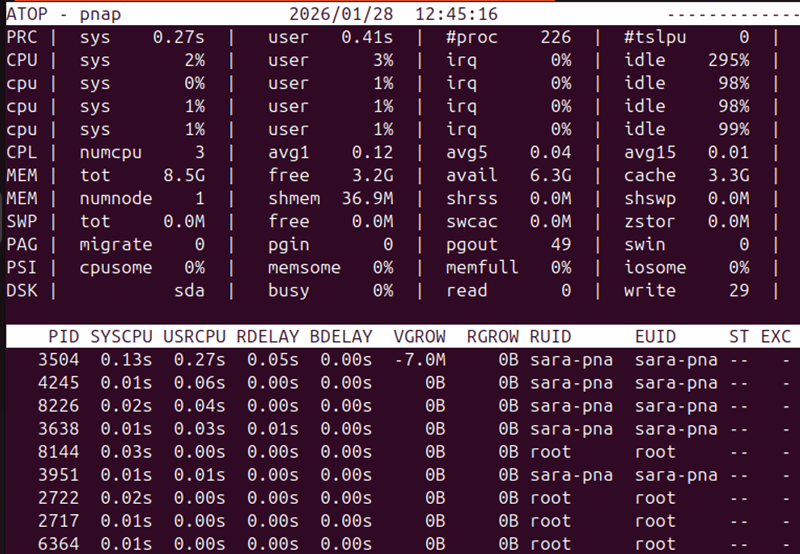
Unlike ps, top, or htop, atop does not display process niceness as a visible NI or NICE column. The on-screen process view prioritizes CPU usage, state, and command information, and niceness cannot be enabled or toggled interactively through a field selection menu.
Even though niceness is not shown explicitly, it still influences the scheduling data atop collects. Processes with higher niceness values receive less CPU time, as reflected in lower CPU usage. Kernel threads, which often run with elevated priority, appear frequently but do not expose their niceness values.
Because atop records performance data at fixed intervals and replays historical snapshots, it is useful for understanding how process priorities affected CPU allocation over time. This makes it suitable for long-term performance analysis and post-incident investigations rather than quick checks of individual process niceness. Therefore, atop is best used alongside tools like ps, top, or htop when you need to inspect or confirm exact niceness values.
Using Linux nice to Launch Process with Altered Priority
The nice command starts a process with an adjusted CPU scheduling priority. Higher niceness values reduce priority, which gives other processes more CPU time, while lower values increase priority but require root privileges.
To launch a process with a specific niceness, use the -n option in this format:
nice -n <niceness> COMMAND [ARG]...For example, to run a sleep process with reduced priority, run:
nice -n 15 sleep 60This starts sleep with a niceness of 15 in the background, and produces no output. The kernel gives it less CPU time when other processes need resources.
Confirm the priority in a new terminal window with:
ps -eo pid,comm,nice,ni | grep sleep
The output shows the sleep process with NI = 15.
Niceness values range from -20 (highest priority) to 19 (lowest priority), and only root users can assign negative values to increase priority. Niceness set at launch applies to the process and any child processes it spawns, but does not affect unrelated running processes.
Using Linux nice to Change User-Owned Process Priority
The renice command lets you adjust the niceness of a running process, which changes its CPU priority without a restart. It works like nice, but for processes already running.
Use the following syntax:
renice -n <niceness> -p <PID>For example, to lower the priority of an existing sleep process:
renice -n 10 -p 9215
Note: Replace <PID> with the target process's process ID, which you can find with ps, top, or htop.
This changes the process niceness to 10, which gives other tasks a higher CPU priority. The change applies immediately and also affects any child processes spawned afterward.
Because renice adjusts running processes, it is used to dynamically manage CPU resources. Like nice, it only affects the specified process and its descendants, not unrelated processes on the system.
Conclusion
This tutorial explained what niceness is and how to check it using different commands. It also covered the Linux nice command syntax and options. The text presented how to use nice to launch processes with altered priority and how to change the priority of user-owned processes with renice.
Next, learn how to kill a process in Linux from the command line.