Zerto offers enterprise-class disaster recovery (DR) and business continuity (BC) software specifically designed for virtualized infrastructure and cloud environments. This phoenixNAP DRaaS offering integrates Zerto toolset into Client environments as well as VMware based infrastructure such as VPDC (Virtual Private Data Center) and MPC (Managed Private Cloud).
Zerto DRaaS provides businesses with continuous mission-critical data replication and recovery with exceptionally low RPO and RTO targets as defined in the SLA. Additionally, the Zerto DRaaS solution enables protecting virtual machines for longer term recovery from an offsite backup.
Zerto Virtual Replication (ZVR) installation
The Zerto Virtual Replication installation deploys the Zerto Virtual Manager (ZVM), which sits in the hypervisor layer, and copies the installation software for the Virtual Replication Appliance (VRA) . A complete installation includes installing Zerto Virtual Replication on the protected and peer, recovery, sites.
Note: Zerto does not recommend that you install Zerto Virtual Replication on the machine running the vCenter Server service.
You can install ZVR using the express installation or perform a custom installation.
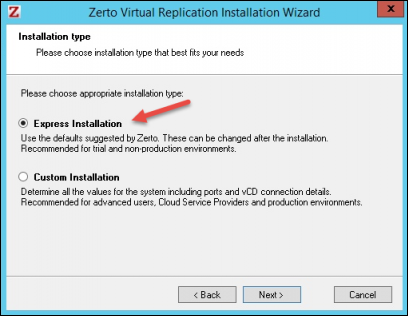
Express ZVR Installation
The express installation uses the default settings provided by Zerto. Additional settings can be changed later if required.
Note: You cannot install Zerto Virtual Replication on the same machine where another version of Zerto Virtual Replication has been installed.
To complete an express installation of ZVR:
1. Run Zerto Virtual Replication Installer executable file.
Important: Microsoft .NET Framework 4 or higher needs to be installed. If the installation fails, install NET Framework 4 which is included as part of the ZVR installation package, reboot the machine and rerun the ZVR installation.
2. The wizard will start, proceed through the installation until the dialog for the installation type appears and select the Express Installation option.
3. Click Next to proceed to the vCenter Server and Site Connectivity dialog.
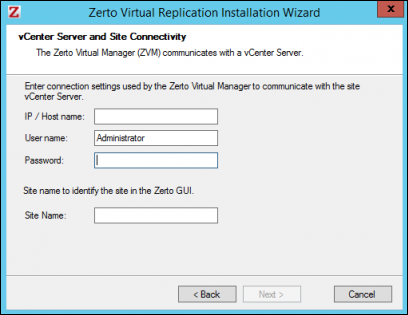
4. Enter the following:
- IP / Host Name. This is the IP address or host name of the machine where the vCenter Server runs.
- User Name. The user name of a user with administrator level privileges in the vCenter Server entered either in the ”username” format or “domain\username”:
- Password. A valid password for the user name in question.
- Site Name. The name you will use to identify the site.
5. Click Next and the installation performs checks in order to complete successfully.
6. Click Next after the checks and continue to the end of the installation.
7. Set any antivirus software running on the machine not to scan the folder where ZVR is installed.
8. Install Zerto Virtual Replication on the peer sites.
ZVR Custom Installation
Zerto Virtual Replication allows you to provide specific details including the ports that will be used by ZVR, as well as full contact details. To perform a custom install of ZVR:
1. Run Zerto Virtual Replication Installer executable file.
Note: Microsoft .NET Framework 4 or higher needs to be installed. If the installation fails, install NET Framework 4 which is included as part of the ZVR installation package, reboot the machine and rerun the ZVR installation.
2. The wizard will start, proceed through the installation until the dialog for the installation type appears and select the Custom Installation option.
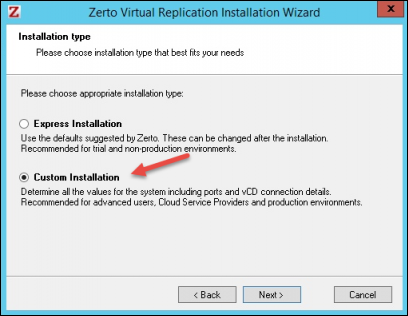
3. Click Next to proceed to the Zerto Virtual Manager Setup dialog.
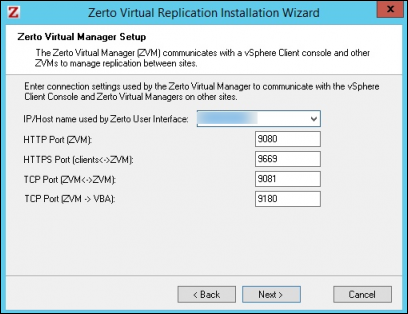
4. Enter the following:
- IP/Host name used by Zerto User Interface. The IP address used to access the Zerto Virtual Manager from the Zerto User Interface. If the machine has more than one NIC, select the appropriate IP from the list.
- HTTP Port (ZVM). The port used for inbound communication between the ZVM and Zerto internal APIs, Cmdlets and a VSS Agent.
- HTTPS Port (ZVM <-> Zerto User Interface). The port used for inbound communication between the Zerto User Interface and the Zerto Virtual Manager.
- TCP Port (ZVM <-> ZVMs on other sites). The port used for communication between Zerto Virtual Managers.
- TCP Port (ZVM -> VBA)__. The port used for communication between the Zerto Virtual Manager and the Virtual Backup Appliance.
5. Click Next to proceed to the Service User dialog.
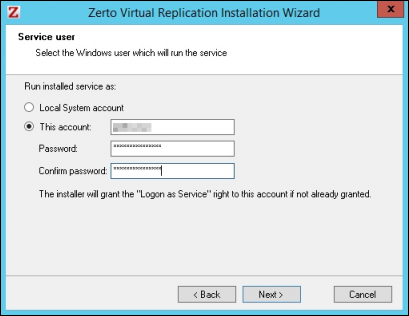
6. Select either Local System account or This account:
- Local System account. Use the Local System account to run the ZVM service, which is installed as part of Zerto Virtual Replication. The Local System account has unrestricted access to local resources.
- This account. Use a specific account as the user account to run the ZVM service, which is installed as part of Zerto Virtual Replication.
- Password. The password to use to run the service under the specified account.
- Confirm password. The Confirmation box for the password.
7. Click Next to proceed to the Database Selection dialog.
- Information required by ZVR is stored in a database embedded in the ZVM. This information includes the details of the site where the Zerto Virtual Manager is installed, details of the Virtual Replication Appliances and the volumes they use. You can use the default embedded SQL-based database or an externally managed database, either Microsoft SQL Server or SQL Server Express.
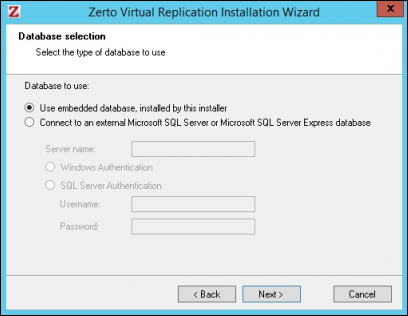
- Select Use embedded database if you want to use the default ZVR database.
- Select Connect to an external Microsoft SQL Server or SQL Server Express database.
Note: Zerto recommends using SQL Server with sites with more than 40 hosts that have VMs that require protecting and more than 400 VMs that need protecting.
- Server name. The domain name and server instance to connect to, with the format domain\instance.
Select one of the following authentication options:- Windows Authentication. This option is only enabled if a specific service user account was specified in the previous Service User dialog, in which case the service account name and password are used.
- SQL Server Authentication. Use SQL Server authentication.
- User Name. The user name for the SQL Server database.
- Password. A valid password for the given user name.
8. Click Next to proceed to the Zerto Virtual Manager Site Details dialog and enter:
- Site Name. The name used to identify the site. This name is displayed in the Zerto User Interface.
- Location. Any information you will use to identify the site.
- Contact Info. Who to contact if needed, e.g. a phone number or email address.
9. Click Next to proceed to the vCenter Server Connectivity dialog.
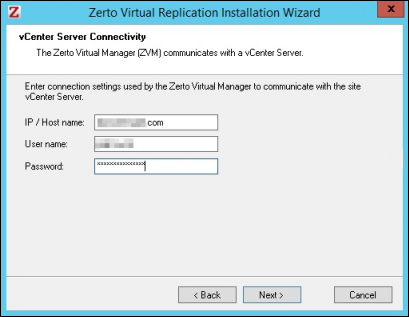
10. Enter connection settings that the ZVM uses to communicate with the vCenter Server:
- IP / Host Name. This is the IP address or host name of the machine where the vCenter Server runs.
- User Name. The user name of a user with administrator level privileges in the vCenter Server entered either in the ”username” format or “domain\username”:
- Password. A valid password for the user name in question.
11. Click Next to proceed to the vCloud Director Connectivity dialog.
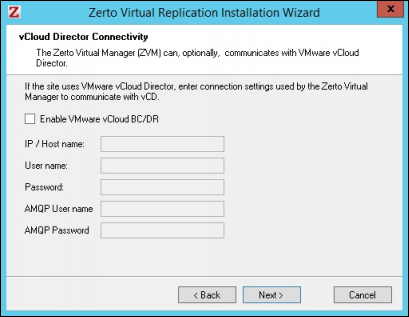
12. Click the Enable VMware vCloud BC/DR checkbox if you are using vCloud Director and you have installed an AMQP server. Enter the VMware vCloud Director access details:
- IP / Host name. The IP address or host name of the machine where vCD runs. When connecting to vCD with multiple cells, enter the virtual IP for the network load balancing used by the cells.
- User name. The user name for an administrator to vCD.
- Password. A valid password for the given user name.
- AMQP User name. The user name for the AMQP server.
- AMQP Password. A valid password for the given AMQP user name.
13. Click Next to proceed to the Check Prerequisites dialog. The installation performs checks to make sure that the installation can proceed successfully.
14. Click Next and continue to the end of the installation when the checks complete successfully.
15. Set any antivirus software running on the machine not to scan the folder where Zerto Virtual Replication is installed.
Important: If the vSphere Client console was open during the installation, close it and reopen it to ensure you have the Zerto Virtual Replication UI loaded.
16. Install Zerto Virtual Replication on the peer sites.
Note: After installing Zerto Virtual Replication, add the machine to the relevant host boot configuration, so that on starting up a host this machine running the Zerto Virtual Manager is also powered on automatically.
Zerto Replication Appliance (ZRA): installing Virtual Replication Appliances
The Zerto Virtual Replication installation includes the OVF template for Virtual Replication Appliances (VRAs). A VRA is a Zerto Virtual Replication virtual machine that manages the replication of virtual machines across sites. A VRA must be installed on every hypervisor which hosts virtual machines that require protecting in the protected site and on every hypervisor that will host the replicated virtual machines in the recovery site.
The VRA compresses the data passed across the WAN from the protected site to the recovery site. It automatically adjusts the compression level according to CPU usage, and if needed totally disabling it.
A few notes about VRAs:
- A VRA can manage a maximum of 1500 volumes, whether these volumes are being protected or recovered.
- A VRA is a thin, Linux-based virtual machine with a small footprint with increased security since there are a minimum number of services installed.
- Zerto recommends installing a VRA on every hypervisor host so that if protected virtual machines are moved from one host in the cluster to another host in the cluster there is always a VRA to protect the moved virtual machines.
- If you want to protect a VMware vApp, you must install a VRA on every ESX/ESXi host in the cluster on both the protected and recovery sites and ensure that DRS is enabled for these clusters.
Before installing a VRA take a note of these requirements:
- 12.5GB datastore space.
- At least 1GB of reserved memory.
- The ESX/ESXi version must be 4.0U1 or higher and Ports 22 and 443 must be enabled on the host during the installation.
You also need to know:
- The password to access the host root account, for ESXi 4.x and 5.x.
- The local network the host will use and the storage the VRA will use.
- The network settings to access the peer site; either the default gateway or the IP address, subnet mask, and gateway.
- If a static IP is used, the IP address, subnet mask, and default gateway to be used by the VRA.
Note: It is not recommended to use DHCP to allocate an IP to the VRA In a production environment. For example, if the DHCP server changes the IP allocation on a reboot, the VRA does not handle the change.
Paired Site Routing Configuration
To set up paired site routing:
1. Navigate to SETUP -> VRAs tab.
2. Select MORE - > Paired Site Routing.

3. Click Enable Paired Site Routing.
4. Fill in the fields:
- Address. The IP address of the next hop at the local site, the router or gateway address, that is used to access the peer site network.
- Subnet Mask. The subnet mask for the peer site network.
- Gateway. The gateway for the peer site network.
5. Click Save.
Note: The settings in the Configure Paired Site Routing dialog apply to all VRAs installed after the information is saved. The existing VRAs are not affected and access to these VRAs continues via the default gateway. If the default gateway stops being used, you must reinstall the VRAs that were installed before setting up paired site routing.
Installing Zerto VRAs on ESX/ESXi Hosts
To install a VRA:
1. Click SETUP>VRAs- in the Zerto User Interface.
2. Select a host which requires a VRA and click NEW VRA.
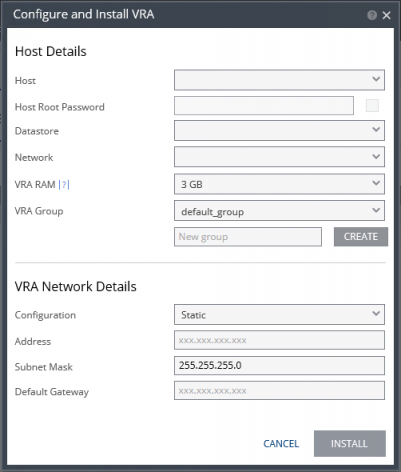
3. Specify the Host Details:
- Host. The host under which the VRA is installed. The drop-down displays the hosts managed by the hypervisor management center which do not have a VRA installed, with the selected host displayed by default.
- Host Root Password. The password used to access the host for the root user. The root access is required in case the Zerto host component is down and needs an automatic restart. The Zerto Virtual Manager checks that the password is valid once a day. If the password was changed, an alert is triggered, requesting the user enter the new password.
- Datastore. The datastore that the VRA will use for protected virtual machine data on the recovery site, including the journals. You can install more than one VRA on the same datastore.
- Network. The network used to access the VRA.
- VRA RAM. The amount of memory to allocate to the VRA. It represents the maximum buffer size for the VRA for buffering IOs written by the protected virtual machines before the writes are sent to the recovery VRA. The recovery VRA also buffers the incoming IOs until they are written to the journal. If a buffer becomes full, a Bitmap Sync is performed after space is freed up in the buffer.
| Amount of VRA RAM | VRA Buffer Pool Size |
|---|---|
| 1GB | 450MB |
| 2GB | 1,450MB |
| 3GB | 2,300MB |
| 4GB | 3,300MB |
| 5GB | 4,300MB |
| 6GB | 5,300MB |
| 7GB | 6,300MB |
| 8GB | 7,300MB |
| 9GB | 8,300MB |
| 10GB | 9,300MB |
| 11GB | 10,300MB |
| 12GB | 11,300MB |
| 13GB | 12,300MB |
| 14GB | 13,300MB |
| 15GB | 14,300MB |
| 16GB | 15,300MB |
The protecting VRA can use 90% of the buffer for IOs to send over the network and the recovery VRA can use 75% of the buffer. This means that a protecting VRA with 2GB of RAM can buffer around 1305MB before the buffer is full and a Bitmap Sync is required.
Note: The number of virtual machines that a VRA can support is not dependent on the amount of VRA RAM.
- VRA Group. Choose the VRA Group from the dropdown list. To create a new VRA group, type in a new name and click CREATE and choose the group you just created.
Note: In a VRA group the priority assigned to a VPG dictates the used bandwidth. This applies only within a group and not between groups. Thus, a VPG with a high priority is allocated bandwidth before VPGs with lower priorities. VPGs that are on VRAs with different VRA groups, for example, VPG1 is on VRA1 in group1 and VPG2 in on VRA2 in group2, do not affect each other, as the priority is relevant only within each group.
4. Insert the VRA Network Details:
- Configuration. Either have the IP address allocated via a static IP address or a DHCP server. If you select the Static option, enter the following:
- Address. The IP address for the VRA.
- Subnet Mask. The subnet mask for the network. The default value is 255.255.255.0.
- Default Gateway. The default gateway for the network.
5. Click INSTALL. The installation status is displayed in either the TASKS popup dialog in the status bar or under MONITORING > TASKS.
The alert is automatically removed when all the hosts in the cluster have VRAs installed.
Note: VRAs are configured and managed by the Zerto Virtual Manager. You cannot take snapshots of VRAs as snapshots cause operational problems for the VRAs.
Pairing Sites with ZVR
Sites with installed Zerto Virtual Replication can be paired with one another and virtual machines that are protected on one site can be recovered to any paired site.
To complete pairing sites:
1. Navigate to the SITES tab within the Zerto User Interface and click PAIR.
2. In the Add Site dialog specify:
- Remote Site ZVM IP Address. IP address or fully qualified DNS host name of the remote site ZVM to pair to.
- Port. The TCP port used for communication between the sites. Enter the port that was specified during the installation, the default is 9081.
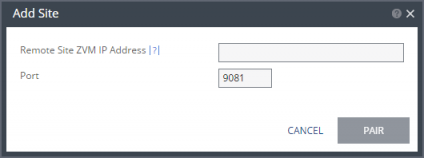
3. Click Pair when ready. Once the pairing completes the summary of the paired site will be displayed in this tab.
Accessing the Zerto Self-Service Portal
The Zerto Self-Service Portal (ZSSP) enables clients to access the recovery sites in order to perform the failover and manage the recovery objectives, based on the SLA with phoenixNAP,
The Zerto Self-Service Portal can be accessed directly from your internet browser using the access information previously provided by phoenixNAP. This includes:
- The Zerto Organization (ZORG) name.
- The user name and password.
- The address required as part of the logon URL.
To Access the Zerto Self-Service Portal from any browser:
1. Use one of the following URLs to navigate to the ZSSP:
- https://phxdr.phoenixnap.com:9779
- https://ashdr.phoenixnap.com:9779
- https://nlddr.phoenixnap.com:9779
2. Enter the necessary information listed above to log into the Zerto Self-Service Portal.
Each time you log in to the ZSSP, a unique session is allocated with access only to data that is relevant to you.
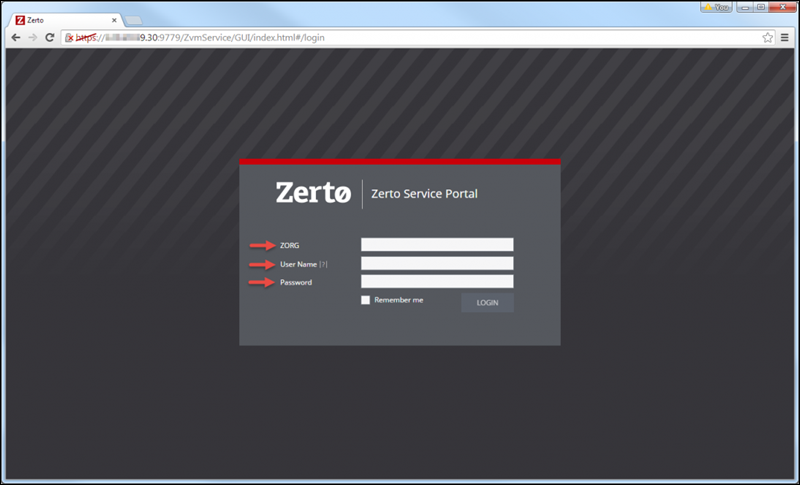
Note: The Zerto Self-Service Portal connection is terminated at the end of the session when the user logs out, and cannot be reused. The session also expires after 10 minutes of inactivity.
Failover Testing
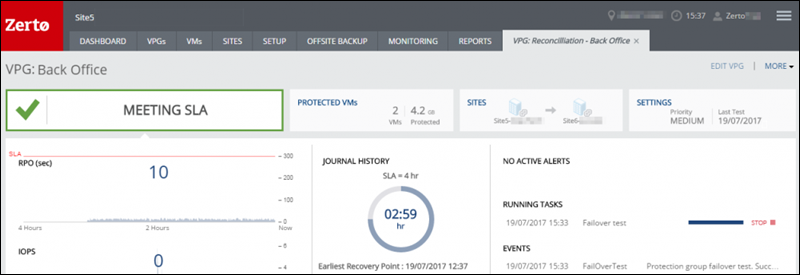
With the ZVM is installed and paired with phoenixNAP infrastructure and VRAs deployed on your hosts, the failover test can be performed. This procedure will show if the disaster recovery you planned is actually the one that will be implemented and that everything is configured and working properly.
The virtual machines to be tested must be in a currently replicating Virtual Protection Group (VPG) which is meeting the SLA. This process will not cause an interruption to your production environment.
Starting the Failover Test
To initiate a failover test:
1. Log in to the Zerto User Interface and switch the operation toggle to TEST.

2. Click FAILOVER to proceed to the Failover wizard.
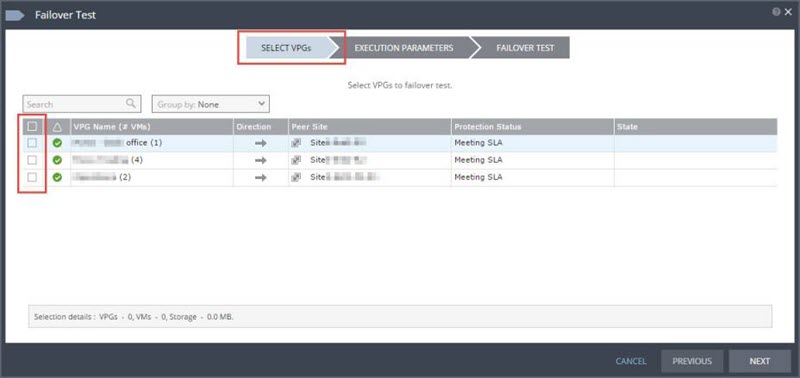
3. Select a single or multiple VPGs to test.
Info: The arrow in the Direction column shows the direction of the process: from the protected site to the peer, recovery, site.
4. Click Next to proceed to the EXECUTION PARAMETERS step.
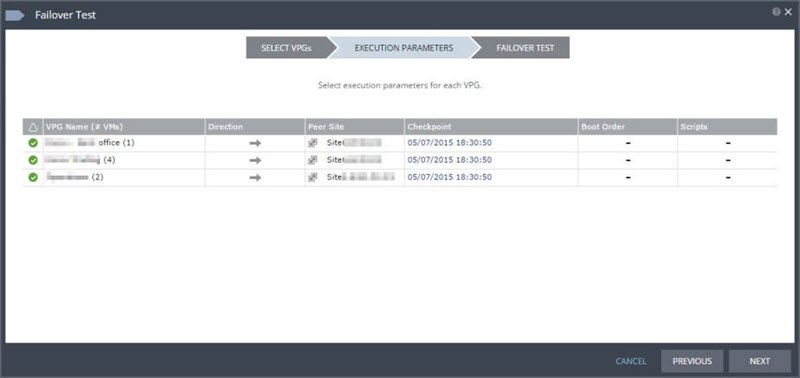
5. The date of the last checkpoint added to the journal will be displayed. To use this checkpoint, proceed to step 7. If you want to change the checkpoint, click on the one you want to change and the dialog will pop up.
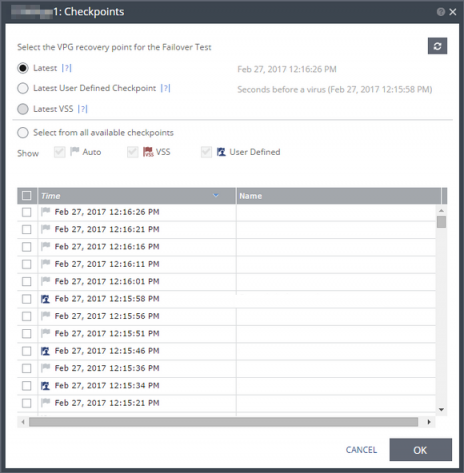
6. Select a checkpoint you want to use. You can choose:
- Latest. The checkpoint used is the latest at this point. If a checkpoint is added between this point and starting the test failover, the new one will not be used for that test.
- Latest User Defined Checkpoint. The operation will use the latest checkpoint created manually. If a checkpoint is added between this point and starting the test failover, the new one will not be used for that test.
- Latest VSS. If you are using the Volume Shadow Copy Service, the operation will use the latest VSS snapshot to ensure the data is crash consistent and application consistent. The frequency of VSS snapshots determines how much data can be recovered.
- Select from all available checkpoints. If you want to choose a checkpoint from a list of all available checkpoints, select this option. It will by default display all checkpoints but you can combine by checking or unchecking the boxes Auto, VSS, or User Defined.
7. Click OK after you have selected a checkpoint.
8. Click Next to proceed to the FAILOVER TEST step.
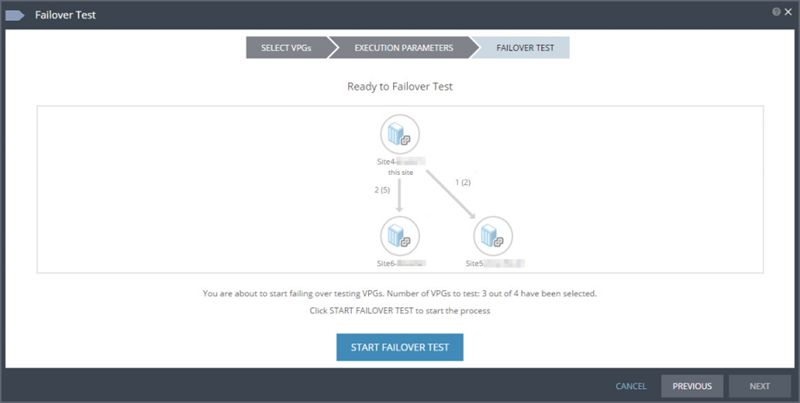
The screen will show the number of VPGs and virtual machines being tested for failover to each recovery site.
9. Click START FAILOVER TEST to begin the test for the selected VPGs.
Note: All testing is written to scratch volumes. The test can last until the maximum size of the scratch volumes is used, which is determined by the journal size hard limit and cannot be changed.
Monitoring the Test
After starting the test you can monitor the process within the Zerto User Interface:
1. Navigate to the VPGs tab.
2. In the Views section select GENERAL.
3. The Operation column in table will show Testing Failover while the test is in progress.
4. To view the failover test details of a specific VPG, click on the name of a VPG you are testing.
5. A dynamic tab will be created and show the VPG details and the status of the failover test.
Stopping the Test
Once you finish testing the failover, you can stop the test in a couple of ways.
1. Click the name of a desired VPG in the VPG tab and then click on the Stop icon once the tab opens.
2. Navigate to the DASHBOARD tab and click on the Stop icon to stop the test.
3. Navigate to the MONITOR tab, click on the TASKS box and stop the test.
In every case, the Stop Test dialog is displayed.
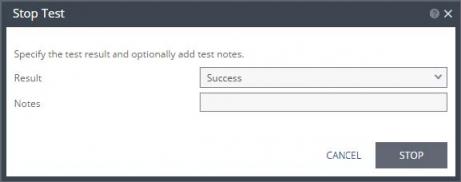
- Result. Specify whether the test was successful or failed.
- Notes. Optional field for specifying the details of the test. Limit is 255 characters.
Once you stop the test, the VMs in the recovery site are powered off and removed and the resource group created for this operation is deleted.
The checkpoint that was used for the test has the following tag added to identify the test: Tested at startDateAndTimeOfTest.
You can view the test results in the REPORTS tab within the Zerto User Interface.
Additional Resources: For more information on Zerto components and for detailed guides refer to the Zerto Technical Documentation page.
Components and Glossary
Checkpoint
Zerto Virtual Replication writes checkpoints to the journal every few seconds and thus ensures crash consistency. These checkpoints ensure write order fidelity and crash-consistency to each checkpoint which can be selected during the recovery.
Additionally, checkpoints can be manually added by the administrator, with a description of the checkpoint.
Journal
Each protected virtual machine has its own journal. Each journal can expand to a size specified in the VPG definition and automatically shrinks when the expanded size is not needed.
Every write to a protected virtual machine is intercepted by Zerto Virtual Replication and a copy of the write is sent, asynchronously, to the recovery site, while the write continues to be processed on the protected site. On the recovery site the write is written to a journal managed by the Virtual Replication Appliance.
Snapshot
A snapshot is a block device which presents an exact copy of a logical volume, frozen at some point in time. Snapshots are used when, for example, a backup needs to be performed on the logical volume, but without causing a disruption to a live system that is changing the data.
Zerto does not use a snapshot mechanism, but is constantly replicating data writes.
VBA (Virtual Backup Appliance)
Virtual Backup Appliance is a Windows service that manages offsite backups within Zerto Virtual Replication on each site. The VBA service runs on the same machine as the Zerto Virtual Manager service.
VPG (Virtual Protection Group)
Virtual machines are protected in virtual protection groups.
A virtual protection groups (VPG) is a group of virtual machines that are grouped together for replication purposes. For example, the virtual machines that comprise an application like Microsoft Exchange, where one virtual machine is used for the software, one for the database and a third for the Web Server, require that all three virtual machines are replicated to maintain data integrity.
VRA (Virtual Replication Appliance)
The VRA is a software module, a virtual machine installed on each hypervisor hosting virtual machines to be protected or recovered. The VRA continuously replicates data from user-selected virtual machines, compressing and sending that data to the remote site over WAN links.
VSS (Microsoft Volume Shadow Copy Service)
Microsoft VSS integration provides crash consistency in a failover. Microsoft Volume Shadow Copy Service enables taking manual or automatic backup copies or snapshots of data on a specific volume at a specific point-in-time over regular intervals.
ZRA (Zerto Replication Appliance)
Zerto Replication Appliance is a virtual machine that manages the replication of protected virtual machine writes across sites. A VRA must be installed on every ESX/ESXi which hosts virtual machines that require protecting in the protected site and on every ESX/ESXi that will host the replicated virtual machines in the recovery site.
ZVM (Zerto Virtual Manager)
The ZVM is a Windows service which manages everything required for the replication between the protection and recovery sites, except for the actual replication of data. The ZVM interacts with the vCenter Server to get the inventory of VMs, disks, networks, hosts, etc.
The ZVM also monitors changes in the VMware environment and responds accordingly.
ZVR (Zerto Virtual Replication)
Zerto Virtual Replication is a software package installed in a site with virtual machines to be protected as well as in the site where these virtual machines will be recovered. The ZVR installation includes ZVM, VRA and VBA.
Upgrading to Zerto Virtual Replication 5.0
Before You Start
Before upgrading to a new version, either by installing the new version over the existing version or by uninstalling the existing version and then installing the new version, Zerto recommends doing the following:
- Clear the Microsoft Internet Explorer cache of temporary Internet files. Not clearing the cache of temporary files can result in problems when accessing the Zerto Virtual Manager.
- Make sure that all VPGs are in the state Protecting, and not in a sync state, such as Delta Sync, or in an error state, such as Needs Configuration.
- Complete any recovery operation before starting the upgrade.
- Stop the Zerto Virtual Manager service.
- Create a backup of the VM where the Zerto Virtual Manager runs, which you will use if the upgrade fails. Zerto recommends taking a snapshot of the machine after stopping the Zerto Virtual Manager service.
Note: The snapshot should only be used to rollback to the pre-upgrade state immediately after the upgrade has completed. The snapshot should not be used after the protection of virtual machines has restarted.
Upgrading the ZVM
The existing Virtual Replication Appliances and protected virtual machines, along with all other information, such as checkpoints, journals, sites, and pairing details, are retained and are available in the upgraded installation.
The upgrade is performed without disrupting the protection, but no new checkpoints are written to the journal during the actual upgrade. This temporarily causes alerts to be issued, even if only a single site was affected, stating that the journal history and RPO do not meet their specified target settings.
Note: VRAs from the existing version are not automatically upgraded when upgrading Zerto Virtual Replication.
Performing the ZVM Upgrade
In order to upgrade the ZVM to the latest version, please complete these steps:
1. Download the new Installer to your ZVM using the link provided in the email.
2. Run the Zerto Virtual Replication installation executable.
The Zerto Replication Installation Wizard is displayed. It will say “Upgrade Zerto Virtual Replication” at the top.
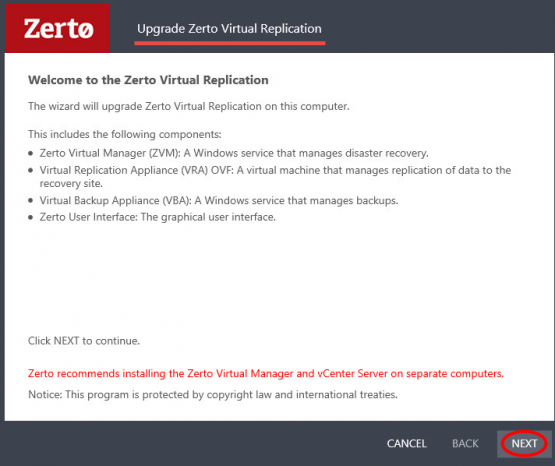
3. Click Next.
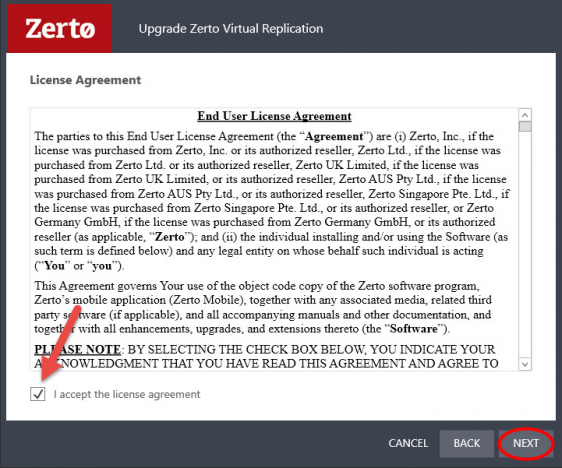
4. Read and accept the License Agreement and click Next again.
5. Leave the Enable Online Services and Zerto Mobile Application box checked and click Next.
6. The installer will perform a few validation checks. Once the checks are completed, click Run.
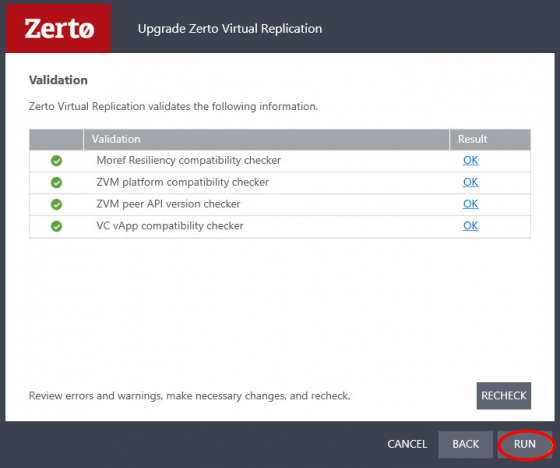
The upgrade proceeds automatically from here.
Note: If the vSphere Client console was open during the upgrade, close it and reopen it.
Upgrading the VRAs
Upgrading the VRAs is an important part of the upgrade process. VRAs from the existing version are not automatically upgraded when upgrading Zerto Virtual Replication. VRAs installed with the previous version of Zerto Virtual Replication can work with the current version of Zerto Virtual Replication. However, this is not recommended.
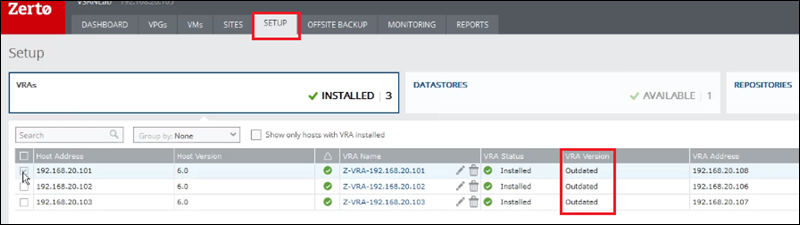
Not all newer versions of Zerto Virtual Replication require upgrading VRAs. Upgrading major releases, such as from 4.5 to 5.0, will require a VRA upgrade. If your VRA is outdated relative to your current version of Zerto Virtual Replication and an upgrade is available, the VRA version reported on the Setup tab of your ZVM will display as outdated. In addition, an alert is issued on the site using the old VRA and on any site that is paired with it.
Note: You can move the mouse over the outdated value to display the VRA version as a tooltip.
Performing the VRA upgrade
You do not need to relocate any VMs while the upgrade procedure is taking place. Upgrading a VRA that manages the recovery of virtual machines results in a bitmap sync being performed after the upgrade. Note that the time to upgrade a VRA is short so the bitmap sync should also be quick.
1. Navigate to your ZVM Console using your ZVM IP.
2. Click the SETUP tab.
3. Check the box to the left of the VRA that needs to be upgraded. If you wish, you may check the box next to all of the VRAs that need to be upgraded. Zerto will process them each one at a time.
4. Click MORE in the top right-hand corner and then click Upgrade.
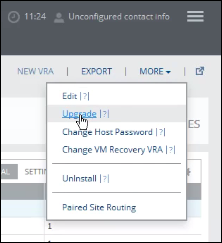
5. An Upgrade VRAs window will appear. Click Upgrade Selected VRAs.
6. An additional Upgrade VRAs dialog box will appear. Click OK.
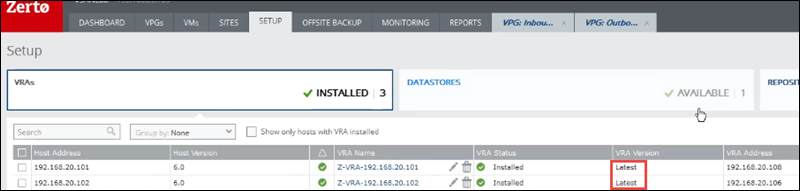
At the bottom of the ZVM console you should see 1 RUNNING TASK Upgrading VRA with a progress bar. You can monitor the progress of the upgrades from here.
If you select all of you VRAs, they are upgraded one at a time. A new task will be created for each VRA.
If you are doing them individually, wait until the menu reads NO RUNNING TASKS before moving on to the next VRA.

Once the VRA is upgraded, the version will be displayed as Latest.
Support
If you require any assistance with the upgrade process, support staff are available 24 Hours, 7 Days a Week, 365 Days a Year.
- Toll Free: 1.855.330.1509
- Phone: 480.646.5362
- Email: support@phoenixnap.com
- Live chat