Helm is a package manager for Kubernetes that provides several useful command-line tools for managing Kubernetes applications. It simplifies Kubernetes application deployment by introducing the Helm chart, a package containing YAML files and templates that generate Kubernetes manifest files.
In this tutorial, you will learn how to use helm install, the Helm command for installing charts in a Kubernetes cluster.
Prerequisites
- A Kubernetes cluster.
- Helm 3 installed.
Helm Install Command Syntax
The helm install command syntax includes a release name, the path to the chart, and optional flags:
helm install [release-name] [chart] [flags]Note: You can give the release any name you want.
Some useful flags are:
| Flag | Description |
|---|---|
--atomic | Deletes the installation in case the process fails. The flag also automatically sets the --wait flag. |
--create-namespace [string] | Creates the namespace for the release if it does not already exist. |
--dependency-update | Runs a Helm dependency update before the installation. |
--dry-run | Performs a simulation of the installation process for testing purposes. |
-g, --generate-name | Generates a release name. The [release-name] parameter is omitted. |
-h, --help | Shows the installation help file. |
-o, --output [format] | Prints the output in one of the allowed formats - YAML, JSON, or the table (default). |
--set [stringArray] | Provides space to set values directly in the command line. Multiple values are allowed. |
-f, --values [strings] | Takes values from the file or URL the user specifies. Multiple values sources are allowed. |
--verify | Verifies the package before its use. |
--version [string] | Lets the user specify the exact chart version (for example, 1.2.1) or a chart version range (for example, ^2.0.0). |
--wait | Waits for the system to be in the ready state before marking the release as successful. The waiting time is specified with the --timeout flag (the default value is 5 minutes). |
Installing Charts with Helm Install Command
The steps for installing an app with Helm include obtaining a helm chart and issuing the helm install command referencing that chart.
Step 1: Find or Create a Helm Chart
To install a Helm chart, you either have to find it online or create a Helm chart yourself. You can obtain them in online repositories or the Artifact Hub. For more information about adding Helm repositories, read how to add, update, or remove a Helm repo.
Use the helm repo add command to add the Helm repository containing the chart you wish to install:
helm repo add [repository-name] [repository-address]In the example below, we add the repo for Jenkins, an open-source automation server:

Update the repositories on your system:
helm repo update
Use the helm search command to search for the charts in the local repositories:
helm search repo [chart]
Make a note of the chart name and proceed to the following step.
Step 2: Install a Chart with helm install Command
There are multiple ways to use the helm install command for installing Helm charts. The most common is using the chart reference given in the NAME section of the helm search output.
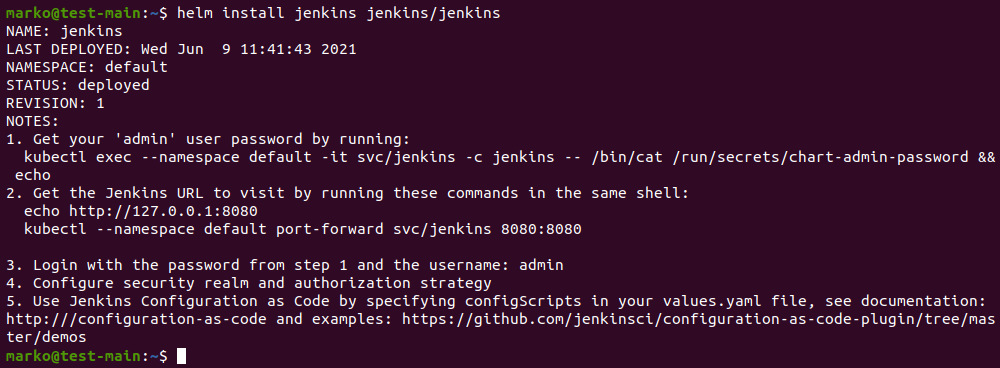
For example, using the syntax explained in the section above, type the following to install Jenkins:
helm install jenkins jenkins/jenkinsThe chart reference consists of a repository prefix and the chart name. In the example above, Helm searches for the jenkins chart in the jenkins repo before proceeding with the installation.
The output should confirm the successful deployment of the chart.
There are multiple ways to tell Helm where to look for a chart. Aside from a chart reference, you can also provide:
- The path to a packaged chart:
helm install jenkins ./jenkins-1.2.3.tgz- The path to a directory containing an unpacked chart:
helm install jenkins-deployment ./jenkins-archive- The absolute URL:
helm install jenkins https://example.com/charts/jenkins-1.2.3.tgz- The chart reference and the URL of the repository:
helm install --repo https://example.com/charts/ jenkins-deployment jenkinsCheck the Status
To check the status of a release, use the following command:
helm status [release-name]The output is similar to the output of the helm install command. It provides information on the last deployment time, the release's namespace, its status, the number of revisions, and other applicable details.
If the STATUS section of the report says deployed, the release has been successfully deployed and is ready for use.
Conclusion
The steps in this tutorial showed you how to use the helm install command to deploy an app on your Kubernetes cluster. The article also included many useful options for customizing the helm install command.
To learn more about other Helm commands, refer to our Helm Commands Cheat Sheet.