Squashing commits in Git means combining multiple commits into a single one. Squashing is most often performed when merging two branches, and the purpose is to simplify the Git tree structure and remove redundant commits.
Git squash is useful when you want to combine a series of small commits into a larger, more meaningful commit.
In this tutorial, you will learn how to squash commits in Git in four different ways.
Prerequisites
- Git installed (see how to install Git on Ubuntu, macOS, Windows, CentOS 7, or CentOS 8).
- A Git repository.
What Is Git Squash?
Git squash is a feature that allows developers to simplify the tree structure of a Git repository by merging multiple sequential commits. The process involves choosing a base commit and merging all the changes from the sequential commits into the selected one.
Squashing produces one base commit which contains changes from several selected commits.
Why Squash Commits?
Squashing multiple commits into one simplifies a project's Git tree and a makes long development history more organized.
Other benefits of squashing commits are:
- Easier reviewing. It is much easier to review a smaller number of larger commits during a code review or pull request. Fewer commits make it easier for reviewers to understand the changes that took place.
- Less clutter. Squashing helps reduce clutter in a Git repository. Consolidating multiple commits into one reduces the number of small, insignificant commits.
- Easier to roll back changes. It is usually much easier to revert changes by resetting a single commit than multiple smaller ones. Thus, it facilitates the process of undoing changes in a repository.
- Simplified merging. Squashing commits simplifies the process of merging branches together by reducing the number of possible merge conflicts.
Note: Squashing commits rewrites Git history. Therefore, it is not recommended to squash commits on branches that are shared with other developers, as it can cause confusion.
When to Squash Commits?
Squash commits when your repository has a series of related commits that can be combined into one. Related commits usually address a single issue or feature, and the best practice is to squash them into one before submitting a pull request. Anyone reviewing the code will find it easier to understand the changes and provide feedback.
Some teams have a practice of squashing commits whenever a feature branch needs to be merged into a long-running branch, such as the master or main branch. Merging fewer, larger commits simplifies the merging process and significantly reduces the risk of any potential merge conflicts.
Another great use case for Git squash is when you want to clean up a project history with many small, insignificant commits. Squash the small commits into larger, more meaningful commits, and make the project history easier to track, read, and understand.
How to Squash Commits?
There are several different ways for squashing commits in Git:
- Squashing during
git merge. - Squashing via interactive
git rebase. - Squashing through a pull request.
- Squashing via
git reset.
The sections below explain each method and provide an example to show how they work.
Method 1: Git Merge
The git merge command allows users to incorporate changes from independent development lines and integrate them into a single branch. Squash commits with git merge by specifying the --squash flag to keep the master branch graph clean.
The result of squashing commits with git merge is a working tree and index state as if a real merge had happened. This action does not make the merge commit or move the HEAD. The command only creates a single commit on top of the current branch and the changes remain in the local working copy.
While it is simple to squash commits using git merge, the command gives very little control to the user regarding the squashing process. To squash commits using git merge, follow the steps below:
1. Switch to the branch you want to merge using git switch or git checkout:
For example:
git checkout <branch_name>
2. Run git merge with the --squash flag and specify the branch containing the commits you want to squash:
For example:
git merge --squash <branch_name>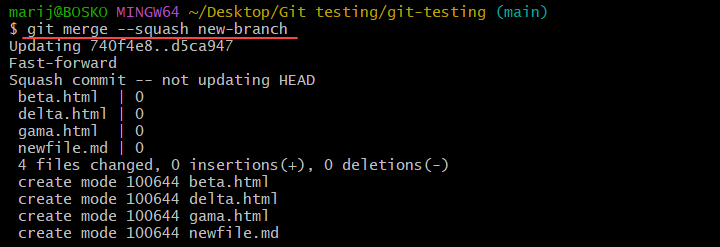
Resolve any merge conflicts that may arise.
3. Commit the changes to complete the merge and add a commit message. The syntax is:
git commit -m "<your_commit_message>"4. Push the changes to the remote repository:
git push --force-with-leaseThe --force-with-lease flag makes Git check whether the remote version of the branch is the same as the one you are merging. This flag verifies if someone pushed new commits in the meantime and rejects the push if the remote branch has been changed.
Method 2: Interactive Rebase
The interactive rebase feature lets you manually squash your commits, which gives complete control of all the actions, in contrast to git merge. For example, after completing work on a feature branch, you can decide to squash the commits on the branch before merging it into the master branch. Squashing cleans up and combines all commits on the branch into one.
Note: Learn the difference between git rebase and git merge.
Follow the steps below to squash commits using interactive rebase:
1. Switch to the branch containing the commits you want to squash. The syntax is:
git checkout <branch_name>2. Check your Git tree and find the first commit on the branch:
git log --graph --oneline --all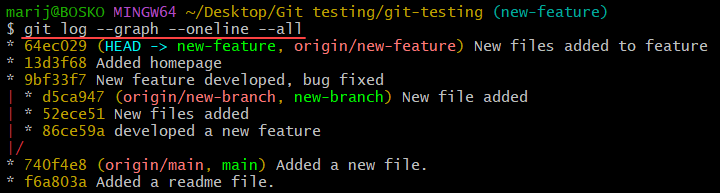
Count the number of commits on the branch you want to squash.
3. Use the following syntax to start the interactive rebase:
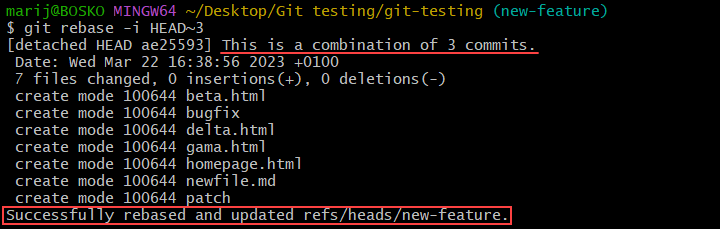
git rebase -i HEAD~<number_of_commits>Replace <number_of_commits> with the number of commits on the branch you want to squash. For example, to squash two commits, run:
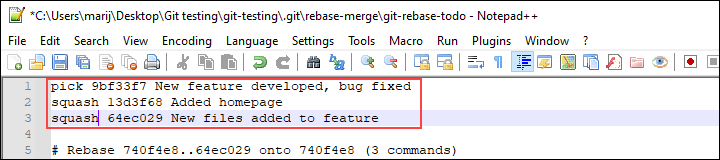
git rebase -i HEAD~24. The default text editor opens and allows you to specify an action to perform on each of the commits on the branch:
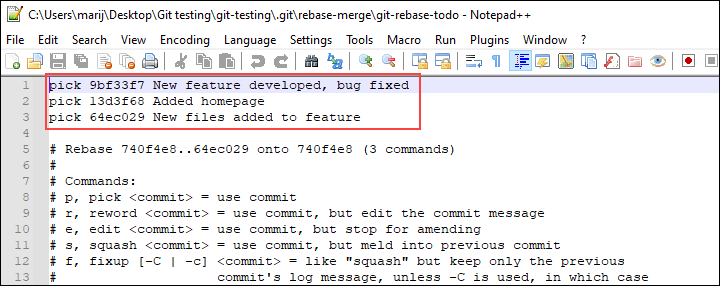
The commits are listed from oldest to newest. Make sure to pick at least one commit before the ones you want to squash. This means that the first commit cannot be squashed, since every commit you squash needs to have one commit before it.
The interactive rebase mode allows users to perform many different actions on the commit history, including squash, edit, drop, etc. Each commit you mark as squash is combined with the one above it.
For example, we will squash the following commits:
5. Save the file and quit the text editor.
6. Enter the message for the new commits in the text editor:
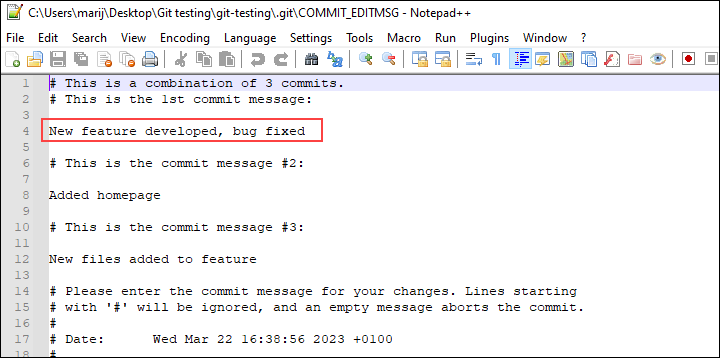
The text editor will appear for each new commit you have created, showing the messages of all the commits you want to squash into one. When you finish writing the commit message, save the file and exit the editor. The default message shows up at the top, so if you are happy with it, just uncomment it and save the file.
After closing the editor, Git completes the rebase process according to the instructions you provided:
7. When the rebase completes, you can push the changes to the remote repository using a force push. However, note that the developers collaborating on the project could have their commits overwritten, so use the option with caution. Publish the changes by running:
git push --force-with-lease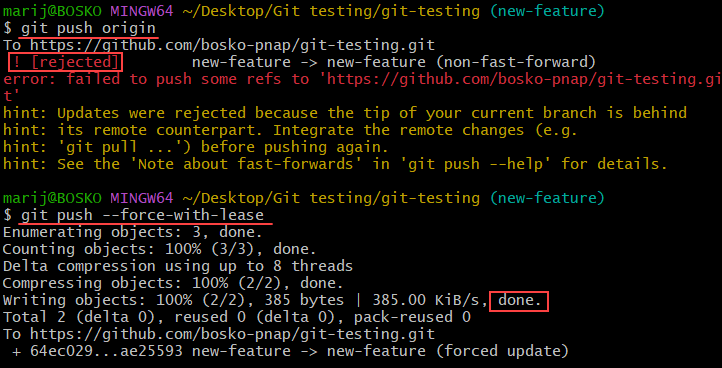
The screenshot above shows the difference between git push and git push --force-with-lease, where the push command fails until the --force-with-lease flag is specified.
Method 3: Pull Request
Some Git repository hosting platforms, such as GitHub and GitLab, provide a built-in option for squashing commits when you want to make a pull request. For example, GitHub allows you to select an option to squash and merge commits when making a pull request.
Follow the steps below:
1. Open a web browser and navigate to https://github.com.
2. Log in and find your repository.
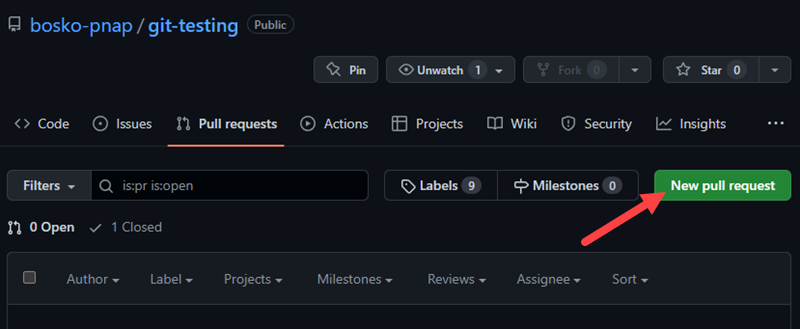
3. Under the Pull requests tab, click the New pull request button.
4. Click Create a merge commit and select the Squash and merge option.
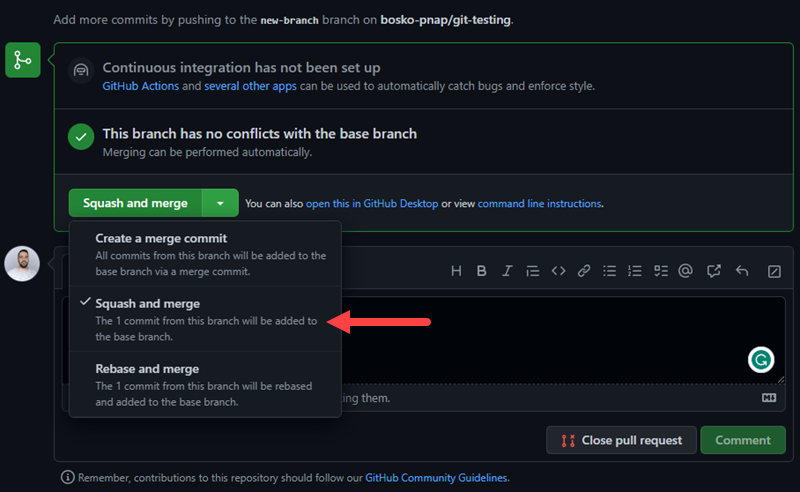
5. Add a comment to complete the merge and squash the commits.
Method 4: Git Reset
Another way to squash commits without using rebase or merge is to use git reset. It is a powerful tool used to reset the current HEAD to the specified state or to undo local changes in a Git repository.
The soft reset works by re-pointing the HEAD to the last commit that you do not want to squash. It doesn't affect the index or the working tree, which means that the index state still contains all the changes from the commits you want to squash.
Follow the steps below:
1. The syntax for squashing commits using git reset is:
git reset --soft HEAD~<number_of_commits> && git commitReplace <number_of_commits> with the number of commits you want to squash.
For example:

2. The command squashes the last three commits into a single new commit. The default text editor opens where you need to specify the new commit message. The messages from previous commits are also listed in the file:
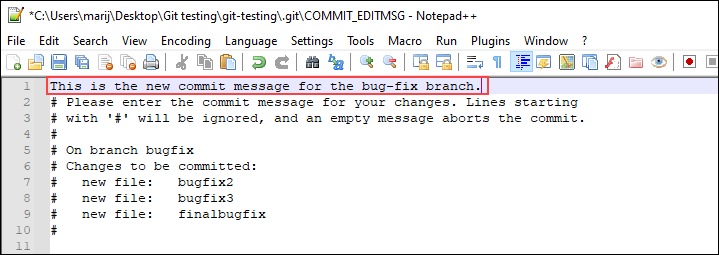
Enter the commit message, save the file, and exit the editor. The command completes the process and squashes the commits.
Conclusion
This tutorial showed how to squash commits in Git using four different methods. Depending on your preference, you can squash commits using git merge, git rebase, git reset, or via a pull request on some of the repository hosting services.
Learn more about Git in our Git beginner's guide, and download a handy Git commands cheat sheet to help you in your Git development.