Testing SSL/TLS connectivity is a common task when diagnosing secure connections, verifying certificates, or debugging handshake issues. One of the most reliable tools for this purpose is OpenSSL s_client.
This tutorial will show you how to install and use OpenSSL s_client through practical, hands-on examples.
Prerequisites
- Access to the terminal.
- OpenSSL installed.
What Is OpenSSL s_client?
OpenSSL s_client is a command-line diagnostic tool that lets users securely connect to a remote server over SSL/TLS and inspect the full handshake process, certificate chain, and protocol details. It is widely used by system administrators, developers, and support engineers.
Unlike higher-level tools such as browsers or curl, s_client exposes low-level details, making it especially useful for troubleshooting.
With OpenSSL s_client, you can:
- Test SSL/TLS connectivity to a server.
- View the full certificate chain.
- Inspect protocol versions and cipher suites.
- Debug handshake failures.
- Verify certificate validity and expiration.
How to Install OpenSSL s_client
Before using s_client, ensure that OpenSSL is installed on your system. Most Unix-like systems include it by default, but you may need to install or update it manually.
The sections below show the installation instructions for different operating systems.
Install on Ubuntu and Debian
Follow the steps below to check whether OpenSSL is installed and install it if necessary.
Step 1: Check if OpenSSL Is Installed
First, verify whether OpenSSL is already available on your system:
openssl version
If OpenSSL is installed, the command returns the OpenSSL version number. If not, it prints a "command not found" error.
Step 2: Update Package Index
If OpenSSL is not installed, update the local package index to ensure you install the latest available version:
sudo apt updateStep 3: Install OpenSSL
Install OpenSSL with:
sudo apt install opensslStep 4: Verify the Installation
Confirm that OpenSSL has been successfully installed:
openssl versionThe command should now return the installed version.
Install on RHEL and CentOS/Rocky Linux
The following steps show how to install OpenSSL on RHEL-based systems:
Step 1: Check if OpenSSL Is Installed
Run the following command:
openssl version
If the command fails, proceed with the installation. If it returns the version number, OpenSSL is already installed on your system.
Step 2: Install OpenSSL
Depending on your system version, use either yum or dnf:
sudo yum install opensslor:
sudo dnf install opensslStep 3: Verify the Installation
Confirm that OpenSSL is installed with:
openssl versionInstall on macOS
macOS includes OpenSSL, but the preinstalled version may be outdated. You can install a newer version using Homebrew. Follow the steps below:
Step 1: Check Existing Version
Run the following command:
openssl version
If the version is outdated or OpenSSL is missing, proceed with the installation.
Step 2: Install OpenSSL Using Homebrew
Make sure that Homebrew is installed on your macOS machine, and then run:
brew install opensslStep 3: Verify Installation
Check the installed version:
openssl versionStep 4: (Optional) Update Your PATH
In some cases, the Homebrew-installed OpenSSL is not used by default. You may need to update your PATH with:
echo 'export PATH="/usr/local/opt/openssl/bin:$PATH"' >> ~/.zshrc
source ~/.zshrc
Adjust the path if you are using a different shell or installation directory.
openssl s_client Command Syntax
The openssl s_client command follows a simple structure. At a minimum, you must specify the target server and port. The general syntax is:
openssl s_client -connect [host]:[port]Replace [host] with the domain name or IP address of the server you want to test, and [port] with the port number the service is running on (for example, 443 for HTTPS). The command initiates an SSL/TLS connection to the specified endpoint and prints diagnostic output.
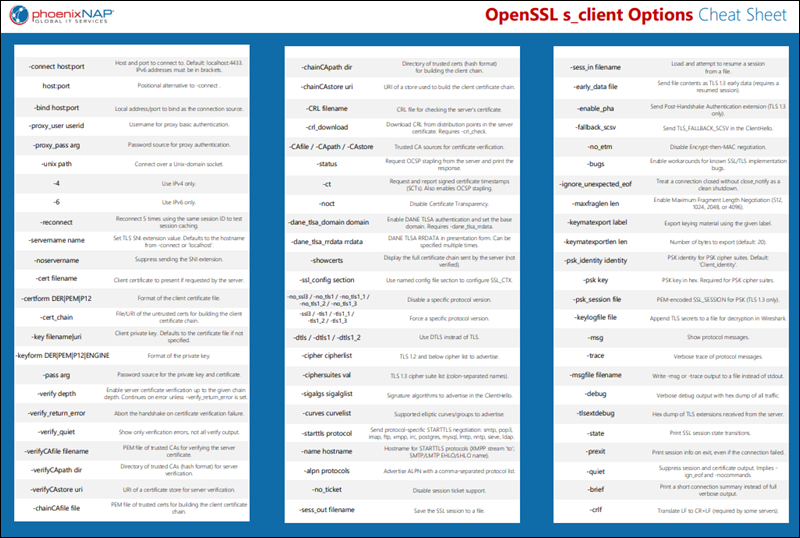
openssl s_client Command Options
The s_client command supports a range of options that control how the connection is established and how results are displayed.
The following table lists the most commonly used options:
| Option | Description |
|---|---|
-connect host:port | Specifies the target server and port. |
-servername hostname | Enables Server Name Indication (SNI) to request the correct certificate for virtual hosts. |
-showcerts | Displays the full certificate chain returned by the server. |
-verify depth | Sets the maximum depth for certificate chain verification. |
-CAfile file | Uses a custom certificate authority (CA) file for validation. |
-tls1_2, -tls1_3 | Forces the use of a specific TLS version. Availability depends on the installed OpenSSL version. |
-cipher cipherlist | Specifies which cipher suites to use during the connection. |
-starttls protocol | Initiates a plain-text connection and upgrades it to TLS (for example, smtp, imap, ftp). |
For a full list of options, download our PDF cheat sheet:
openssl s_client Command Output Explained
When you run openssl s_client, it returns detailed information about the SSL/TLS connection. The output can be verbose, and its exact format may vary slightly depending on the OpenSSL version.
The following table breaks down the most important parts of the output:
| Output Section | Description |
|---|---|
CONNECTED | Confirms that the TCP connection to the server was successfully established. |
depth= | Indicates the certificate chain depth during verification. Lower values represent certificates closer to the server. |
verify error | Displays issues encountered during certificate validation, such as missing or untrusted certificate authorities. |
Certificate chain | Lists all certificates presented by the server, including intermediate certificates. |
Server certificate | Displays details such as subject, issuer, and validity period. |
SSL handshake | Shows the negotiated protocol version and cipher suite. |
Verify return code | Indicates whether certificate validation succeeded. A value of 0 means validation succeeded using the available CA certificates. |
OpenSSL s_client Usage and Examples
The following examples demonstrate common ways to use OpenSSL s_client to test SSL/TLS connectivity and inspect certificates.
For each example, run the command directly in your terminal. Replace example.com with the actual domain you want to test.
Test Basic SSL Connectivity
This command verifies that a server accepts SSL/TLS connections on port 443. Enter the following in your terminal:
openssl s_client -connect example.com:443Replace example.com and 443 with the domain and port you want to test:
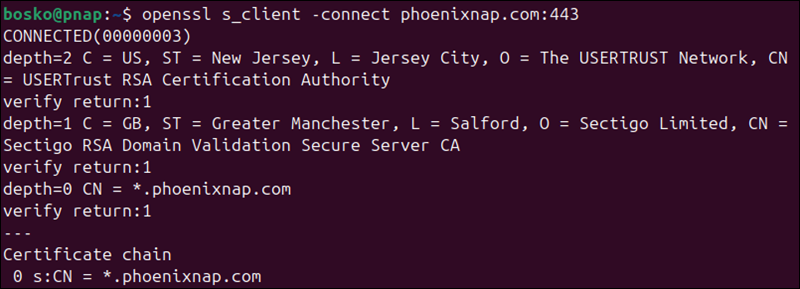
The command initiates a TLS handshake with the target server and:
- Displays
CONNECTEDif the connection succeeds. - Prints the server certificate and certificate chain.
- Prints the negotiated protocol and cipher near the end of the output.
- Returns a
Verify return codeof0if the certificate is valid.
If the connection fails, you may see errors such as "connection refused" or "handshake failure".
Note: After the connection is established, you can interact with the server manually by typing protocol-specific commands. For example, when testing an HTTPS server, you can send a simple HTTP request:
GET / HTTP/1.1
Host: example.com
This allows you to verify how the server responds after the TLS handshake is complete.
Use SNI to Connect to Virtual Hosts
Some servers host multiple domains on the same IP address. In these cases, you must specify the hostname using SNI to receive the correct certificate.
Run the following command:
openssl s_client -connect example.com:443 -servername example.comFor example:

The command ensures the server knows which domain you are trying to access. The command output:
- Returns the correct certificate for the specified domain.
- Includes the
subject=field that matches the hostname.
If you omit -servername, the server may return a default or incorrect certificate.
Display Full Certificate Chain
Displaying the full certificate chain is useful when verifying whether the server provides a complete certificate chain. Use the command below to view all certificates sent by the server, including intermediate certificates:
openssl s_client -connect example.com:443 -showcertsFor example:
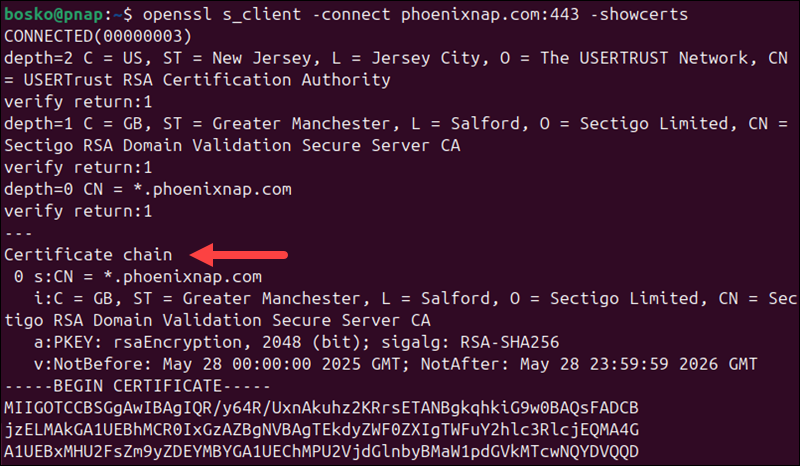
In the output:
- Multiple certificates appear in the output, each enclosed in
-----BEGIN CERTIFICATE-----. - The chain typically includes the server certificate and one or more intermediates.
- Missing intermediate certificates may lead to verification errors.
You can copy and save these certificates if needed for further analysis.
Force a Specific TLS Version
Use this option to test whether a server supports a specific TLS version or to diagnose protocol compatibility issues. The option is useful when troubleshooting failed connections between clients and servers, verifying support for newer protocols such as TLS 1.3, or checking if older, insecure versions (such as TLS 1.0) are disabled.
Run the following command:
openssl s_client -connect example.com:443 -tls1_2This forces the connection to use TLS 1.2.
For example:
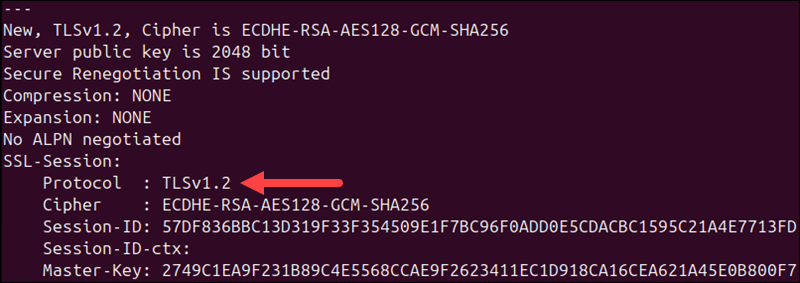
In the output:
- If supported, the connection succeeds and shows Protocol :
TLSv1.2. - If not supported, the handshake fails with a protocol error.
You can repeat the test with other versions (such as -tls1_3) to check compatibility.
Verify Certificate Against CA File
Use this option to validate a server certificate against a specific certificate authority (CA) instead of the system's default trust store. This is useful when testing services that use internal or private CAs, verifying certificates in staging or development environments, or troubleshooting certificate trust issues when the system does not recognize the CA.
Run the following command:
openssl s_client -connect example.com:443 -CAfile ca.pemReplace ca.pem with the path to your CA certificate file.
For example:
openssl s_client -connect phoenixnap.com:443 -CAfile /etc/ssl/certs/ca-certificates.crt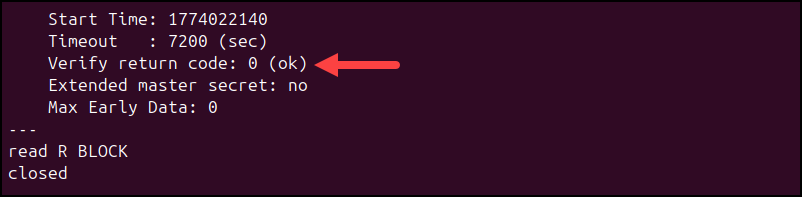
In the output:
- The certificate is validated against the provided CA file.
- A successful validation returns
Verify return code: 0. - If the CA is missing or incorrect, verification errors are displayed.
This is commonly used in private or internal PKI environments.
Test STARTTLS for Email or Other Protocols
Some services (such as SMTP, IMAP, or FTP) begin as unencrypted connections and are later upgraded to TLS using STARTTLS. Use the -starttls option to test these services.
Use the following command:
openssl s_client -connect mail.example.com:587 -starttls smtpReplace mail.example.com with your mail server address and adjust the protocol as needed.
- The connection starts in plain text and upgrades to TLS.
- The handshake proceeds similarly to standard TLS connections.
- Certificate and protocol details are displayed after the upgrade.
Use this method when testing mail servers or other services that do not use TLS immediately on connection.
Troubleshooting SSL Problems with s_client
Use openssl s_client to isolate SSL/TLS issues by analyzing specific parts of the output. Focus on key fields such as Verify return code, subject, issuer, Protocol, and Cipher.
The following table maps common problems to their causes and solutions:
| Problem | What to check | Likely cause | Solution |
|---|---|---|---|
| Certificate verification failed | Verify return code | Missing or untrusted CA. | Provide a valid CA bundle using -CAfile or install system CA certificates. |
| Hostname mismatch | subject= | Certificate does not match the requested domain. | Use -servername to enable SNI or verify the correct hostname. |
| Incomplete certificate chain | Certificate chain | Missing intermediate certificates. | Configure the server to include the full chain. |
| Protocol version not supported | Protocol | Server does not support the requested TLS version. | Retry with a different option, such as -tls1_2 or -tls1_3. |
| Cipher mismatch | Cipher | No shared cipher between client and server. | Specify a compatible cipher using -cipher. |
| Handshake failure | SSL handshake messages | Protocol or configuration mismatch. | Test different TLS versions and ciphers to isolate the issue. |
| Connection refused or timeout | No CONNECTED message | Server unreachable or port closed. | Verify server address, port, and firewall settings. |
If the issue is not immediately clear, enable verbose debugging to inspect the handshake in more detail:
openssl s_client -connect example.com:443 -debug -msgThis command prints low-level handshake messages, which can help identify where the connection fails. In the output, you can expect:
- Detailed SSL/TLS message exchange.
- Insight into handshake steps and failures.
- More verbose output for deeper analysis.
Use this mode when standard output does not provide enough information to diagnose the issue.
Conclusion
This tutorial showed how to use OpenSSL s_client to test SSL/TLS connectivity, inspect certificates, and analyze handshake details. It is a useful tool for diagnosing connection issues, verifying certificate validity, and ensuring secure communication between clients and servers.
Next, learn how to generate a CSR with OpenSSL.