Veeam Cloud Connect allows existing users of Veeam’s backup and replication technology to securely back up and restore your existing VMware or Hyper-V environment to the cloud.
PhoenixNAP recommended Best Practices for Cloud Backup for Veeam:
1. Create a Backup Job and point the storage to a local directory.
2. Create a Backup Copy Job to transfer the backup to the offsite repository.
Any other method can make software features unsupported and may cause server unavailability issues.
Add Service Provider
1. In the bottom left pane of Veeam Backup and Replication, click to select Backup Infrastructure.
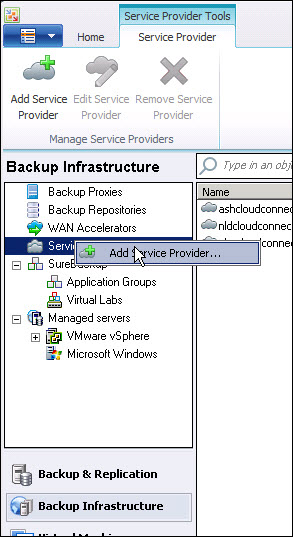
2. In the top left pane, right-click and select Add Service Provider; the New Service Provider wizard opens.
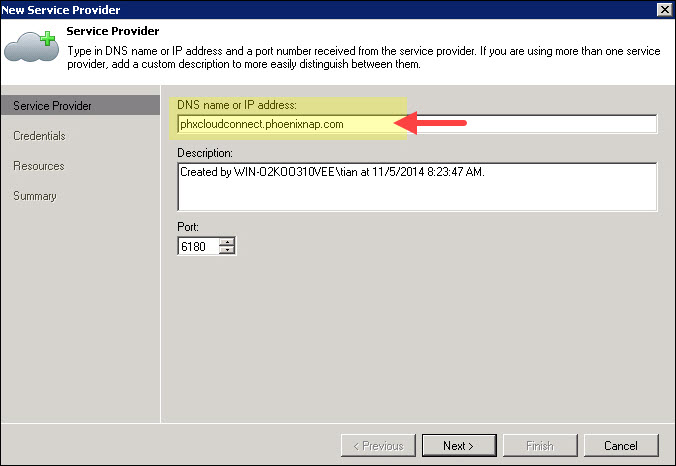
3. In the DNS name or IP address field, enter one of the following, depending on which server you want to use:
| Server Location | Server Address |
|---|---|
| Phoenix | phxcloudconnect2.phoenixnap.com |
| Ashburn | ashcloudconnect.phoenixnap.com |
| Atlanta | atlcloudconnect.phoenixnap.com |
| Netherlands | nldcloudconnect.phoenixnap.com |
| Singapore | sincloudconnect.phoenixnap.com |
Important: All Cloud Backup for Veeam repositories at the Phoenix location established prior to February 20, 2019 had been assigned to the phxcloudconnect.phoenixnap.com server address. If for some reason, you need to reconfigure your setup, please use the above-mentioned server address and NOT phxcloudconnect2.phoenixnap.com.
4. Edit the Description if desired.
5. Ensure the port displays 6180.
6. Click Next.
7. On the next screen, click Add next to the Credentials drop-down.
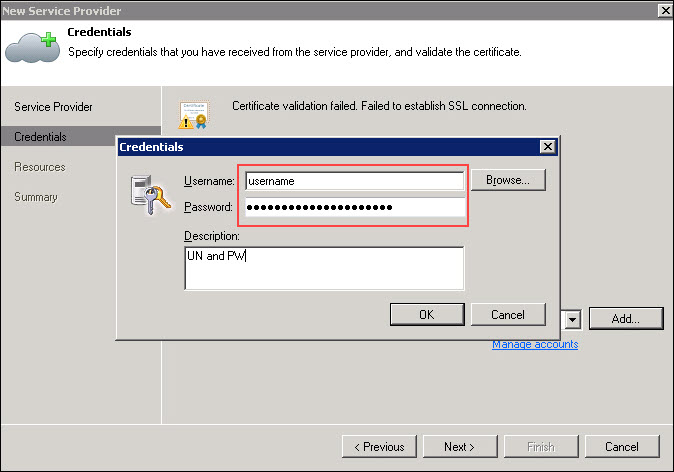
8. Enter the Username and Password information supplied in your welcome email.
9. Click OK.
10. Click Next.
11. Review the Available cloud repositories.
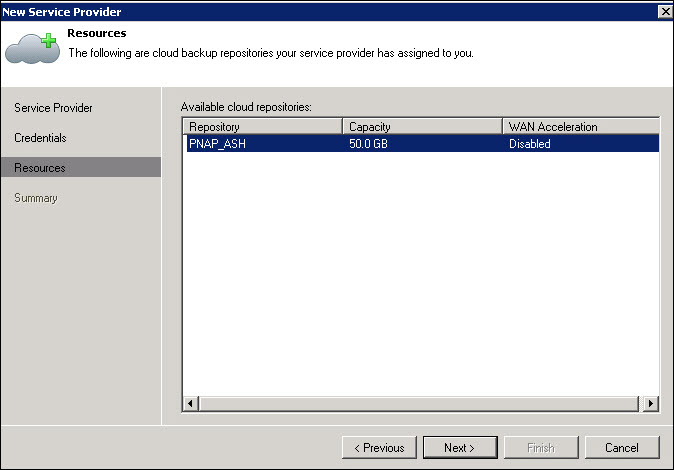
12. Click Next.
13. Review the Summary of the setup options.
14. Click Finish when you are satisfied with the selections or Previous to go back and make edits.
Create Backup Job
Backup must be set up and scheduled. You may set up a backup job that backs up only one or several VMs.
VM Data is copied at the block level. Data is retrieved from the source storage, compressed and deduplicated, and written to the backup repository using the Veeam proprietary format. Backups can be used for many data restore scenarios, including Full VM, VM Guest OS files/folders, and VM Files and Virtual Disks (VMware VMs only).
Phoenix NAP recommended Best Practices for Backup Jobs include pointing the storage to a local directory and then using the Backup Copy Job to transfer the backup to the offsite repository.
Backup jobs can perform both full and incremental backups; a full backup is always created during the first job, and incremental backups are produced for subsequent backups. VIB is used for forward incremental backups, and VRB is used for reversed incremental backups. The retention policy settings determine how many increments are kept on the disk.
To create a backup job:
1. On the Home tab, click Backup Job.
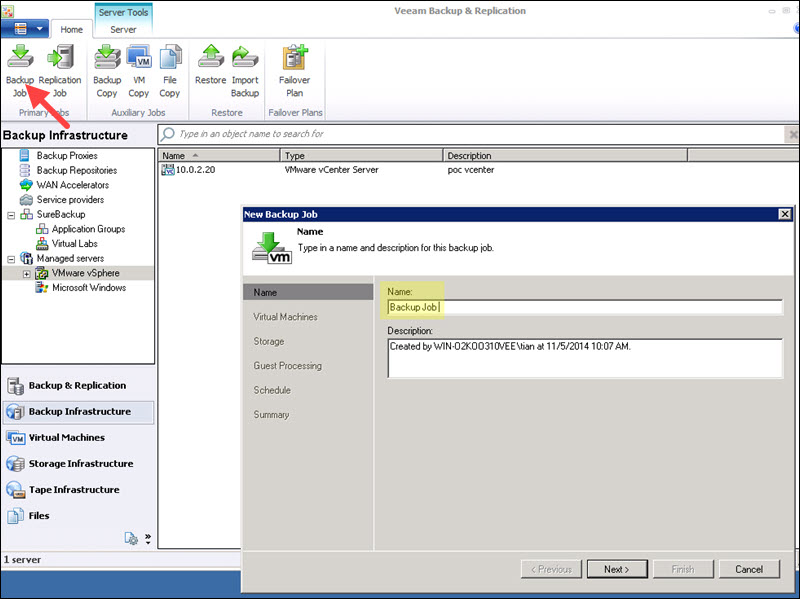
2. Give the job a name in the Name field.
3. Enter a Description, if desired. A default description is entered for you.
4. Click Next.
5. Click Add to locate the VM(s) you want to back up with this job (use the search field if necessary).
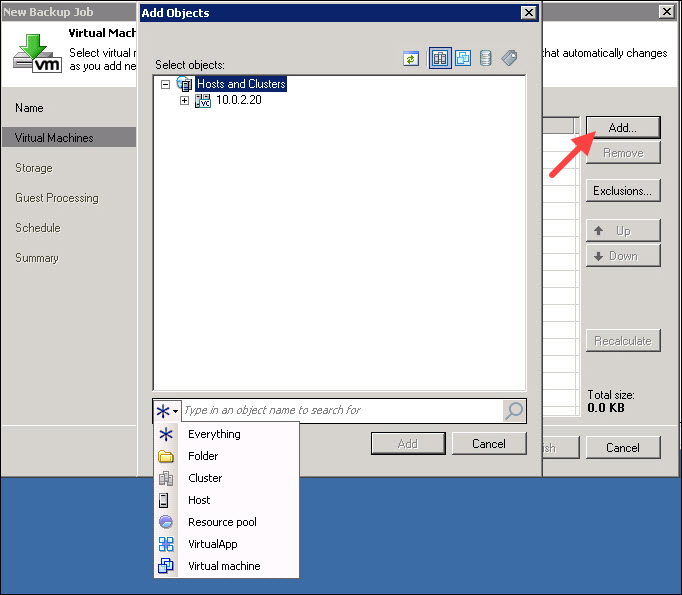
6. Click to select (or CTRL+click to select more than one) the objects to include in the job.
7. Click Add.
8. Make note of the storage space calculated for the job.
9. Move items up or down as necessary. When satisfied, click Next.
10. Select the Backup Repository, making sure it has enough free space to accommodate the job's calculated space requirement.
Note: It is recommended that you use a local storage for your target repository. Failure to do so will result in the loss of the Virtual Lab, SureBackup, and Instant Recovery functions. For more information please see the following articles on Veeam's website:
11. Select how many restore points you want to keep on the disk.
12. Click Advanced.
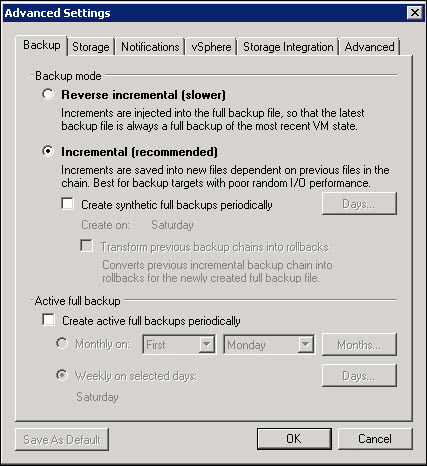
13. Select the backup mode you wish to use and set any options that go with that type (Synthetic or Active full backup intervals can be set here).
14. Click OK.
15. Click the Storage tab.
16. Select any Data Reduction and Compression settings you wish to use.
17. Select the Enable backup file encryption checkbox if desired, then click Add and enter the password to use for the encryption.
18. Click OK.
19. Click Next.
20. Select the Enable appliclation-aware image processing box if you want transactionally consistent backups of VMs.
21. Click Add, then select the account type to use for the VM. The account you provide must be a user account with Local Administrator Privileges on the VM Guest OS. (The same user account should exist on ALL VMS that are part of the backup job, or you must enter separate credentials for each VM. To configure each VM individually, click the Credentials button, then select a VM, then click Set User, then _Add__ and enter the credentials. Repeat for each VM.)
22. Back to the Guest Processing screen, click Next.
23. Set up a schedule to run the job automatically by selecting the check box and entering schedule information.
24. Click Create.
25. Review the details of the job in the summary.
26. To run the job immediately, click the Run the job when I click Finish checkbox.
27. Click Finish.
Create a Backup Copy Job
To follow the 3-2-1 backup best practice, you can configure a backup copy job and target it at the cloud repository. Backup copy jobs allow you to create several instances of the same backup file in different locations, onsite or offsite. For example, you can configure a backup job to create a VM backup on the local backup repository and use the backup copy job to copy the created VM backup from the local backup repository to the cloud repository. Copied backup files have the same format as those created by backup jobs, and you can use any data recovery option for them.
During the backup copying process, Veeam Backup & Replication does not simply copy a backup file from one backup repository to another. Instead, Veeam Backup & Replication retrieves data blocks necessary to create a restore point as of the latest point in time and copies this data to the cloud repository. The backup chain produced on the target backup repository is forever incremental: the first file in the chain is a full backup, while all subsequent restore points are incremental.
The backup copy process is job-driven. When you create a backup copy job, you define what backup file you want to copy, the target repository for storing the copy, the retention policy, and other settings for the copying process. The backup copy job supports the GFS retention scheme, allowing you to design a long-term archiving plan.
The backup copy job runs continuously in cycles. By default, a new backup copy cycle begins every day; however, you can specify any time interval needed. At the beginning of every backup copy interval, Veeam Backup & Replication checks the source backup repository: if a new restore point has been added to the primary backup chain, Veeam Backup & Replication automatically copies it to the target backup repository. After that, the backup copy job is put on hold until a new backup copy interval begins and a new point appears on the source backup repository.
Detailed descriptions of Backup Copy Jobs can be found on the Veeam Backup and Replication documentation page, but a basic backup copy job is described here.
To create a backup copy job:
1. Click Backup Copy at the top of the screen.
2. Select VMware or Hyper-V.
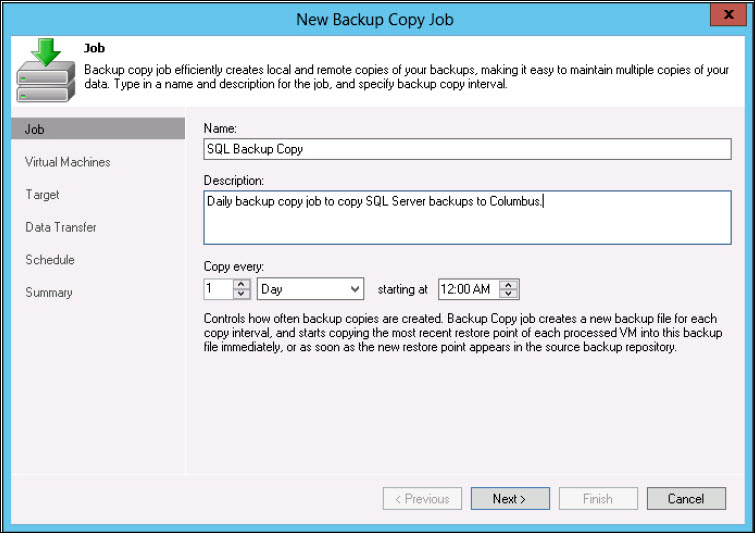
3. On the Name screen, specify a name and description for the backup copy job.
4. Specify a time interval for the synchronization process to start. Veeam Backup & Replication will check if new restore points are available in the source backup repository. If a new restore point is found, it will be copied to the target backup repository at the synchronization interval.
5. Click Next.
6. On the Virtual Machines screen, click Add.
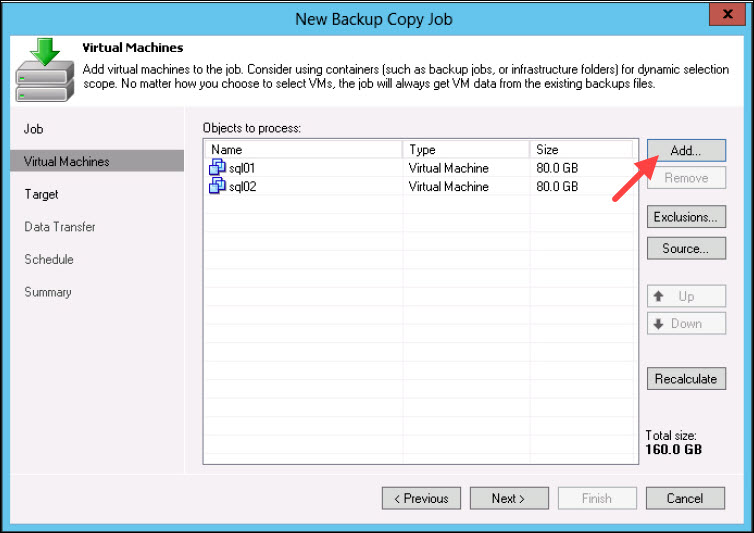
7. Select the VMs whose restore points you want to copy from the local backup repository to the cloud repository.
8. Click Exclusions and specify any objects to exclude, if desired.
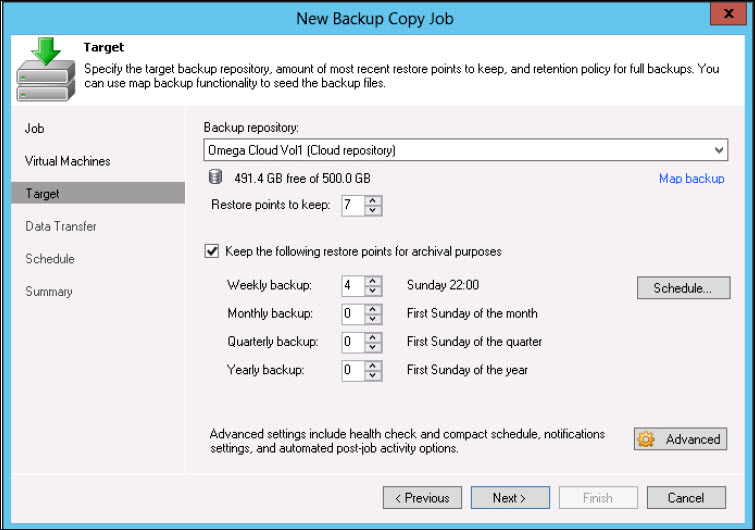
9. On the Target screen, select the cloud repository to copy the VM Backup to from the Backup repository list.
10. To use the GFS (Grandfather-Father-Son) retention scheme (recommended), select the Keep full backups for archival purposes check box.
11. In the fields below, define the number of daily, weekly, monthly, quarterly and yearly full intervals for which backups must be retained.
12. Click Advanced to set up encryption of the copy.
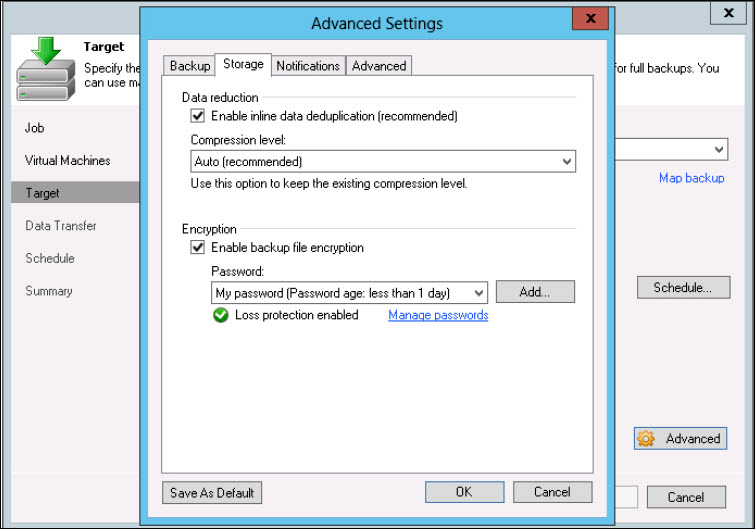
- Select the Storage tab.
- Click to select the Enable backup file encryption check box.
- In the Password field, select a password that you want to use to encrypt the backup file. (If you have not created a password beforehand, click Add or use the Manage passwords link to specify a new password.)
13. On the Data Transfer screen, specify a data transfer path for the backup copy job:
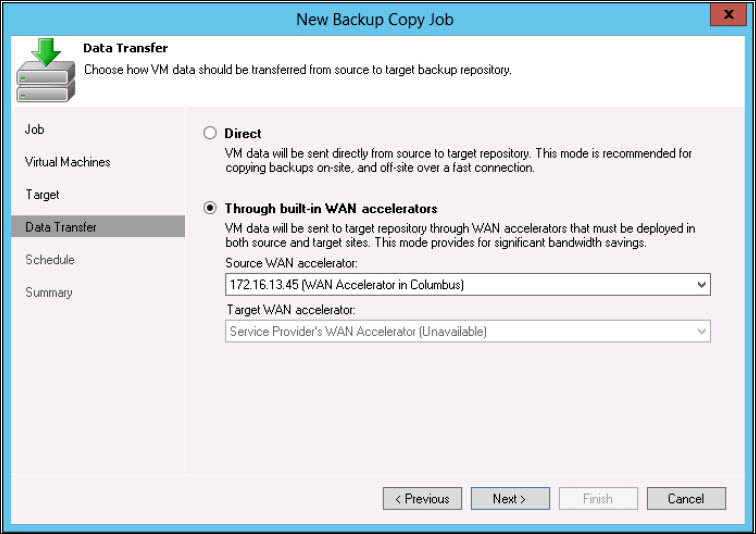
- If the cloud repository does not use WAN accelerators, select Direct.
- If the cloud repository uses WAN accelerators, select Through built-in WAN accelerators. In the Source WAN accelerator field, select the WAN accelerator that you have configured on your side.
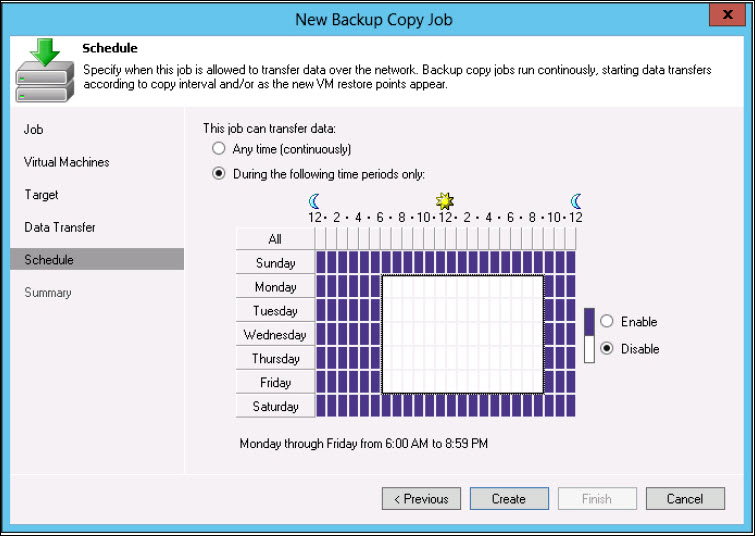
14. On the Schedule screen, define any time span in which the backup copy job must not transport data over the network if desired. This is used to prevent the backup copy job during times when it would be detrimental to valuable resources.
15. On the Summary screen, select the Run the job when I click Finish check box if you want to start the created job immediately.
16. Click Finish.
Replication
Create a New Replication Job
Replication is, essentially, copying a VM from a source (host) to a destination (redundant target host). An exact copy is made of your VM and is registered on the target host, maintained and synced with the original host and maintained in a ready-to-start state. Replication is recommended for your most critical VMs running tier-1 apps and needing the fastest recovery times.
A replication job can contain multiple VMs but processes each VM sequentially within the job. It can be initiated manually or scheduled for automated replications. Replication is similar to a backup job; the first run copies the source VM and creates a full replica on the target host, and subsequent jobs are incremental--updating anything that has changed since the last job. Unlike backups, however, the replica is stored in an uncompressed state in its native format, ready when you need to temporarily or permanently failover for critical service restoration.
Before creating a replication job, existing users will need to go through the Add a New Service Provider wizard. Note that Veeam Cloud Connect Replication is supported in Phoenix, Ashburn, and Atlanta.
Replication documentation can be found in Veeam's knowledge base.
When you reach step 7 in the documentation, select the PNAP-provided host before continuing.
Set Failovers and Access
To set up failovers, refer to the official cloud failover and failback setup documentation.
Site Down, Failover VM Inaccessible
Should something happen to necessitate a failover and your local Veeam server is inaccessible, an existing failover plan can be initiated from the self-service portal:
1. Browse to https://phxvccr.phoenixnap.com.
2. Use your standard Veeam Cloud Connect credentials, and click Login. This gives you access to initiate a failover plan that has already been defined and to view other information regarding your replication job(s) status(es).
If a failover has been initiated and the replicated VMs unexpectedly cannot be accessed:
1. Access https://phxvccrvpn.phoenixnap.com/sslvpn-plus/ using a Chrome or Firefox browser.
2. Enter your User Name and Password, and click Login.
3. In the List column, click Install. VMWare SSL VPN-Plus is installed.
4. After installation, launch the VPN.
5. Enter your User Name and Password in the correct fields and click OK.
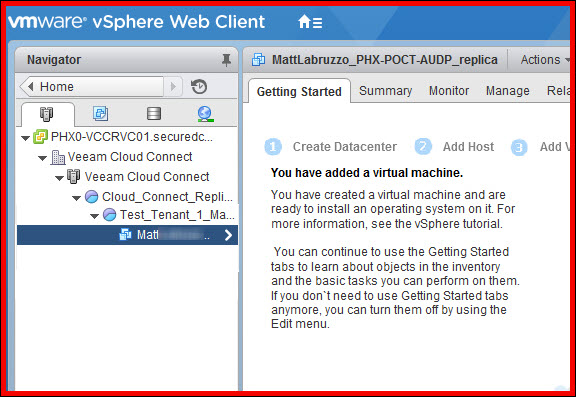
6. Browse to https://phx0-vccr-console.phoenixnap.com. This opens the VSphere client.
7. Enter your User Name and Password and click Login.
8. Expand the collapsed navigator icons until you locate the VM (see image).
9. Right-click the VM and select Open Console.
Existing Jobs
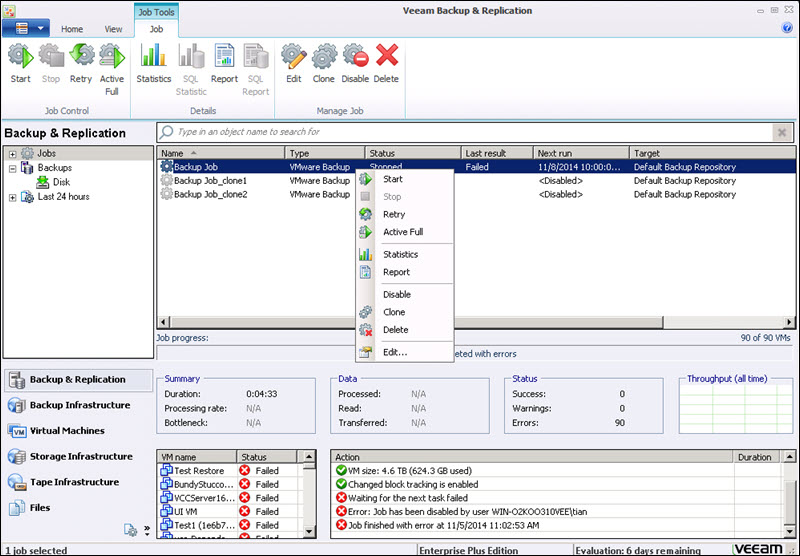
Existing backup jobs will be displayed in the job list at Backup & Replication > Jobs. The following options are accessible by either right-clicking the job in the list and selecting the option or by clicking to highlight the job in the list, and then clicking the option in the top menu:
- Start. Use this to run a job immediately.
- Stop. If the job is currently running, this option will be available. Stopping an in-progress job will result in unusable restore points and is not recommended.
- Retry. Use this if you want to try a failed job again. If a job fails, though, you may want to review the Edit option and make sure that all the settings for the job, including credentials, are correct.
- Active Full. Use this, if available, to create an Active Full restore point.
- Statistics. Used to view the status and information about current jobs.
- Report. Loads an HTML formatted report of the backup job and its status.
- Disable. Disabling a job will prevent it from running in the future. The job will remain in the list but will display as <Disabled> in the Next Run column. Clicking Disable again will enable the job again.
- Clone. Clone makes a copy of the backup job. The clone is given the same name as the original job, but with _clone1 (or 2, 3, etc...) appended on the end of the name.
- Delete. Absolutely and irreversibly deletes the job.
- Edit. Opens the wizard that was used to create the job and allows you to run through again to make changes to the job. See the Create Backup Job section for more information.
Restore Full VM
You may restore one or more VMs from a backup to the original location or a new location. The restoration can be to the latest state or any good known point in time.
Detailed descriptions of restorations can be found on the Veeam Backup and Replication documentation page, but a basic restoration is described here.
1. Click Backup & Replication in the bottom left pane.
2. Expand the Backups node in the top left pane.
3. Right-click the VM backup job you wish to restore from and click Restore entire VM.
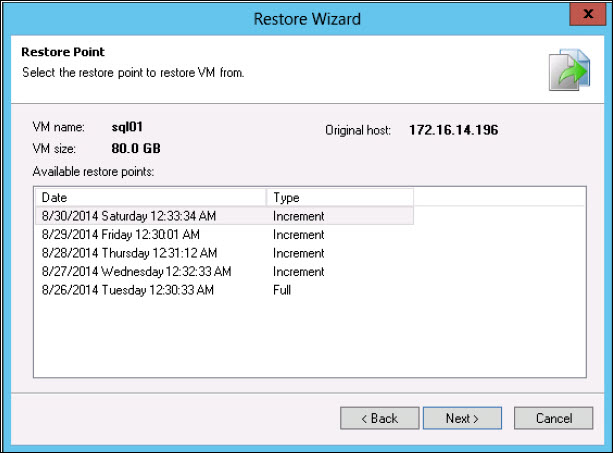
4. In the wizard, click Point and select the restore point to use.
5. Click Next.
6. Choose the location to restore the VM to:
- To Original Location: Select Quick rollback for incremental restores--CBT will be queried to get necessary data blocks and restore only those from the backup. This reduces the restore time and has minimal impact on production environments.
7. Click Next.
8. Define the host, resource pool, datastore, and folder for restoration and specify the network (only if restoring to another location).
9. Click Next.
10. Enter a reason for the restoration and click Next.
11. Click to select Power on VM after restoring.
12. Click Finish.
Restoring VM Files
You can restore specific VM files from the backup: VMDK, VMX, and others (for VMware VMs) and VHD/VHDX, XML, and others for Microsoft Hyper-V VMs. This scenario can be used, for example, if one of your VM files is missing or is corrupted and you need to bring it back.
VM files can be recovered to the latest state or to any good-to-know point in time. You can restore them to the original location or a new location.
This section describes the basic steps for file restoration. More information is available on Veeam's website.
To restore VM files:
1. In the bottom left pane, click Backup & Replication.
2. In the top left pane, click Backups.
3. Right-click the job and click Restore VM Files.
4. When you get to the Restore Point page of the wizard, click to select the desired restore point.
5. On the Restore Destination page of the wizard, select the server for VM file restoration.
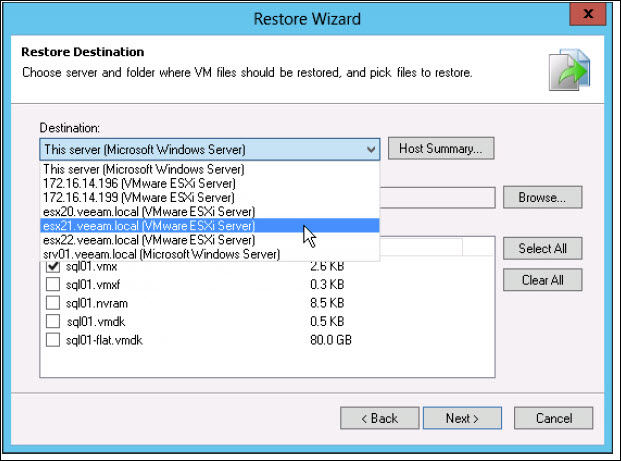
6. Specify the path for the folder on the host where files should be restored. Example: C:\backup\restored.
7. Click the check box next to each file to restore.
8. Enter a reason for the restoration, then click Next.
9. Click Finish.
Restoring VM Disks
You can restore virtual hard disks of VMware VMs from the backup. The restored disks can be attached to the original VM (for example, if you need to replace a corrupted disk) or mapped to any other VM.
This section describes the basic steps for VM Disk restoration. More information is available on Veeam's website.
Restore a VM Virtual HDD:
1. In the bottom left pane, click Backup & Replication.
2. In the top left pane, select Backups.
3. In the work area, right-click the VM that requires restoration and choose Restore VM hard disks.
4. On the Restore Point screen, select the appropriate restore point.
5. Click Next.
6. Click Browse and select the VM the restored virtual hard disk(s) should be attached to.
7. Select the check boxes next to the VHDD you want to restore.
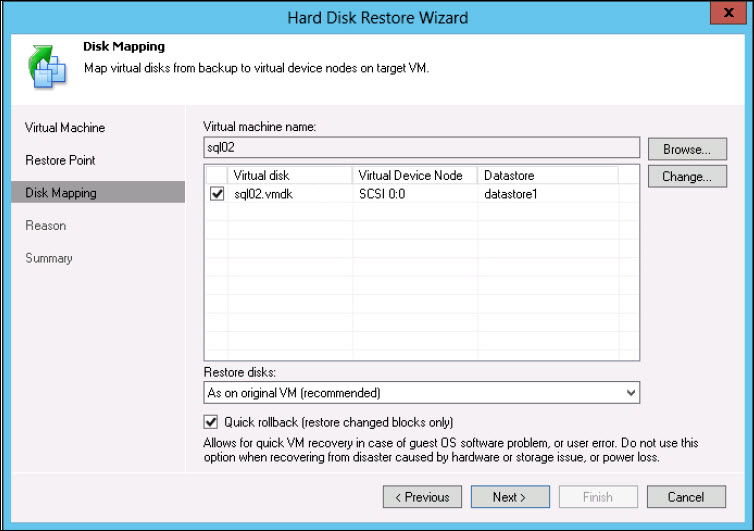
8. Select Change.
9. Select a datastore for the restored VHDD and select a virtual device node:
- To change the disk format, click the drop-down menu under Restore disks: and choose the desired option.
- To attach a restored disk to the VM as a new drive, choose a node that is not yet occupied.
10. Select Quick rollback to use incremental restore for disk restore to the original location and original format.
11. Click Next.
12. Enter a Reason on that wizard screen.
13. Select Power on VM after restoring.
14. Click Finish.
Restoring VM Guest OS Files
You can restore individual Microsoft Windows guest OS files from backups of Microsoft Windows VMs.
During file-level recovery, Veeam Backup & Replication does not extract the VM image from the backup file. Virtual disk files from the backup are published directly into the Veeam backup server file system with the help of Veeam's proprietary driver. After VM disks are mounted, you can use the Veeam Backup Browser or Microsoft Windows Explorer to copy necessary files and folders to the local machine drive, save them in a network shared folder or simply point any applications to restored files and work with them as usual.
This section describes the basic steps for VM Disk restoration. More information is available on Veeam's website.
To restore VM guest OS files of a Microsoft Windows VM from the backup:
1. In the bottom left pane, click Backup & Replication.
2. In the top left pane, click Backups.
3. In the work area, right-click the appropriate VM and select Restore guest files (Windows).
4. On the Restore Point screen, select the appropriate restore point.
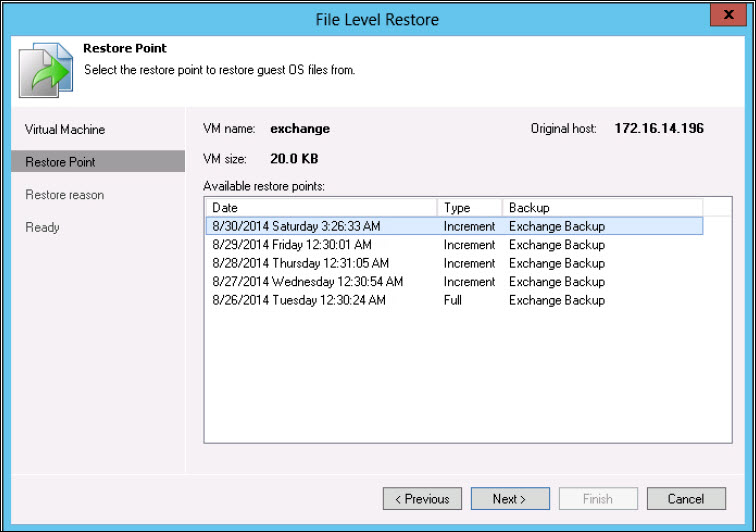
5. Click Next.
6. On the Reason screen, enter appropriate text.
7. Click Next.
8. Click Finish.
9. A Veeam Backup Browser is displayed with a file tree. Right-click the appropriate file or folder and select an option:
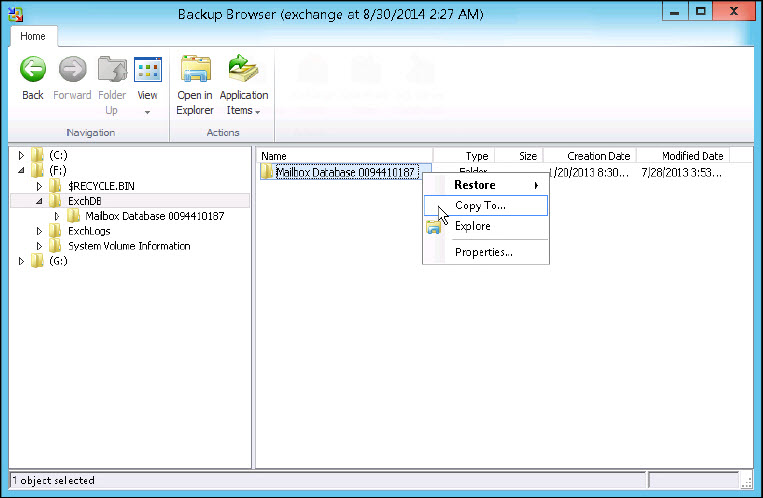
- Restore > Overwrite. Overwrites the original file or folder on the VM guest OS with the backed-up version.
- Restore > Preserve. Saves the file or folder next to the original file or folder with the added prefix RESTORED-.
- Copy To. Allows you to specify a path on the local machine or in a network-shared folder to store a copy in.
10. Click OK.
Copying Backups from Cloud Repositories
You can manually copy backup files from the cloud repository to any host or server in your backup infrastructure.
Before you begin the copying operation, make sure that the target host or server is added to the backup infrastructure.
To copy backup files:
1. Click to open Files.
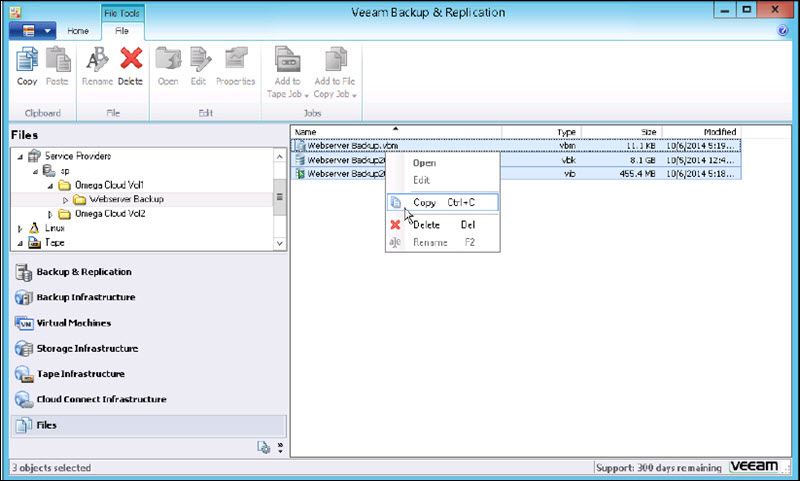
2. In the top left pane, expand the file tree of the cloud repository under the Service Providers node.
3. Right-click the backup files that you want to copy and click Copy.
4. In the top left pane, expand the file tree of the target server or host.
5. Right-click a destination folder and select Paste.
You can also drag and drop to copy backup files from the cloud repository.
Conclusion
After reading this guide, you know how to utilize VCC to securely back up and restore VMware and Hyper-V environments to the cloud through Veeam's Backup & Replication solution.
Next, learn about the key differences between backup and replication.