Terraform is popular because its configurations are easy to read and understand, thanks to the HashiCorp Configuration Language (HCL). The command-line interface follows the same idea. Terraform commands are short and clearly describe what they do.
This guide will cover the most common Terraform commands and include a cheat sheet you can use as a quick reference.
Terraform CLI Basics
The Terraform CLI is included when you install Terraform. In a typical workflow, you open a terminal, move into the project folder that contains your .tf files, and run terraform commands from there.
Note: If your team needs a simpler, more automated approach to Terraform infrastructure deployments, take a look at our Bare Metal Cloud IaC solution.
Get Help
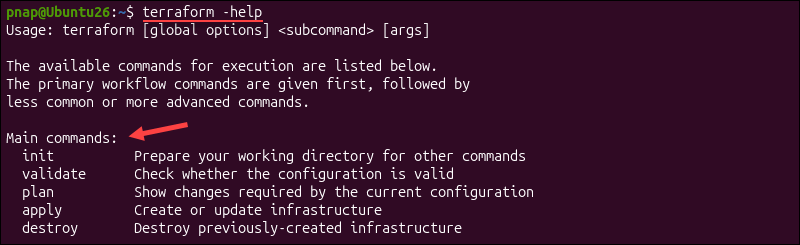
To see the list of available Terraform commands, enter:
terraform -helpThe terminal shows the main Terraform commands and gives a brief description of each.
To get help for a specific command, add -help after the command name:
terraform plan -helpThis displays the available options for the plan command. You can replace plan with another command to get its help options.
Show Terraform Version
Use the following command to check which Terraform version is installed:
terraform version
In this example, the version is v1.15.5, and the platform is running on a linux_amd64 system.
Format Your Code
Before you run terraform plan or terraform apply, you can check if your Terraform configuration files are written correctly.
Format Terraform Code
To make sure your .tf files follow Terraform's standard formatting for indentation and spacing, run:
terraform fmtThis command rewrites .tf files in the current directory to match formatting rules. If Terraform reformats a file, it prints the file name in the output.

In this example, the file name main.tf confirms that the file was successfully reformatted. If there is no output, that means that all files are already correctly formatted.
Use the -recursive option to check files in all subdirectories:
terraform fmt -recursiveThis option is especially helpful for larger projects that contain multiple Terraform modules, since modules are usually defined in nested directories.
Initialize Working Directory
Initializing the Terraform working directory is the first step in setting up your project.
Initialize Directory
To set up the current Terraform working directory, enter the following command:
terraform initTerraform reads the configuration files, connects to the configured backend, and downloads the providers and modules the project needs.
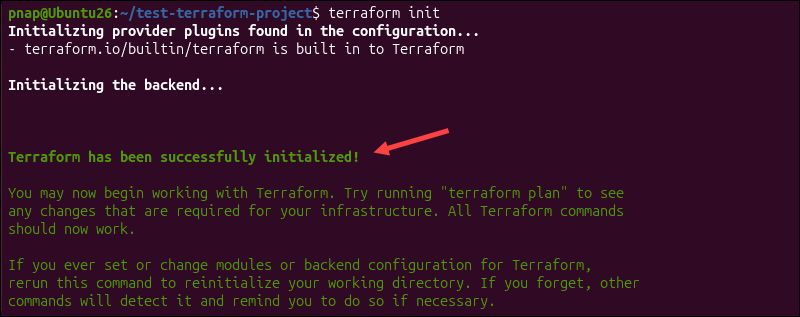
You can run terraform init more than once. In fact, you have to use it whenever you start a new project or update backend settings, providers, or modules.
Download and Install Modules
The terraform init command automatically downloads modules and providers. You can use the -upgrade option to search for newer versions:
terraform init -upgradeThis tells Terraform to update modules and provider plugins to the latest versions that match the settings in your configuration.
Validate Terraform Code
Once you create or edit a Terraform file, you can check if the configuration is valid by running:
terraform validate
Terraform checks the syntax and confirms the configuration is valid and consistent.
Reconfigure Backend
If you modify a backend setting, such as switching to remote storage, you need to reinitialize the working directory. The -reconfigure option tells Terraform to use the new backend configuration, but not to migrate the existing state:
terraform init -reconfigureIf you want Terraform to also move the existing state to the newly configured backend, use:
terraform init -migrate-stateThis option attempts to copy the existing state to the new backend. Keep in mind that Terraform may ask you to confirm manually before moving the existing state.
Disable Interactive Prompts
In automated environments like CI/CD pipelines, you need to prevent Terraform from prompting for interactive input. Otherwise, the workflow will get stuck until someone responds. You can do this using the -input=false option:
terraform init -input=falseIf Terraform does not have all the information it needs, the init command will fail right away instead of waiting for a response.
Plan Infrastructure
Before you apply changes to infrastructure, you can preview what Terraform intends to do without making any permanent changes.
Review Infrastructure Changes
Enter the following command to see which resources Terraform plans to modify based on your configuration:
terraform planTerraform compares the configuration to the existing state file and current infrastructure, then shows which resources it plans to create, update, or remove.
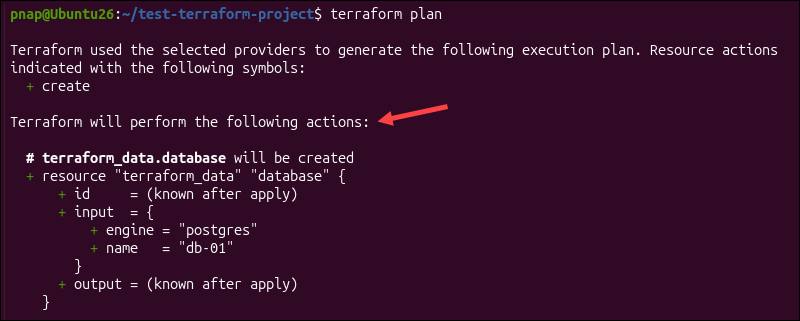
Review the output carefully before you run terraform apply.
Save Plan File
If you want to save the plan to a file, use the -out option:
terraform plan -out=tfplanThis command saves the Terraform plan in the tfplan file.
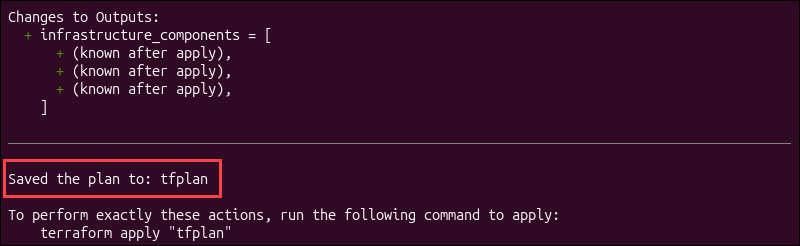
You can now use the file with terraform apply to make sure Terraform follows the outlined plan exactly.
Create a Destroy Plan
Destroying resources without knowing what will be removed puts your infrastructure at risk. You can preview what Terraform would destroy using the following command:
terraform plan -destroy
The command does not delete anything. It only shows what would be removed if you run a destroy operation.
Deploy Infrastructure
The terraform apply command applies the changes described in the Terraform plan. Follow the steps in the sections below.
Apply Proposed Changes
Once you review the plan for your Terraform deployment, you can instruct Terraform to apply the proposed changes:
terraform apply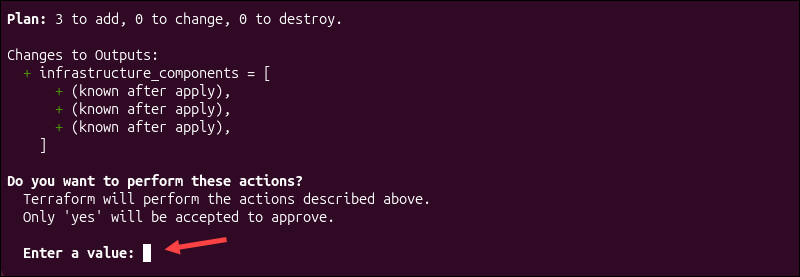
Terraform creates an execution plan, shows you the changes it plans to implement, and asks you to type yes before continuing.
Bypass Interactive Approval
If you are using an automated deployment pipeline or script, you may want to skip the confirmation prompt. You can do this with the following command:
terraform apply -auto-approveKeep in mind that this will apply the changes immediately without asking you again.
Pass Inline Variables
In some cases, you may need to overwrite an input variable for a specific run. Instead of editing your whole configuration, you can use the -var option to pass the variable directly in the command:
terraform apply -var='server_count=3'Use this method for quick tests or simple one-time overrides. If you need to do this often, using a variable file is usually easier.
Reference a Variable File
Instead of passing a variable manually, you can create a file with your variables and use the -var-file option to reference it:
terraform apply -var-file='production.tfvars'The filename, production.tfvars, is only an example. Replace the placeholder with the actual name of your variables file.
Destroy Infrastructure
The terraform destroy command removes all the infrastructure that Terraform manages in your current project and workspace.
Destroy Managed Resources
Use the following command to remove resources in the current Terraform project:
terraform destroyTerraform shows a plan of the resources it will remove and asks you to confirm before destroying them. After you type yes, Terraform lists the resources that were destroyed.
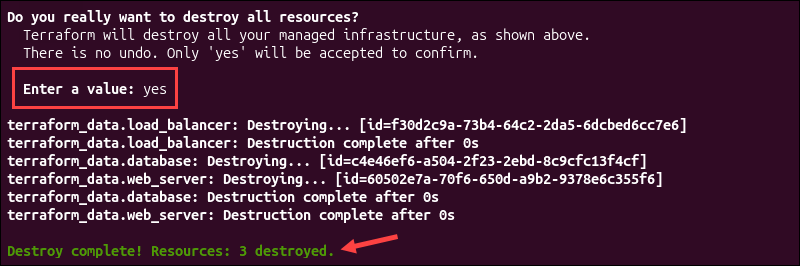
Even with this safeguard in place, be careful when using this command, especially in production.
Target Specific Resources
If you want to delete a specific resource, use the -target option. For example, the following command removes the aws_instance.example resource:
terraform destroy -target=aws_instance.exampleTargeting is useful for one-time tasks, but you should avoid using it often, because it can lead to unexpected results.
Automate Pipeline Teardowns
Because the destroy command asks you to manually confirm, it can slow down automated pipelines. To run it without prompts, use this command:
terraform destroy -auto-approve -input=falseTerraform removes any resource that was approved earlier in the pipeline without asking again. If any required information is missing, the command fails instead of waiting for input.
View and Manipulate State File
The Terraform state file links the resource blocks in your configuration to the actual infrastructure they represent. When you run terraform plan or terraform apply, Terraform compares the state file, your configuration, and infrastructure to decide what it needs to change.
State commands let you view and modify this information to affect what Terraform does before you run plan or apply.
List Resources Within State
Use the following command to list all resources tracked in the state file:
terraform state listTerraform lists state file resources in the terminal.

This command is a quick way to check which resources Terraform is tracking before you start editing the state file.
Show Specific Resource Details
Once you have a name of a specific resource, you can review its details using:
terraform state show terraform_data.web_serverThe command displays the attributes for that specific resource.
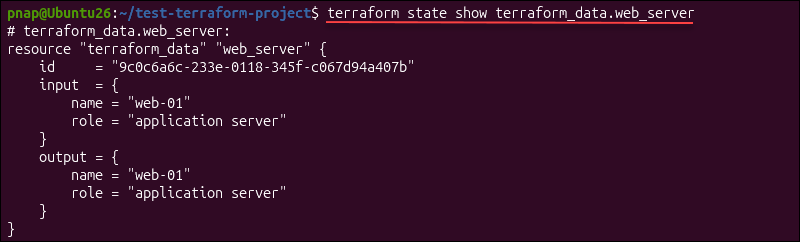
In this example, the resource address is terraform_data.web_server. Replace it with the address of a resource from your configuration.
Note: Learn more about the terraform show command.
Rename an Item in State
On occasion, you might need to rename a resource in your Terraform configuration. If you do so, Terraform treats it as a new resource and tries to recreate it.
To keep tracking the existing infrastructure under the new name, use:
terraform state mv terraform_data.load_balancer terraform_data.public_load_balancer
Terraform moves the existing state entry to the new resource address instead of treating it as a separate resource.
Remove Items From State
To remove a resource from the state file, use the terraform state rm command followed by the resource address. For example:
terraform state rm terraform_data.databaseTerraform confirms it has stopped managing the resource, but it does not delete the actual infrastructure.

If the resource is still in your configuration, Terraform will recreate it the next time you run terraform apply.
Pull State Content Locally
Terraform includes commands that let you download the current state file to your local system. To print the current state in the terminal, enter:
terraform state pull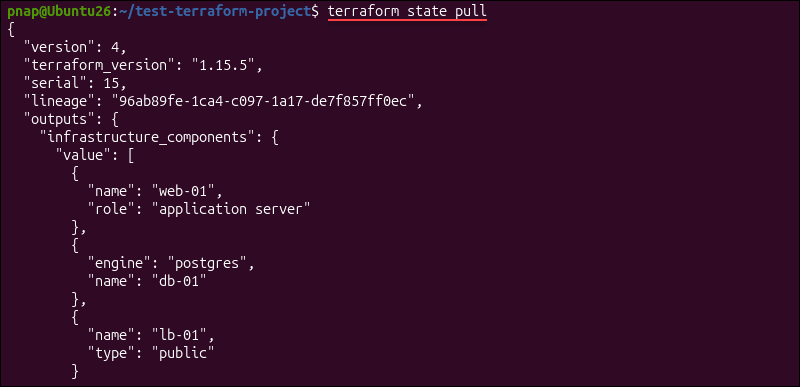
To save the output to a local file, run:
terraform state pull > local-backup.tfstateUse this option when state is stored on a remote backend, and you need to review it locally.
Push Local State Remotely
You can use terraform state push to upload a local state file to the configured backend:
terraform state push local-backup.tfstateThis command attempts to overwrite the destination state. Uploading the wrong state file can cause serious issues, especially if others use the same environment.
Replace a State Provider
If a provider changes its source address and you want Terraform to continue tracking the existing resources under the new provider reference, you need to update it in the state file. Use the terraform state replace-provider command followed by the provider's old address and the new one.
For example:
terraform state replace-provider hashicorp/aws registry.acme.corp/acme/awsThis command updates all resources in the state file that use the old provider address and replaces them with the new one.
Align and Reconcile State
The following commands allow you to import, reconcile, or refresh the state file without using the terraform state command directly.
Import Existing Infrastructure
Use the terraform import command to bring existing resources under Terraform management. For example, if you have a phoenixNAP Bare Metal Cloud server, you can import it with:
terraform import pnap_server.server BMC_SERVER_IDThe first value is the Terraform resource address from your configuration, and the second is the infrastructure ID provided by the provider.
The resource is added to the state, but you still need to describe it in your Terraform configuration.
Refresh the State File
If the infrastructure changed outside Terraform, you can use the -refresh-only option to check how Terraform would update the state file to match:
terraform plan -refresh-only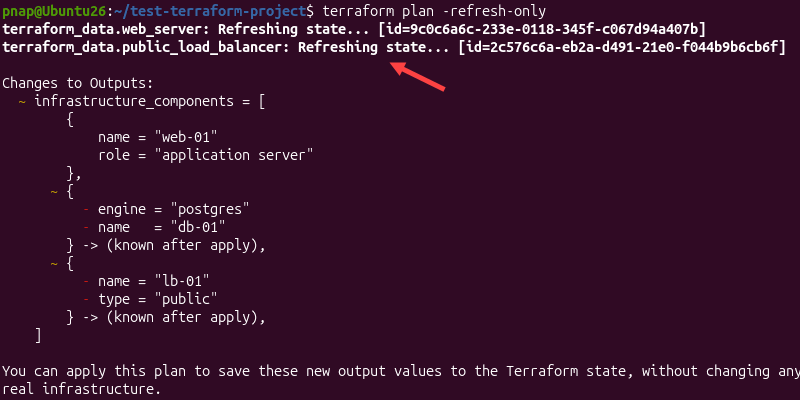
This command does not make any changes. It only shows how Terraform would update the state file. If the proposed changes look correct, you can then apply them.
Execute Refresh Only Plans
To actually update the state file using -refresh-only, enter:
terraform apply -refresh-onlyTerraform checks the current infrastructure and updates the state file to match. It does not create, update, or delete resources.
Manage Multiple Workspaces
A CLI workspace lets you keep separate sets of state data in the same working directory. This way, you can use one configuration to manage different environments, such as development and testing, from the same project directory.
Create a New Workspace
Enter the following command to create a new Terraform workspace in your project directory:
terraform workspace new devThe name dev is only an example. You can replace it with any workspace name you wish.

Terraform creates the workspace and automatically switches to it.
List Available Workspaces
Use the following command to list all workspaces in the current project:
terraform workspace list
Terraform shows all available workspaces. The one you are currently using is marked with an asterisk.
Switch Between Workspaces
If you have more than one workspace, use the following command to switch between them:
terraform workspace select test
After running this command, Terraform starts using the state associated with the selected workspace.
Display the Current Workspace
To show only the active workspace without listing all of them, enter:
terraform workspace show
You can use this command to confirm that you are in the right environment before applying changes.
Delete an Empty Workspace
If you do not need a workspace anymore, you can remove it using the following command:
terraform workspace delete dev
Terraform can only delete workspaces that are not currently selected. If a workspace still has resources, you need to destroy or move them to another workspace before deleting it.
View Outputs and Test Expressions
Output values are defined in output blocks in the root module. They allow you to access values after Terraform has created or updated infrastructure. This includes vital data, such as IP addresses, DNS names, and provider-generated IDs.
View Outputs
Use the following command to display all output values from the state file:
terraform outputIf you specify an output name in the command, Terraform prints only that value.
View Outputs in JSON Format
To see outputs in JSON format, enter:
terraform output -jsonJSON output is best used in scripts and CI/CD pipelines because other tools can parse it much more easily.
Evaluate Expressions Interactively
You can use the Terraform console to test expressions in an interactive environment before adding them to your configuration. Enter the following command to access the console:
terraform consoleIn the console, you can check expressions, variables, functions, and values stored in state. For example:
terraform.workspace
terraform_data.web_server.id
terraform_data.web_serer.output
These expressions show the current workspace name and values Terraform has stored for the web_server resource.
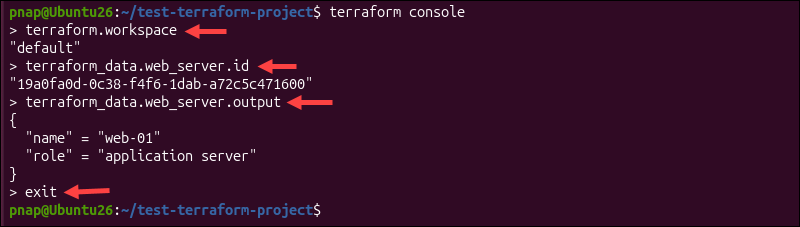
To leave the console, type exit or press Ctrl-C.
View Providers and Graph Dependencies
Terraform can help you see which providers a project uses and how resources relate to one another. This way, you can visually inspect a configuration and better understand its dependencies.
Get Provider Information
Use the following command to show the required providers for the current configuration and state:
terraform providers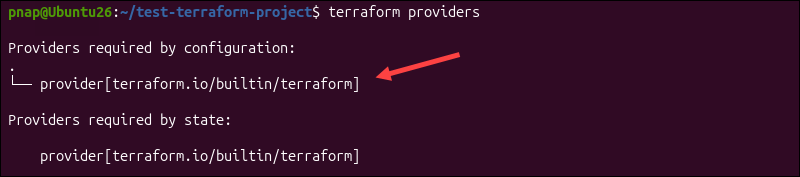
Terraform displays this information in a tree view to show where each provider requirement comes from.
Generate Visual Dependency Graphs
Use the following command to generate a dependency graph:
terraform graphThe command outputs graph data in DOT format.

You can open it in a text editor or use a DOT renderer to create a visual diagram that makes resource dependencies easier to track.
Release Workspace State Lock
If you run more than one Terraform operation at a time, it can cause conflicts or corrupt the state. To avoid this, Terraform locks the state file while it is being updated. While a lock is active, other operations have to wait or fail.
Force Unlock State Migrations
Most of the time, you do not need to lock or unlock the state yourself. Terraform will release locks on its own after a run is done. But sometimes a lock can get stuck if a run crashes, the network fails, or the process stops suddenly.
If this happens, Terraform shows a lock ID in the error message. You can use the ID to unlock the state:
terraform force-unlock LOCK_IDBefore you run terraform force-unlock, check that there are no active Terraform runs. Use this command only to fix a stuck lock. Do not use force-unlock just because another run is slow.
Manage Terraform Cloud Connections
If your CLI needs to access HCP Terraform or Terraform Enterprise, you can authenticate the CLI once and let Terraform store the API token locally for later use.
Authenticate an API Token
To log in from the command line, type:
terraform loginTerraform opens a browser window and asks you to generate or confirm an API token.
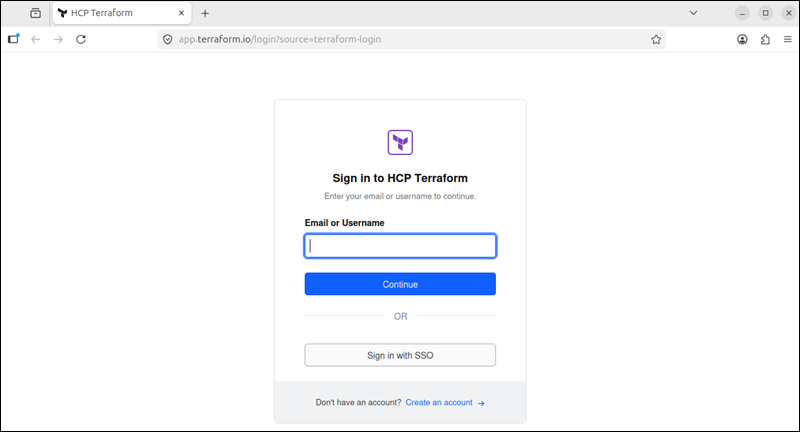
The token is then stored locally so the CLI can authenticate future commands. The command works with HCP Terraform, Terraform Enterprise, and other servers that support Terraform's login protocol.
Remove Local Credentials
To remove locally stored credentials, enter:
terraform logoutThis removes the token you stored with the previous terraform login command.
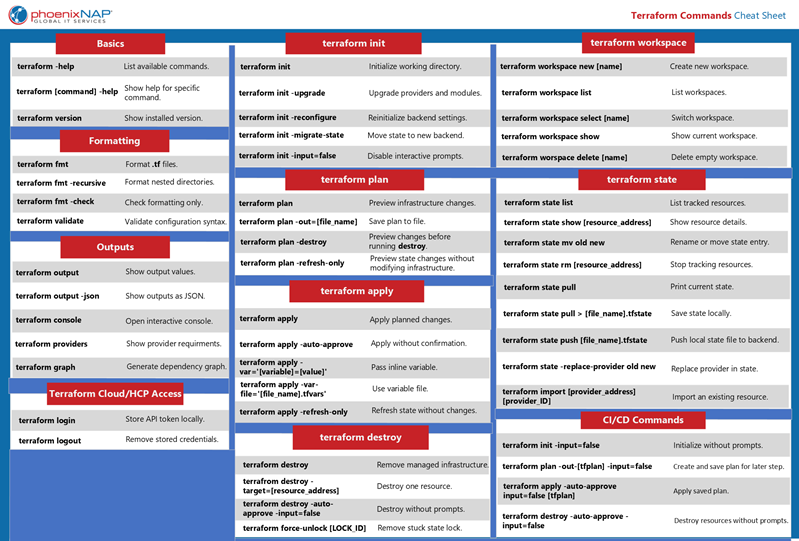
Terraform Commands Cheat Sheet PDF
Download the Terraform Commands Cheat Sheet in PDF format. Use this one-page reference sheet to access essential Terraform commands whenever you need them.
Frequently Asked Questions
This section contains answers to some of the most common questions users have when starting with Terraform.
What Is Terraform CLI?
Terraform CLI is the command-line tool that comes with Terraform. After installation, you use the terraform command in a terminal to work through the Terraform workflow. The commands are run from the project folder where your configuration files are stored.
What Order Do You Run Terraform Commands In?
The exact order can vary, but most Terraform workflows use the following order:
| Command | Description |
|---|---|
1. terraform fmt | Format Terraform files. |
2. terraform init | Initialize the working directory. |
3. terraform validate | Check if the configuration is valid. |
4. terraform plan | Preview infrastructure changes. |
5. terraform apply | Apply the planned changes. |
6. terraform destroy | Remove managed infrastructure if you no longer need it. |
What Is the Difference Between Plan and Apply?
The terraform plan command shows what Terraform will do before it makes any changes. It does not change infrastructure.
The terraform apply command carries out the changes outlined by terraform plan. It uses the Terraform configuration and state file to create, update, or destroy resources so the infrastructure matches what you defined in your configuration.
What Terraform Commands Are Useful in CI/CD?
Common Terraform commands in CI/CD pipelines include:
| Command | Description |
|---|---|
terraform init -input=false | Initializes the working directory and skips manual prompts. |
terraform fmt -check | Checks if Terraform configuration files use the standard format but does not modify them. |
terraform plan -out=tfplan -input=false | Creates an execution plan and saves it to a file called tfplan without asking for input. In pipelines, one step usually creates the plan and another reviews and applies it later. |
terraform apply -auto-approve -input=false tfplan | Applies the saved tfplan file without asking for confirmation or interactive input. If you provide a saved plan, Terraform treats it as approved. |
terraform destroy -auto-approve -input=false | Deletes the infrastructure managed by the current project without asking for confirmation. |
Conclusion
This article covered some of the most useful Terraform commands for managing projects and automating workflows. Keep this cheat sheet close so you can quickly look up commands as you work on your infrastructure.
To put some of these commands into practice, learn how to provision infrastructure with Terraform.