Stateless applications are popular in cloud-native architecture due to their ease of scalability and disposable nature. However, if data-driven, these applications require persistent state and predictable identifiers to function correctly within a Kubernetes cluster.
This article explores the Kubernetes StatefulSet object. It explains the mechanics, use cases, and configuration steps for deploying these specialized controllers.
What Is StatefulSet in Kubernetes?
A StatefulSet is a dedicated workload API object that manages stateful applications. This controller provides guarantees about the ordering and uniqueness of a collection of Kubernetes Pods.
Unlike basic scheduling units, a StatefulSet maintains a sticky identity for each of its Pods. The system builds Pods from identical container specifications, but they remain non-interchangeable throughout their lifecycles. Each Pod associates with a permanent identifier that persists across restarts, rescheduling, and node migrations.
Deployment vs. StatefulSet
Deployments manage stateless workloads in which Pods are interchangeable and lack distinct identities. If a Pod in a Deployment fails, the controller replaces it with a generic successor that does not match prior storage or network configurations.
StatefulSets handle workloads that require unique identities and persistent data storage. The controller assigns a fixed ordinal index (e.g., web-0, web-1) to each Pod. When a Pod restarts or migrates to a different physical node, it retains its specific index, hostname, and storage volumes.
StatefulSet vs. DaemonSet
DaemonSets ensure that all or specific nodes run a single copy of a designated Pod. This controller handles node-level infrastructure applications rather than application state or horizontal scaling.
StatefulSets focus on the network identity and storage persistence of the application layers. They scale independently of the cluster node count based on the replica configuration in the manifest.
While DaemonSets manage logging and monitoring agents across the infrastructure, StatefulSets run databases and distributed systems that require cluster consensus.
StatefulSet vs. ReplicaSet
ReplicaSets maintain a stable set of replica Pods. They identify Pods using broad label selectors rather than individual network or storage identities.
StatefulSets wrap around the core logic of ReplicaSets but enforce strict ordering guarantees. They create, update, and delete Pods sequentially rather than concurrently, reducing split-brain risks and ensuring that distributed systems safely replicate data during scaling operations.
How Do Kubernetes StatefulSets Work?
StatefulSets manage Pods by assigning an ordinal index starting from zero. The controller applies this index to the Pod name, the network hostname, and the attached storage volumes.
StatefulSet has the following scaling strategy:
- When scaling up, the controller creates Pods sequentially, from the lowest to the highest index. The system waits for each Pod to reach a running and ready state before launching the next one.
- Scaling down reverses the operation. It terminates Pods from the highest index to the lowest to preserve data integrity and prevent quorum loss.
The network identity relies on the companion headless service to map traffic directly to the ordinal hostnames. The storage layer uses dedicated templates to mount unique storage drives to the correct matching Pod index, ensuring that pod-0 always reconnects to volume-0.
Core Components of StatefulSets
Every StatefulSet requires a specific set of auxiliary components to function properly within the cluster. These components ensure network reachability and data persistence.
The following diagram illustrates how the auxiliary components work with StatefulSets:
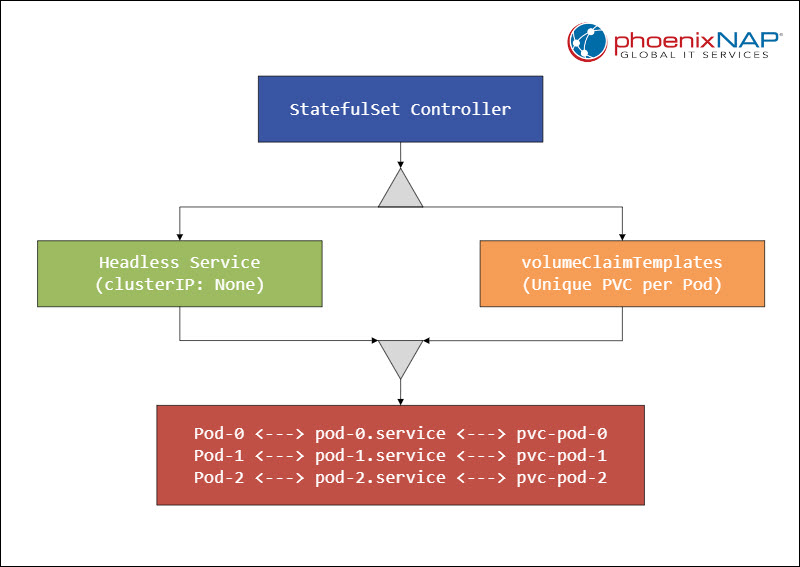
Continue to the sections below for descriptions of each component.
Headless Service
A Headless Service manages the network domain for the StatefulSet Pods. Developers create this service by setting the clusterIP field to None in the service specification. For example:
apiVersion: v1
kind: Service
metadata:
  name: nginx-headless
  namespace: default
  labels:
    app: nginx
spec:
  # This makes the service headless
  clusterIP: None
  selector:
    app: nginx
  ports:
  - name: web
    port: 80
This configuration allows direct DNS resolution to individual Pod IP addresses rather than load-balancing traffic across a generic pool.
The DNS infrastructure generates reliable A records with the following pattern:
$(pod-name).$(service-name).$(namespace).svc.cluster.localvolumeClaimTemplates
The volumeClaimTemplates section provides instructions for dynamic storage provisioning. This template generates a unique PersistentVolumeClaim (PVC) for every Pod inside the StatefulSet.
The storage remains attached to the specific ordinal slot even when the system deletes or moves the Pod to another node. This component eliminates the need to manually provision storage volumes before scaling up the workload.
Pod Selector
The selector matches Pods by labels to maintain the integrity of the stateful controller pool. The configuration must match the labels defined in the Pod template section exactly. Misconfiguration causes the controller to launch duplicate instances or lose track of existing active stateful nodes.
Replicas Field
The replicas field defines the total number of desired stateful Pods in the cluster. Changes to this number trigger the controller's sequential scaling behavior. The controller creates or destroys one identity slot at a time to keep the stateful topology stable.
Update Strategy
The updateStrategy field dictates how the controller handles updates to the container images or configurations. The default configuration uses the RollingUpdate strategy, which rolls out changes in reverse order.
Engineers can also implement a Partition parameter within this field. A partitioned update updates only Pods with an ordinal index greater than or equal to the specified partition value, allowing canary deployments of database updates.
How to Create StatefulSet in Kubernetes
Deploying a StatefulSet includes defining the network and storage layers. Follow the steps in the sections below to configure and launch a stateful workload.
Step 1: Define Headless Service
Create a YAML configuration file service.yaml for the Headless Service to establish the network domain. This resource must match the service name defined in the subsequent StatefulSet manifest to generate correct DNS mappings:
apiVersion: v1
kind: Service
metadata:
  name: mariadb-service
  namespace: database
  labels:
    app: mariadb
spec:
  ports:
  - port: 3306
    name: mysql
  clusterIP: None
  selector:
    app: mariadb
The absence of a ClusterIP ensures that Kubernetes routes traffic directly to the Pod IPs rather than proxying through a single virtual IP.
Step 2: Configure StatefulSet Manifest
Create the primary StatefulSet manifest with the application specifications. Ensure the serviceName field matches the metadata name of the headless service to link the network and workload components.
apiVersion: apps/v1
kind: StatefulSet
metadata:
  name: mariadb-cluster
  namespace: database
spec:
  selector:
    matchLabels:
      app: mariadb
  serviceName: "mariadb-service"
  replicas: 3
  template:
    metadata:
      labels:
        app: mariadb
    spec:
      containers:
      - name: mariadb
        image: mariadb:10.11
        ports:
        - containerPort: 3306
          name: mysql
        volumeMounts:
        - name: data
          mountPath: /var/lib/mysql
  volumeClaimTemplates:
  - metadata:
      name: data
    spec:
      accessModes: [ "ReadWriteOnce" ]
      storageClassName: "premium-rwo"
      resources:
        requests:
          storage: 10Gi
This manifest establishes a three-node cluster layout. The system provisions three distinct ten-gigabyte volumes using the designated storage class name.
Step 3: Apply Manifests to Cluster
Execute the deployment commands using kubectl:
1. Create the database namespace:
kubectl create namespace database2. Create the headless service:
kubectl apply -f service.yaml
3. Create the StatefulSet:
kubectl apply -f statefulset.yaml
Verify the sequential creation of the components by monitoring the cluster resources in a separate terminal session. Track the progress using the tracking command:
kubectl get pods -n database -wThe mariadb-cluster-0 enters the running state completely before mariadb-cluster-1 initiates creation, proving the ordered startup logic.

Step 4: Verify Network Identity Resolution
Launch a temporary container within the same namespace to test DNS discovery. Run a lookup query against the specific hostnames of the stateful instances:
kubectl run dns-test --rm -i --tty --image=busybox -n database -- nslookup mariadb-cluster-0.mariadb-serviceThe output displays the exact internal IP address of the first Pod slot. This lookup confirms that peer nodes can find each other using fixed addresses, even when individual Pod IPs rotate due to node failures.
Step 5: Test Storage Persistence and Rescheduling
Write a test file directly into the mounted storage path of the first replica node. Simulate a hardware or application failure by manually deleting the specific Pod instance.
kubectl exec mariadb-cluster-0 -n database -- touch /var/lib/mysql/persisted_marker.txt
kubectl delete pod mariadb-cluster-0 -n database
Watch the controller recreate the instance. Log back into the newly spawned container to confirm that the file remains intact on the persistent disk volume.
When to Use Kubernetes StatefulSets (Use Cases)
Certain architectures require precise identity and storage constraints for a StatefulSet. Use this controller when the application architecture requires coordination, consensus, or static tracking between nodes.
Distributed Databases
Systems like PostgreSQL, MySQL clusters, and MongoDB require primary-secondary topologies. StatefulSets ensure that specific instances boot first to assume the primary role while secondary instances connect using predictable hostnames to replicate transactions.
Clustered Storage Systems
Distributed storage engines like Ceph, GlusterFS, or MinIO rely on specific disk mappings across hardware zones. StatefulSets maintain the link between designated data drives and specific processing pods across restarts, preventing data corruption.
Message Brokers
Applications like Apache Kafka and RabbitMQ track consumer offsets and cluster state per broker node. Predictable network identifiers allow client applications to maintain persistent connections to specific brokers without resynchronizing the entire partition map.
Distributed Search Engines
Elasticsearch and OpenSearch depend on shard distribution across distinct nodes to achieve high availability. The stable identities provided by StatefulSets prevent expensive shard reallocation when a container completes a restart.
Common Pitfalls with Kubernetes StatefulSets
Misconfiguring stateful workloads can lead to data synchronization errors or scheduling locks. The following operational risks may cause cluster instability and service degradation:
- Storage orphanage. Deleting a StatefulSet does not automatically purge the associated PersistentVolumeClaims from the underlying infrastructure providers.
- Persistent volume deadlocks. If a physical node fails suddenly, the attached volume might remain locked by the cloud provider storage subsystem interface.
- Headless service omission. Omitting the Headless Service or misspelling its name breaks the DNS entry generation for individual stateful instances.
- Non-graceful node termination. Forcing the deletion of a stateful Pod on an unresponsive node can violate the single-writer guarantee of ReadWriteOnce volumes. If two instances of the same ordinal index run simultaneously due to network partitioning, data corruption occurs on the shared storage layer.
Kubernetes StatefulSets: Best Practices
The following sections list architectural choices that safeguard stateful data against node failures and infrastructure upgrades.
Use Dedicated Storage Classes
Configure explicit storage classes with volumeBindingMode: WaitForFirstConsumer enabled. This setting forces the volume provisioning engine to wait until the scheduler selects a node, ensuring that the storage is placed in the exact availability zone where the computing resources reside.
Set Realistic Readiness Probes
Configure accurate readiness and liveness probes to monitor internal application synchronization before scaling operations continue. Safe probes prevent the controller from launching a new instance while the previous instance remains unready, safeguarding the quorum.
Implement Pod Anti-Affinity
Apply strict pod anti-affinity rules within the manifest deployment template. This configuration forces the scheduler to distribute stateful Pods across different physical nodes or availability zones. These rules protect the application tier from single-point hardware failures.
Configure Termination Grace Periods
Set a long terminationGracePeriodSeconds value in the Pod specification to accommodate slow database shutdowns. This buffer allows the database engine to flush transaction logs to disk and cleanly disconnect from peer nodes before the system sends a SIGKILL signal.
For example:
spec:
  terminationGracePeriodSeconds: 120
  containers:
  - name: database
    image: postgres:15
When to Avoid StatefulSets
Not all applications with data requirements belong inside a Kubernetes controller. The following are scenarios where StatefulSets should be avoided:
- Monolithic single-instance applications. Monolithic apps that do not scale horizontally or support distributed networking introduce unnecessary complexity when paired with StatefulSets. Use standard Deployment utilizing a single replica with an attached persistent volume.
- Managed cloud database services. Running complex systems like Oracle or large production MySQL clusters inside Kubernetes increases infrastructure maintenance demands compared to managed cloud alternatives.
- Applications with local state requirements. Applications that use disk storage only for temporary scratch space or local caching do not require a StatefulSet. These workloads should use Deployments combined with emptyDir volumes.
Conclusion
After reading this article, you should be better equipped to start using Kubernetes StatefulSets. The article introduced the core components, described the step-by-step setup, outlined best practices, and highlighted common pitfalls to avoid.
Next, read about other Kubernetes objects in our comprehensive guide.