Disk usage analysis is a common Linux system administration task. Users often need to identify how much disk space files and directories consume to manage storage and locate large files.
The du command, short for disk usage, reports the amount of disk space used by files and directories. It scans a specified path and summarizes the disk space used by directories and their contents.
This guide will explain the du command syntax, common options, practical examples, troubleshooting steps, and alternative tools for analyzing disk usage in Linux.

Prerequisites
- A Linux system.
- Access to the terminal.
- sudo or root permissions (depending on the directory you want to access).
du Command Syntax
The basic du command syntax is:
du [options] [path]The command consists of the following elements:
[options]. Modifies how the command calculates and displays disk usage.[path]. Specifies the file or directory to analyze. If no path is provided,duanalyzes the current directory.
When you run du without options, it lists the disk usage for each directory in the current location. The values represent the space used on the file system instead of the exact file and directory sizes.
du Command Options
The du command provides several options that control how disk usage information is displayed. The table below lists commonly used options.
| Option | Description |
|---|---|
-h | Displays sizes in a human-readable format such as KB, MB, or GB. |
-s | Displays only the specified directory's total size. |
-a | Includes individual files in the output. |
-c | Adds a total line at the end of the output. |
-d N | Limits the directory depth displayed in the results. |
--max-depth=N | Displays disk usage up to the specified directory depth. |
--exclude=PATTERN | Excludes files or directories that match the specified pattern. |
--apparent-size | Shows the apparent file size instead of the allocated disk usage. |
--time | Displays the last modification time for each entry. |
-x | Limits the scan to a single file system. |
Combine different options to control how du reports disk usage and narrow the scope of the analysis.
du Command Examples
The du command analyzes how disk space is distributed across directories and files. It is used to identify large directories, inspect storage usage, and understand how files consume disk space within a file system.
To demonstrate du command usage through practical examples, first create a small directory structure.
Take the following steps:
1. Use mkdir with the -p option to create a parent directory named du-demo along with three subdirectories:
mkdir -p du-demo/{logs,backups,media}The mkdir command creates the directory du-demo and the subdirectories logs, backups, and media inside it. The -p option ensures the parent directory is created automatically if it does not already exist. There is no output.
2. Use fallocate to create files with predefined sizes inside the directories:
fallocate -l 5M du-demo/logs/system.log<br>fallocate -l 20M du-demo/backups/archive.tar<br>fallocate -l 50M du-demo/media/video.mp4<br>fallocate -l 1M du-demo/notes.txtThese commands create four files of specific sizes, with no terminal output. The -l option sets the file length, which ensures the directories contain measurable disk usage.
3. Use cd to move into the example directory:
cd du-demo
Run the examples from inside du-demo to keep the commands shorter and make the output easier to read.
The following sections use this directory structure to demonstrate how different du options affect the output.
Check Disk Usage of the Current Directory
When you run the du command without arguments, the output displays the disk usage of the current directory and all its subdirectories.
Use du to list disk usage:
du
The command scans the current directory and displays the disk usage of each subdirectory. The output includes all nested directories, and each line shows the total space used by that directory, including its files and subdirectories.
By default, the sizes are shown in kilobytes and reflect the actual disk space used, not the exact file sizes.
Check Disk Usage of a Specific Directory
Use du with a path to check the disk usage of a specific directory instead of the current one.
For example:
du logs
The command scans the specified directory and displays the disk usage of its contents. The output includes all nested directories, and each line shows the total space used by that directory, including its files and subdirectories.
In this example, the output shows the total disk space used by the logs directory (5214), including the system.log file it contains.
If the directory contains only files and no subdirectories, du displays a single line with the total size of that directory.
Display Disk Usage in Human-Readable Format
By default, du displays sizes in kilobytes, which is difficult to interpret. Use the -h option to display sizes in a human-readable format, such as MB or GB.
Run:
du -h
The command scans the current directory and prints the disk usage of each subdirectory using readable size units.
In this example, the output shows values such as 51M, 5.1M, and 21M, which correspond to the sizes of the media, logs, and backups directories.
Show Total Size of a Directory
Use the -s option to display only the total directory disk usage instead of listing all subdirectories.
Combine -s with -h to make the output easier to read:
du -sh .
The command summarizes the total disk usage of the current directory and displays the result in a human-readable format.
In this example, the output shows a single value that represents the total size of the du-demo directory (77M), including all files and subdirectories.
List Disk Usage for Files and Directories
By default, du displays only directories. Use the -a option to include individual files in the output.
Run:
du -a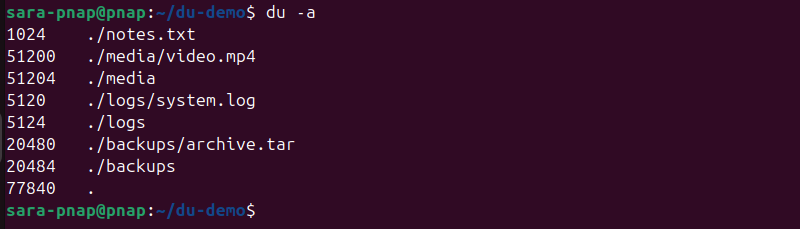
The command scans the current directory and lists disk usage for both files and directories.
In this example, the output shows entries for directories such as media, logs, and backups, along with individual files like video.mp4, system.log, archive.tar, and notes.txt.
Limit Directory Depth
Use the --max-depth option to control how many levels of subdirectories du displays. This helps reduce output and focus on higher-level directories.
Run:
du -h --max-depth=1
The command displays disk usage for the current directory and its immediate subdirectories only.
In this example, the output shows the sizes of media, logs, and backups, along with the total for the current directory, but does not list deeper nested contents.
Exclude Files or Directories
Use the --exclude option to skip files or directories that match a specific pattern. This is useful when you want to ignore logs, backups, or temporary files.
Run the following:
du -h --exclude="*.log"
The command scans the current directory and excludes any files that match the specified pattern.
In this example, the output shows the disk usage of all directories except the system.log file in the logs directory, so the reported size for logs is smaller than before.
Show Apparent File Size
By default, du reports the actual disk space used, which depends on how files are stored on the file system. Use the --apparent-size option to display the logical file size instead.
Use the following command:
du -h --apparent-size
The command calculates sizes based on the file content length rather than allocated disk blocks.
In this example, the output shows the logical sizes of files and directories, which match the sizes specified when creating the files.
Find Largest Directories
Pipe du to sort to identify the largest directories in a given location. This is a common task when you need to troubleshoot disk space issues.
Run the following:
du -h --max-depth=1 | sort -hr
The command lists disk usage for the current directory and its immediate subdirectories, then sorts the results in descending order by size.
In this example, the output shows the media directory at the top as the largest, followed by backups and logs, with the total for the current directory also included.
du Command Troubleshooting
The du command is simple, but its output is sometimes confusing or unexpected. Most issues occur due to file system behavior, permissions, or disk usage calculations.
The following list presents common issues and how to resolve them:
- Permission denied errors. Access to certain directories is restricted. Run the command with elevated privileges using
sudoor as root, or limit the scan to directories you have permission to read. - Unexpectedly large disk usage. The reported size reflects actual disk space used, not the exact file size. Use
--apparent-sizeto display logical file sizes instead. - Output difficult to read. The default output uses kilobytes. Use the
-hoption to display sizes in a human-readable format. - Too much output. The command lists all nested directories by default. Use
-sto show only totals or--max-depthto limit how deep the scan goes. - Different results compared to
df. Theducommand shows disk usage of files and directories, whiledfreports overall file system usage, including reserved and system space. - Inconsistent results on mounted or shared directories. File system type and mount behavior affect how disk usage is reported. Results vary when you scan network mounts or shared folders.
du Command Alternatives
The du command provides detailed disk usage information, but other tools offer different ways to analyze storage. Some focus on overall file system usage, while others provide interactive or visual interfaces.
The following list presents common alternatives to du:
dfcommand. Displays overall disk space usage for mounted file systems. Use it to check available and used space at the file system level rather than per directory.ncduutility. An interactive disk usage analyzer that provides a navigable interface. It allows you to browse directories, identify large files, and delete them directly from the interface.dufutility. A modern alternative todfwith improved readability and formatting. It displays disk usage statistics in a clean, structured layout.- file managers. Graphical file managers such as GNOME Files or KDE Dolphin include built-in disk usage analysis tools. These provide a visual way to inspect directory sizes without using the command line.
Conclusion
This tutorial explained what the du command is, its syntax, and options. It also showed how the command works on several practical examples. The text elaborated on common issues with the command, how to troubleshoot them, and suggested command alternatives.
Next, learn how to list files and directories in Linux with the ls command.