GitHub offers a range of tools for managing and sharing code, but not every situation calls for a full repository. Sometimes, you need a quick way to share a script, save a configuration snippet, or document a solution for later use. That is exactly what GitHub gist is designed for.
This article will explain what GitHub Gists are, how to create and manage them, and best practices for working with them.
Prerequisites
- A GitHub account.
- The curl command installed.
What Is a GitHub Gist?
A GitHub Gist is a lightweight tool for sharing and storing code snippets, notes, configuration files, and other small pieces of text-based content. Each gist is a fully functional Git repository, which means it supports version control, forking, and cloning, but it does not require the setup overhead of a standard GitHub repository.
The Gist interface is available on GitHub's dedicated Gist platform. Like regular repositories, gists support syntax highlighting for a wide range of programming languages and allow others to comment, fork, and embed your content.
Note: If you are looking to take GitHub automation further, phoenixNAP Bare Metal Cloud integrates directly with GitHub Actions, allowing you to automate server creation, deletion, and management as part of your CI/CD workflows. See our guide on Bare Metal Cloud GitHub Actions for a full walkthrough.
Gist vs. Standard GitHub Repo
While gists and standard repositories are both built on Git, they serve different purposes. Gists are optimized for simplicity - they trade collaboration features like branches and pull requests for a fast, minimal interface suited to single files or small collections of content.
The table below summarizes the key differences between the two:
| Feature | GitHub Gist | Standard Repository |
|---|---|---|
| Purpose | Sharing snippets and small files | Managing full projects |
| Directory structure | Not supported | Supported |
| Branches | Not supported | Supported |
| Pull requests | Not supported | Supported |
| Issues | Not supported | Supported |
| Forking | Supported | Supported |
| Version history | Supported | Supported |
| Visibility options | Public or secret | Public or private |
| Native embed snippet | Supported | Not supported |
| Discoverability | Via Discover page (public) | Via GitHub search |
Use a standard repository for projects that require collaboration features such as branches, pull requests, and issue tracking. Use a gist when you need a fast, no-setup way to share or store a focused piece of content.
Gist Use Cases
Gists are versatile enough to support a variety of workflows. Whether it is a persistent home for a reusable script or a quick way to share a config file with someone, gists fit naturally into everyday development tasks.
Common use cases include the following:
- Sharing code snippets. Share a single function, a useful command, or a solution to a common problem without creating a full repository.
- Storing configuration files. Keep shell aliases, dotfiles, or environment configurations in a gist for easy access across machines.
- Writing quick notes or to-do lists. Use Markdown to format notes and reference them via a stable URL.
- Embedding code in documentation or blog posts. Paste a gist's embed code into any HTML page to display a live, syntax-highlighted snippet.
- Documenting bug reports or repro cases. Attach a gist link to an issue or support ticket as a clean, shareable reproduction case.
- Prototyping small scripts. Write and test a quick script without committing it to a project repository.
Types of Gists
GitHub offers two types of gists, distinguished by their visibility:
- Public gists appear in the Discover section of gist.github.com, where anyone can browse newly created gists. They are indexed by search engines and searchable within GitHub. Public gists are a good choice when you want to share content openly with the developer community.
- Secret gists do not appear in Discover and are not searchable unless you are the author and are logged in. However, secret gists are not truly private as they are accessible through the GitHub API and by anyone who has the URL, including people you did not share it with. If your content contains sensitive information, use a private repository instead.
Note: Once you create a public gist, you cannot convert it back to secret. A secret gist can be made public by editing it and updating its visibility, but the reverse is not possible. If you need to hide a public gist later, you must create a new secret gist and delete the original public one.
How to Create a Gist in GitHub
There are two main methods for creating a gist: through the GitHub web interface or using the GitHub CLI.
Both methods let you choose between a public and a secret gist. Refer to one of the methods below that fits your needs.
Method 1: Using GitHub Web Interface
The web interface is the most straightforward way to create a gist. Follow the steps below:
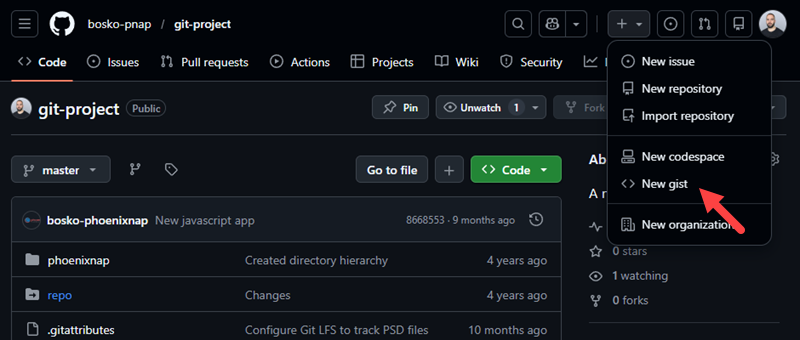
1. Navigate to the Gist homepage.
Go to the Gist homepage while logged into your GitHub account. Alternatively, click the + icon in the top-right corner of any GitHub page and select < > New gist.
2. Enter a description.
In the description field at the top, add an optional but recommended summary of the gist's purpose.
3. Name your file.
Enter a filename including its extension, for example, setup.sh or config.yaml. The extension determines the syntax highlighting language.
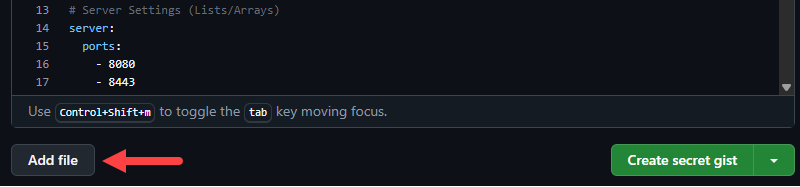
4. Add your content. Paste or type your code, configuration, or text in the editor. To add more files to the same gist, click Add file.
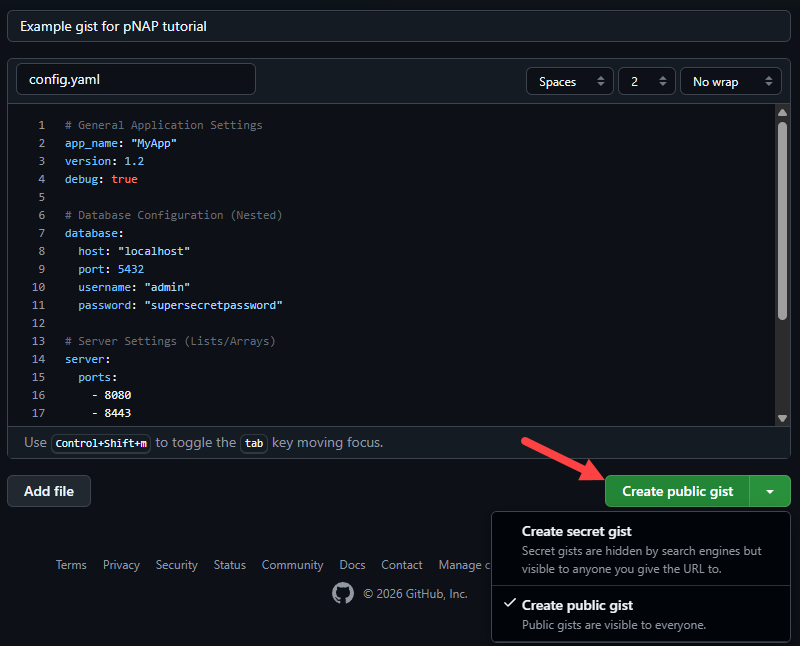
5. Set visibility and create.
Click Create secret gist to keep the gist unlisted, or click the arrow next to the button and select Create public gist to make it publicly discoverable.
Method 2: Using GitHub CLI
The GitHub CLI (gh) allows you to create gists directly from the terminal. This is useful when you want to share a file without leaving your workflow. Follow the steps below:
1. Install the GitHub CLI.
If you have not already installed it, follow the instructions from GitHub's CLI platform for your operating system. For this tutorial, we will use the Windows version, but the commands apply to all OSes.
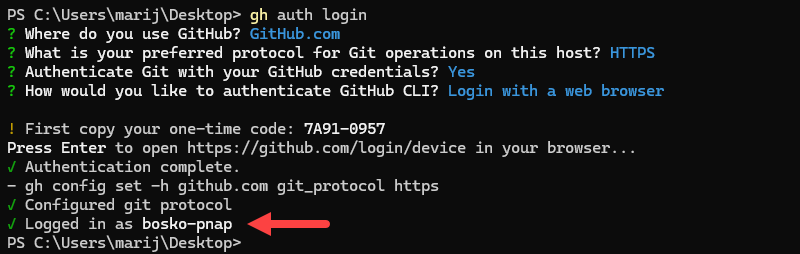
2. Authenticate.
Open the Windows Command Prompt or PowerShell and run the following command:
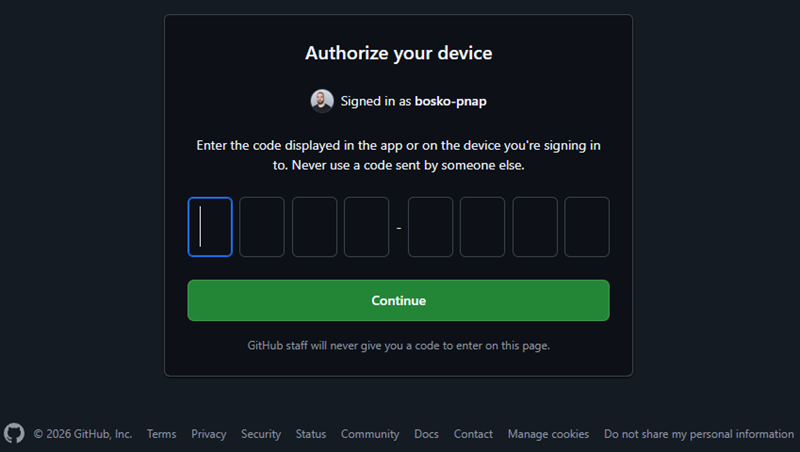
gh auth loginFollow the prompts to log in to your GitHub account. Use the arrow keys to navigate and press Enter to confirm:

After you finish the prompts, copy the one-time code and press Enter to open the device authorization page in your browser. Paste the code from the terminal to authorize your device:
Click the Authorize github button to confirm:

If everything is fine, the terminal displays the following message:
3. Create the gist.
Run the gist create command with the path to your file:
gh gist create [file_path]To create a secret gist, add the --public=false flag. To add a description, use the -d (--desc) flag.
For example:
gh gist create filename.sh -d "My setup script" --public=falseThe CLI outputs the URL of the newly created gist:

You can also create a gist from standard input by piping a command's output in the CLI. For example:
cat script.sh | gh gist create -d "Install script" -Using GitHub Gists
Once you create a gist, a range of operations are available on the gist page or through the GitHub API. The sections below showcase different gist operations through practical examples.
List Existing Gists
To view a list of all your gists, run the following command in the GitHub CLI:
gh gist list
By default, the command returns your 10 most recent gists, displaying the gist ID, description, file count, visibility, and the time of the last update. To return more results, use the --limit flag:
gh gist list --limit 50To filter results by visibility, use the --public or --secret flag. For example:
gh gist list --public
Edit or Delete Gist
You can edit a gist at any time on its GitHub page. Each edit creates a new revision in the gist's history, so earlier versions remain accessible.
To edit a gist, open it on GitHub and click the Edit button in the top-right area. Make your changes, then click Update secret gist or Update public gist to save.

To delete a gist, open it on GitHub and click the Delete button. Confirm the action when prompted. Deletion is permanent and cannot be undone.
To edit a gist in the CLI, use the following:
gh gist edit GIST_IDReplace GIST_ID with the ID of the gist you want to edit. The command opens the gist in the configured editor.
Deploy to Gist
If you have a local copy of a gist (cloned to your machine), you can push changes back to the gist using standard Git commands. After making edits locally, stage your changes with:
git add [file_name]Alternatively, stage all changes with:
git add .To commit your changes, use the syntax below:
git commit -m "Commit message"Lastly, push changes to the remote with:
git pushThis workflow is especially useful when making iterative edits to a script or configuration file that you want to keep synchronized with the hosted version.
Fork a Gist
Forking a gist creates your own copy of someone else's gist under your account. The fork starts with the original content and its history, and any future edits you make do not affect the original.
To fork a gist, open it on GitHub and click the Fork button:
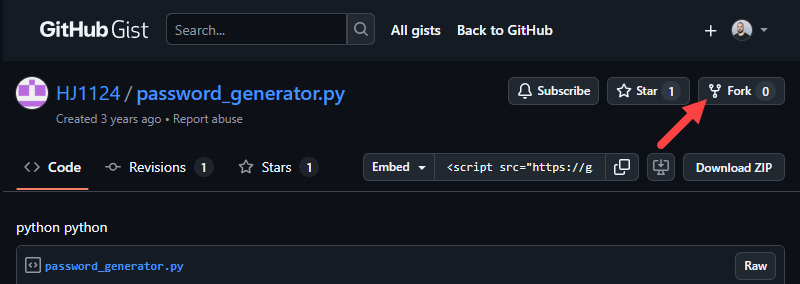
The forked copy appears in your gist list, where you can edit, embed, or share it independently.
How to List Gist Forks
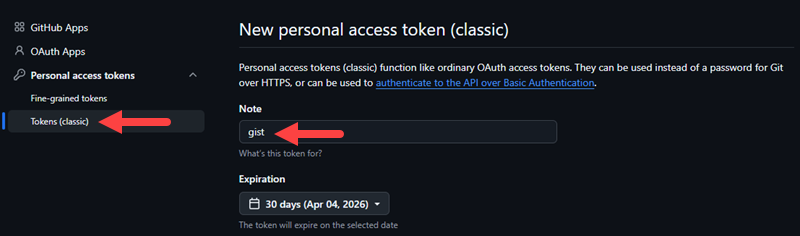
To view a list of forks for a given gist, you can use the GitHub REST API. Send a GET request to the forks endpoint with your personal access token. Follow the steps below to generate a new access token and list gist forks:
1. Go to the GitHub home page and click your profile picture in the top-right corner. Select Settings.
2. Scroll down the left sidebar and click Developer settings.
3. Select Personal access tokens > Tokens (classic), or use Fine-grained tokens if you prefer the newer format.
4. Click Generate new token and give it a name.
5. Under scopes, check the gist box:
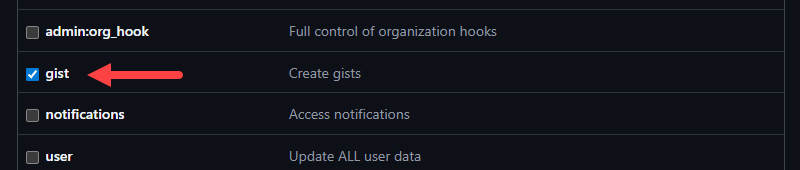
6. Click Generate token and copy it immediately, as GitHub only shows it once.
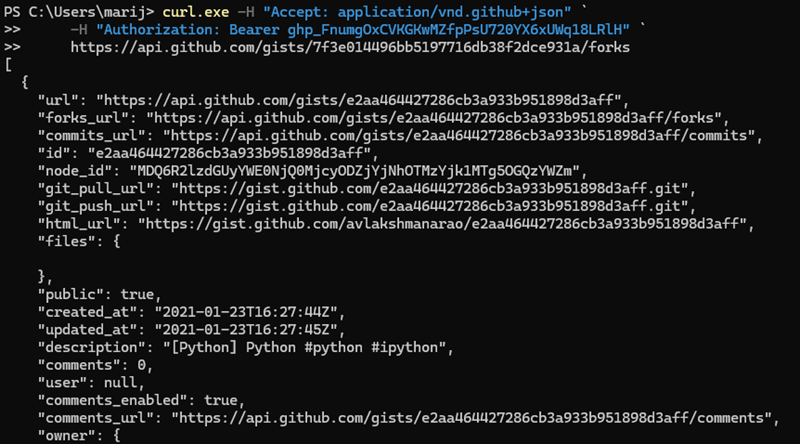
7. Use the token in the following syntax if you are a Windows user:
curl.exe -H "Accept: application/vnd.github+json" `
     -H "Authorization: Bearer YOUR_TOKEN" `
https://api.github.com/gists/GIST_ID/forks
Alternatively, if you are on Linux or macOS:
curl -H "Accept: application/vnd.github+json" \
     -H "Authorization: Bearer YOUR_TOKEN" \
https://api.github.com/gists/GIST_ID/forksNote: The two commands are identical in structure and produce the same result. The only difference is the line continuation character - Linux and macOS use a backslash (\), while Windows PowerShell uses a backtick (`). Use whichever matches your operating system.
Replace GIST_ID with the ID found in the gist's URL. Replace YOUR_TOKEN with the token you obtained in the previous steps. The response returns a list of fork objects, each containing the fork owner's information and timestamps.
For example:
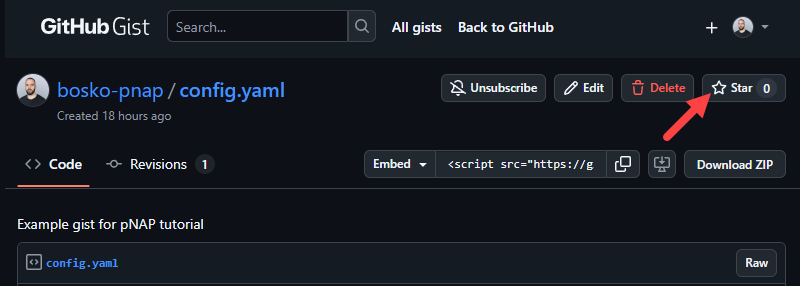
Star/Unstar a Gist
Starring a gist saves it to your starred gists list for easy reference. To star a gist, open it on GitHub and click the Star button. To unstar it, click the button again:
You can also star and unstar gists via the API. To star a gist, use the following syntax:
curl -X PUT -H "Authorization: Bearer YOUR_TOKEN" \
     https://api.github.com/gists/GIST_ID/star
To unstar a gist:
curl -X DELETE -H "Authorization: Bearer YOUR_TOKEN" \
     https://api.github.com/gists/GIST_ID/star
Replace YOUR_TOKEN with your authorization token, and the GIST_ID with the ID found in the gist's URL.
Check Star Status of a Gist
To check whether you have starred a specific gist, send a GET request to the star endpoint. If you are on Linux or macOS, use the following:
curl -H "Authorization: Bearer YOUR_TOKEN" \
     https://api.github.com/gists/GIST_ID/star
For Windows users, the syntax is:
curl.exe -H "Authorization: Bearer YOUR_TOKEN" `
     https://api.github.com/gists/GIST_ID/star
A 204 No Content response indicates that you have starred the gist. A 404 Not Found response indicates that you have not.
For example:

Share Code Snippets
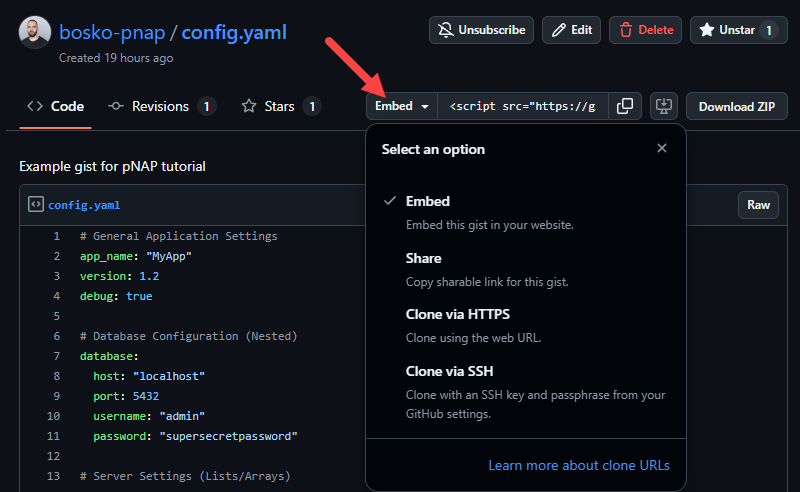
GitHub provides three ways to share a gist with others.
- Link sharing. Copy the gist's URL directly from the browser and send it to anyone. Anyone with the link can view the content, regardless of whether they have a GitHub account.
- Embed. Click the Embed dropdown on the gist page and copy the <script> tag. Paste it into any HTML page to display the gist as an embedded, syntax-highlighted snippet that updates automatically when you edit the gist.
- Clone. Use the HTTPS or SSH URL from the Embed dropdown to clone the gist locally. This lets you work with it as a regular Git repository.
Collaborative Editing and Version Control
Because every gist is a Git repository, it maintains a full revision history. Each save or push creates a new commit that captures what changed and when. To view the full history, click the Revisions tab at the top of any gist page. Each revision shows a diff, making it easy to track changes over time.
Other users can comment on a gist directly on its GitHub page, enabling asynchronous discussion without adding collaborators to a repository. For more structured collaboration, a collaborator can fork the gist, make changes, and share the fork URL for comparison.
Advanced Gist Features
Beyond the basics, gists support several features that make them more powerful in real-world workflows:
- Markdown rendering. If you name a gist file with the .md extension, GitHub renders it as formatted Markdown. This makes gists useful for writing lightweight documentation, checklists, changelogs, or notes that are meant to be read rather than executed.
- Multi-file gists. A single gist can contain multiple files, which is useful for grouping related files. For example, pairing a script with a sample input file or a README. To add files, click Add file when creating or editing the gist.
- Tracking revisions. The Revisions tab on any gist page shows the complete commit history with side-by-side diffs. This allows you to review what changed between any two versions, compare approaches, or revert to an earlier state by copying the content from a previous revision.
- Embedding in web pages. Gists can be embedded in any website by pasting the auto-generated <script> tag from the Embed dropdown. The embedded snippet is live, and it reflects the current state of the gist, including GitHub's syntax highlighting.
- Pinning gists to your profile. You can pin up to six gists to your public GitHub profile. This makes frequently referenced snippets or notable examples visible to anyone who visits your profile page, without requiring them to search through your gist list.
- GitHub REST API access. The GitHub REST API exposes full CRUD operations for gists, including creating, reading, updating, deleting, forking, starring, and listing gists. This allows gists to be integrated into automation scripts, CI pipelines, or developer tools. The base endpoint for all gist operations is https://api.github.com/gists.
Best Practices for Using GitHub Gists
Following a few consistent habits keeps gists useful and easy to manage, especially as their number grows over time.
Some best practices are:
- Use descriptive file names. Include the file extension in the name so GitHub can apply the correct syntax highlighting. A name like deploy-nginx.sh is immediately clear, while untitled is not.
- Write a meaningful description. The description is the primary way to identify a gist in your list and in search results. Keep it concise but specific enough to distinguish similar gists.
- Avoid storing sensitive information. Never include API keys, credentials, tokens, or other secrets in a gist, even if it is a secret one. Secret gists are not access-controlled, and anyone with the URL can view them.
- Use comments in your code. If a gist is intended to be reused or shared, add inline comments to explain non-obvious logic. This benefits both collaborators and your future self.
- Specify dependency versions. If your gist uses external libraries or tools, note the specific versions in a comment or README file. This prevents compatibility issues when the gist is used later.
- Use the Revisions tab before making breaking changes. If others may be relying on your gist, note significant changes in a README or create a new version rather than silently overwriting the existing one.
- Prefer a private repository for sensitive or complex content. If your content is sensitive, use a private repository with proper access controls. If your project grows beyond a few files and needs branches or pull requests, it is time to graduate it to a full repository.
- Organize with consistent naming conventions. With no folders or tags available, naming conventions are the primary organizational tool. Consider prefixing gists by category, such as bash-, python-, or config-, to group related content in your list.
Conclusion
This tutorial explained what a GitHub Gist is and how to use one. Knowing when to use a gist versus a full repository, and following consistent naming and documentation habits, will help you get the most out of this often-overlooked GitHub feature.
Next, check out our comprehensive GitHub tutorial for beginners.