Terraform provisioners execute scripts and commands on a local machine or a remote resource during resource creation or destruction. They help automate post-provisioning tasks that Terraform cannot perform directly, such as installing software, copying files, or running configuration scripts.
However, provisioners are intended for exceptional cases, not routine infrastructure management. Because they run imperative actions outside Terraform's declarative workflow, they sometimes reduce reliability and make deployments more difficult to maintain.
This guide will explain what Terraform provisioners are, how they work, how to configure them, and when they are the right tool for infrastructure automation.
What Are Terraform Provisioners?
Terraform provisioners run scripts and commands on a local machine or a remote resource as part of a resource's lifecycle. They perform post-deployment tasks, such as installing software, copying files, or running initialization scripts.
Provisioners extend Terraform's capabilities beyond resource provisioning. However, because they execute imperative actions outside Terraform's declarative workflow, HashiCorp recommends using them only when other solutions, such as cloud-init or configuration management tools, are not suitable.
The following section compares Terraform providers and provisioners to clarify their different roles in a Terraform deployment.
Terraform Providers vs. Terraform Provisioners
Although names sound similar, providers and provisioners serve different purposes. Providers interact with infrastructure platforms to create and manage resources, while provisioners execute scripts or commands before or after specific lifecycle events.
The table below summarizes the main differences between Terraform providers and provisioners:
| Feature | Terraform Providers | Terraform Provisioners |
|---|---|---|
| Primary purpose | Manage infrastructure resources. | Execute scripts and commands during a resource's lifecycle. |
| How they work | Communicate with infrastructure APIs. | Run locally or connect to remote resources through SSH or WinRM. |
| Execution model | Declarative. | Imperative. |
| Usage | Required for managing infrastructure. | Optional, for post-provisioning or cleanup tasks. |
| State management | Infrastructure changes are tracked in the Terraform state. | Executed actions are not tracked as managed infrastructure. |
How Do Terraform Provisioners Work?
Terraform executes provisioners during specific stages of a resource's lifecycle. A provisioner can run after Terraform creates a resource or before Terraform destroys it. Terraform also controls how provisioner failures affect the operation and resource state.
The following sections explain when provisioners run and how Terraform handles their execution.
Provisioner Lifecycle: Creation-Time vs. Destroy-Time
By default, Terraform runs a provisioner after it creates the associated resource. This allows the provisioner to perform tasks that depend on the already existing resource, such as installing software or copying files.
A provisioner can also run before Terraform destroys a resource by setting the when argument. This is useful for cleanup tasks that must run while the resource is still available.
The following diagram shows when creation-time and destroy-time provisioners execute within the Terraform resource lifecycle.
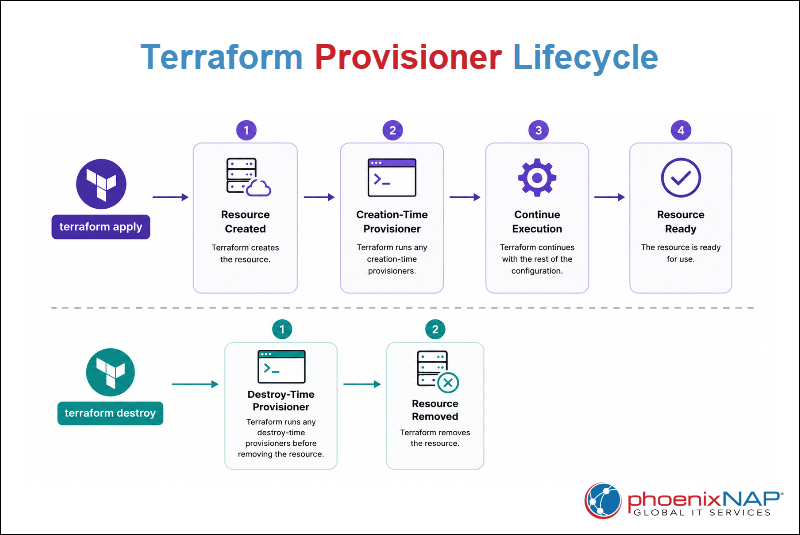
During the basic lifecycle, Terraform does the following:
- Creates the resource.
- Runs any creation-time provisioners.
- Continues with the rest of the configuration.
- Runs destroy-time provisioners before removing the resource during destruction.
Provisioners are executed in the order they appear within a resource block, so multiple provisioners can form a defined sequence of actions.
On-Failure Behaviors (continue vs. fail)
Terraform uses the on_failure argument to determine how to handle a failed provisioner. The default behavior is fail, which causes the Terraform operation to stop in case of a failure. Setting on_failure = continue tells Terraform to ignore the provisioner error and continue the operation.
The two behaviors work as follows:
fail(default). Terraform reports the provisioner error and fails the current operation. If a creation-time provisioner fails, Terraform also marks the resource as tainted because it may be only partially configured.continue.Terraform ignores the provisioner error and continues the operation. Use this only when a failed provisioner does not prevent the resource from being usable.
For most provisioners, fail is the safer choice because it prevents a provisioning error from being treated as a successful deployment.
State Management and Tainted Resources
A failed creation-time provisioner can leave a resource partially configured. Terraform therefore marks the resource as tainted, indicating it may not be fully functional. During the next terraform plan or terraform apply, Terraform plans to destroy and recreate the tainted resource.
Destroy-time provisioners behave differently. Terraform runs them before destroying the resource. If a destroy-time provisioner fails, Terraform reports an error, and the resource remains available so you can try the destroy operation again.
A destroy-time provisioner does not run if its resource is already tainted.
Modern Terraform can automatically detect when a resource is to be replaced, so you do not need to manually run terraform taint. When you need to explicitly replace a resource, use terraform apply -replace instead. The terraform taint command is deprecated.
Terraform Provisioners Syntax and Configuration
Terraform defines provisioners inside resource blocks. A provisioner block specifies the action Terraform should perform, while its arguments provide the information needed to perform that action.
Some provisioners run commands on the same machine where Terraform runs. Others perform actions on a remote machine. Remote provisioners are not a separate provisioner type. They are provisioners, such as file and remote-exec, that connect to another machine to perform their tasks.
Remote provisioners need a connection block that tells Terraform how to access the target machine. For example, an SSH connection can specify the target host, username, and private key.
The following sections explain provisioner block syntax, connection settings, and how provisioners work with null_resource and terraform_data.
Provisioner Block Syntax
A provisioner is defined inside a Terraform resource block. The provisioner block has a label that identifies the provisioner type, such as local-exec, file, or remote-exec.
The basic syntax is:
resource "resource_type" "resource_name" {

  # Resource configuration

  provisioner "provisioner_type" {

    # Provisioner arguments

  }

}
The main parts of this structure are:
resource. Defines the Terraform resource that contains the provisioner.resource_type. Identifies the type of resource.resource_name. Gives the resource a name within the Terraform configuration.Provisioner. Defines the provisioner block.provisioner_type. Identifies the action Terraform should perform.Provisioner arguments. Provide the information needed for that action.
For example, the following configuration uses a local-exec provisioner to run a command after Terraform creates a resource:
resource "some_resource" "example" {

  # Resource configuration

  provisioner "local-exec" {

    command = "echo Resource created"

  }

}
This example contains the following elements:
local-exec.Tells Terraform to run the command on the machine where Terraform is running.command.Specifies the command Terraform should execute.echo Resource created. The echo command that Terraform runs after creating the resource.
The arguments available inside a provisioner depend on its type. For example, file uses source and destination to specify which file to copy and where to place it. remote-exec uses inline to specify commands Terraform should run on a remote machine.
You can define multiple provisioners inside the same resource. Terraform runs them in the order in which they appear in the configuration.
Connection Block (SSH & WinRM Prerequisites)
Remote provisioners need a way to connect to the machine they will manage. Terraform uses a connection block to define this information.
Terraform supports SSH and WinRM connection types for remote provisioners. The connection settings tell Terraform where the remote machine is and how to authenticate.
The following configuration shows a basic SSH connection:
connection {
  type        = "ssh"
  host        = self.public_ip
  user        = "ubuntu"
  private_key = file("~/.ssh/id_ed25519")
}
The main settings in this example are:
type. Specifies the connection method. Here,sshtells Terraform to use SSH.host. Specifies the remote machine's address. In this example,self.public_iprefers to the public IP address of the resource that contains the provisioner.user.Specifies the username Terraform uses to connect to the remote machine.private_key. Specifies the private SSH key Terraform uses for authentication. Thefilefunction reads the key from the specified file.
The remote machine must be accessible and ready to accept the connection before Terraform can run a remote provisioner. The required prerequisites therefore include a reachable network address, valid credentials, and a running SSH or WinRM service.
A connection block can apply to all provisioners in a resource or be defined inside a specific provisioner when different connection settings are required. This allows the same resource to use different connection details for different provisioning tasks.
Additionally, for the file provisioner over SSH, the remote machine must also have scp installed.
Using Provisioners with null_resource and terraform_data
Provisioners are usually placed inside the resource they configure. However, sometimes you need to run a provisioner without attaching it directly to an infrastructure resource. Terraform provides null_resource and terraform_data for these cases.
null_resource is a legacy resource often used to run provisioners independently. It can use triggers to determine when Terraform should replace the resource and rerun its provisioner.
terraform_data is a built-in Terraform resource for workflows that do not need an external infrastructure resource. It can participate in Terraform's dependency graph and can associate provisioners with configuration values or changes.
For new configurations, terraform_data is the preferred choice when a provisioner cannot be attached directly to the resource it affects.
Terraform Provisioners Examples
Understanding provisioners is easier when you can see how they behave in real infrastructure scenarios. Practical examples show where provisioners run, how they interact with resources, and what happens when an action succeeds or fails.
The following examples demonstrate local scripts, file transfers, remote commands, web server configuration, destroy-time actions, and variable-based triggers.
Note: The following examples use Bare Metal Cloud (BMC) to demonstrate common Terraform provisioner behavior. Learn how BMC Infrastructure as Code integration works and explore our automation tools page.
Executing Local Scripts with local-exec
The local-exec provisioner runs a command on the machine where Terraform is running. It does not connect to the resource created by Terraform. This makes it useful when a Terraform operation needs to trigger a local action, such as creating a file or running a script.
For this example, we use terraform_data because the goal is to demonstrate the provisioner without creating additional infrastructure. terraform_data is a built-in Terraform resource that can participate in Terraform's dependency graph without creating infrastructure through a provider.
For instance, take the following steps:
1. Use a text editor, such as Nano, to create a Terraform configuration file named main.tf with the following configuration:
resource "terraform_data" "bmc_provisioner_demo" {
  provisioner "local-exec" {
    command = "echo 'BMC provisioner demo completed' > provisioner-output.txt"
  }
}
The configuration contains the following elements:
terraform_data. Defines a Terraform-managed resource without creating an external infrastructure resource.local-exec. Defines the provisioner that runs a command on the machine running Terraform.command. Specifies the command Terraform should execute.echo. Writes the message to the local provisioner-output.txt file.
When Terraform creates the terraform_data resource, it also runs the local-exec provisioner. The command creates provisioner-output.txt on the same machine where Terraform is running.
2. Create the resource and run the provisioner with:
terraform apply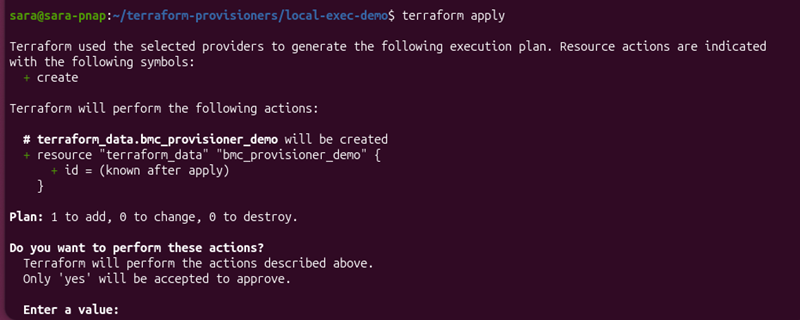
Terraform first displays the execution plan and asks for confirmation. The plan shows Terraform will add one resource, with no changes or destructions. Enter yes to approve the plan.
After confirmation, Terraform creates the resource and runs the local-exec provisioner. The output shows the provisioning step, the executed command, and the successful completion of the resource creation.
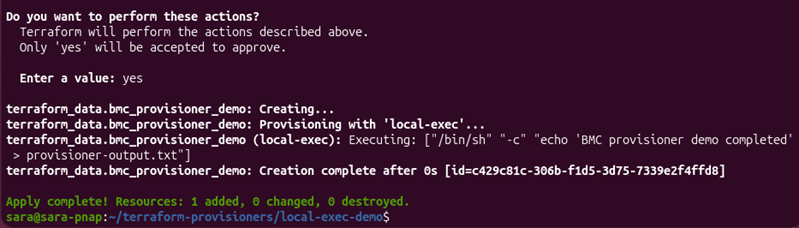
The command also creates provisioner-output.txt in the current working directory.
3. Verify the file and view its contents with the cat command:
cat provisioner-output.txt
The command displays BMC provisioner demo completed, confirming the provisioner created the file on the machine where Terraform is running.
This example demonstrates the main difference between local and remote provisioners. local-exec runs the command locally and does not perform the action on the BMC server. The next examples use remote provisioners to transfer files and execute commands on the remote machine.
Transferring Files to a Remote Machine with file Provisioner
The file provisioner copies files or directories from the machine running Terraform to a remote machine. Unlike local-exec, it does not execute a command.
In this example, we use a local machine running Terraform and a remote BMC environment. Terraform connects to the remote machine over SSH and transfers a local text file.
The example consists of three parts:
- Creating the local file. Creating the file on the local machine that Terraform will transfer.
- Transferring the file. Configuring and running the
fileprovisioner to copy the file to the remote machine. - Verifying the transfer. Connecting to the remote machine and confirming the file arrived.
The following sections explain each part of the process.
Create a Local File
Create a text file on the local machine. This file will be the source for the transfer.
1. Run:
nano message.txt2. Add the following content:
BMC provisioner file transfer test3. Verify the file contains the expected message with:
cat message.txt
The output confirms the source file is ready for the transfer.
Transfer the File
Create a separate Terraform configuration file named file-provisioner.tf. It tells Terraform which file to transfer, where to place it, and how to connect to the remote machine.
1. Add the following text to the file and save and exit:
resource "terraform_data" "bmc_file_demo" {
  provisioner "file" {
    source      = "message.txt"
    destination = "/tmp/message.txt"

    connection {
      type        = "ssh"
      host        = "10.0.2.15"
      user        = "terraform"
      private_key = file(pathexpand("~/.ssh/terraform_provisioner_key"))
    }
  }
}
The main parts of the configuration are:
terraform_data. Defines a Terraform-managed resource without creating external infrastructure. Use it to provide a resource for the provisioner.file. Defines the provisioner that transfers the file.source.Specifies the local file Terraform transfers.destination.connection.Defines how Terraform connects to the remote machine.type. Specifies SSH as the connection method.host. Specifies the IP address of the remote machine.user.Specifies the user Terraform uses for the SSH connection.private_key.Specifies the private SSH key Terraform uses to authenticate.
2. Before applying the configuration, review the planned changes with:
terraform plan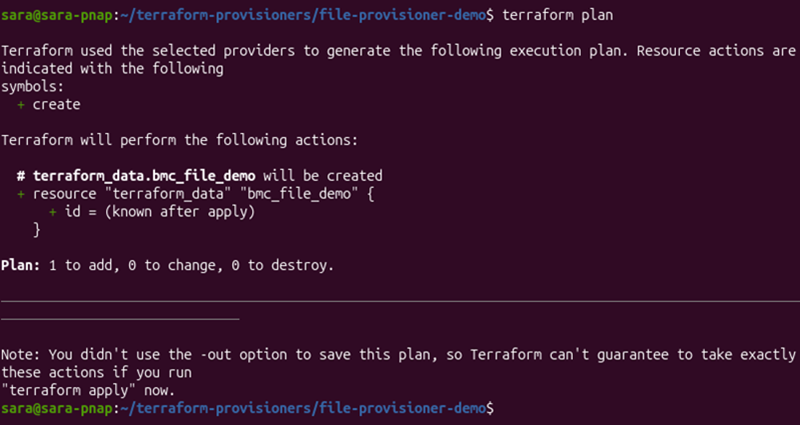
The plan shows Terraform will create one terraform_data resource. The file provisioner does not appear as a separate resource because it runs as part of resource creation.
3. Create the resource and run the provisioner:
terraform apply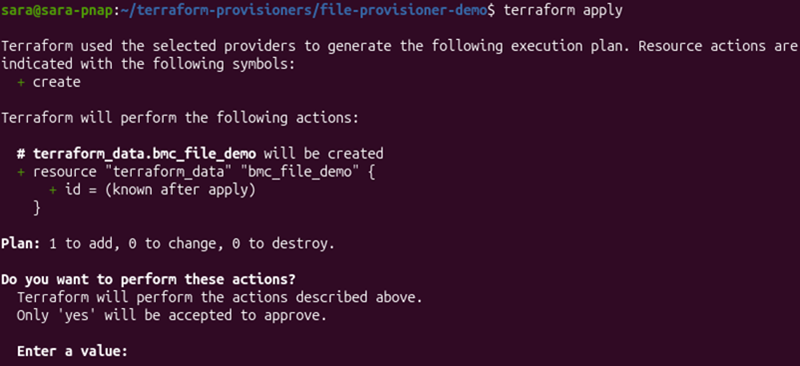
Terraform displays the execution plan and asks for confirmation. Enter yes to approve the changes.
After confirmation, Terraform creates the resource and runs the file provisioner:
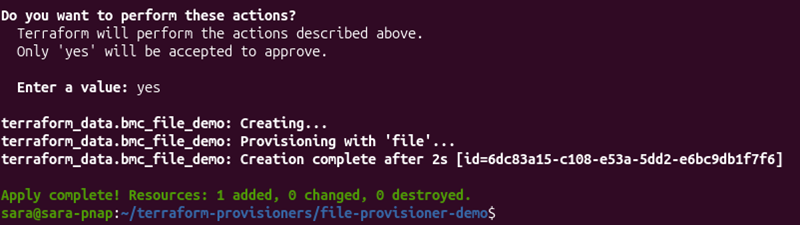
The output shows Provisioning with 'file'..., followed by Creation complete. This confirms Terraform ran the file transfer during resource creation.
Verify the Transfer
Terraform reports the provisioner completed successfully, but we should also verify the file reached the remote machine. Do the following:
1. Connect to the machine over SSH:
ssh -i ~/.ssh/terraform_provisioner_key terraform@10.0.2.152. Display the transferred file:
cat /tmp/message.txt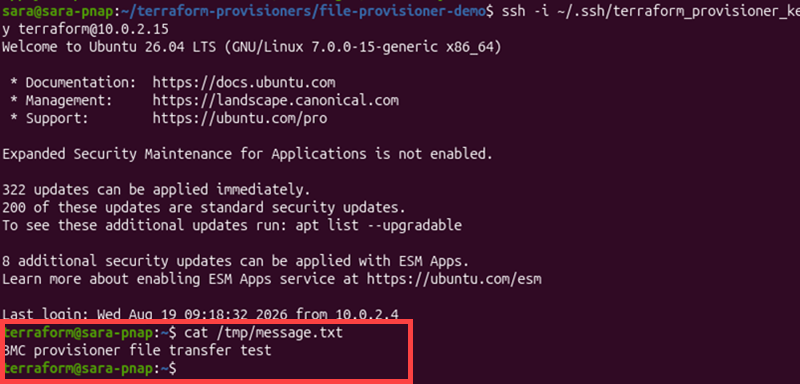
The command displays the BMC provisioner file transfer test, confirming the file was copied from the local machine to the remote machine.
3. Exit the SSH session with exit.
The file provisioner transfers files but does not execute them. The next example uses remote-exec to run commands directly on the remote machine.
Running Remote Commands with remote-exec
The remote-exec provisioner runs commands on a remote machine after Terraform creates a resource. Unlike local-exec, which runs commands on the local machine, remote-exec connects to the remote machine and executes the commands there.
In this example, we can reuse the SSH connection setup from the previous section. Configure remote-exec to run several simple commands and use their output to confirm the commands execute on the remote machine.
The example consists of three parts:
- Configuring the remote commands. Adding a
remote-execprovisioner and defining the commands Terraform should run. - Running the provisioner. Applying the Terraform configuration and reviewing the command output.
- Verifying the result. Connecting to the remote machine and confirming the result independently.
The following sections explain each part.
Configure the Remote Commands
Create a separate Terraform configuration file named remote-exec.tf. It uses terraform_data to provide a Terraform-managed resource for the provisioner:
resource "terraform_data" "remote_exec_demo" {
  provisioner "remote-exec" {
    inline = [
      "echo 'Remote command executed successfully'",
      "hostname",
      "uname -a"
    ]

    connection {
      type        = "ssh"
      host        = "REMOTE_HOST"
      user        = "REMOTE_USER"
      private_key = file(pathexpand("PATH_TO_PRIVATE_KEY"))
    }
  }
}
The main parts of the configuration are:
terraform_data.Defines a Terraform-managed resource without creating external infrastructure. It provides a resource for the provisioner.remote-exec.Defines the provisioner that runs commands on the remote machine.inline.Contains the commands Terraform runs on the remote machine. Terraform executes them in the order they appear.connection.Defines how Terraform connects to the remote machine.type.Specifies SSH as the connection method.host.Specifies the address of the remote machine.user.Specifies the user Terraform uses for the SSH connection.private_key.Specifies the private SSH key Terraform uses to authenticate.
The example uses three commands to make the result easy to identify:
- echo. Displays a message confirming that the provisioner ran.
- hostname. Shows the hostname of the remote machine.
- uname -a. Presents information about the remote system.
Together, these commands make it clear remote-exec runs commands on the remote machine rather than on the local machine.
Run the Provisioner
Before you apply the configuration, review the planned changes. Do the following:
1. Run terraform plan:
terraform plan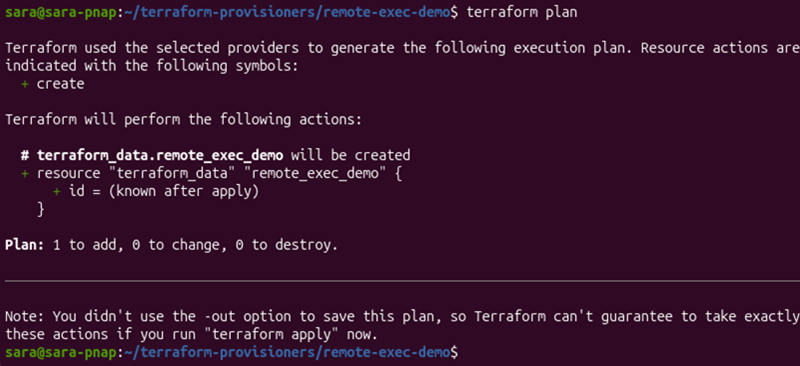
The plan shows Terraform will create one terraform_data resource. The remote-exec provisioner does not appear as a separate resource because it runs as part of resource creation.
2. Create the resource and run the provisioner with:
terraform apply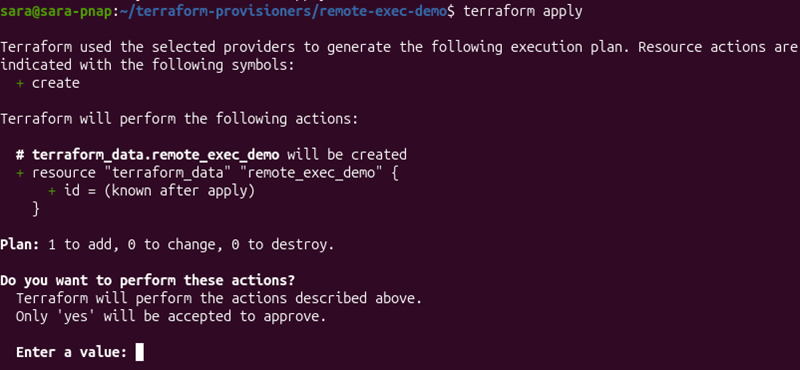
Terraform displays the execution plan and asks for confirmation. Enter yes to approve the changes.
After confirmation, Terraform connects to the remote machine over SSH and runs the commands defined in inline.
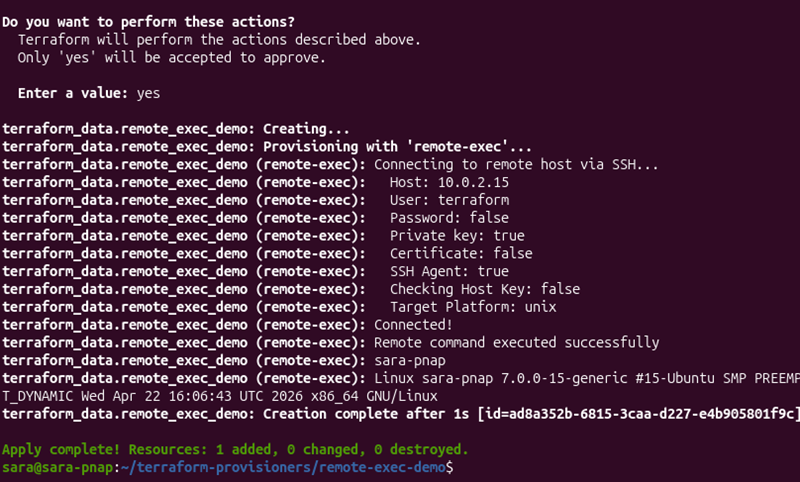
The output shows Terraform connecting to the remote host and reporting Connected!. It then shows the command output, including the remote machine's hostname and system information. This confirms remote-exec executed the commands on the remote machine.
Verify the Result
The provisioner output already shows the command results, but an independent check can confirm the reported hostname belongs to the remote machine. Do the following:
1. Connect to the remote machine over SSH:
ssh -i ~/.ssh/terraform_provisioner_key terraform@REMOTE_HOST2. Display the hostname:
hostname
The hostname should match the value returned by remote-exec. This independently confirms the command ran on the remote machine.
3. Exit the SSH session with exit.
The remote-exec provisioner can run commands on a remote machine after Terraform creates a resource. However, it is best suited for simple provisioning tasks rather than complex or repeatable system configuration.
Combining file and remote-exec for Web Server Bootstrap (Nginx)
Nginx is one of the most popular web servers today. It can serve static files, handle HTTP requests, and act as a reverse proxy.
This example combines the file and remote-exec provisioners to bootstrap a Nginx web server. Bootstrapping includes preparing a machine for its intended role. Terraform transfers a web page to the remote machine with file, then uses remote-exec to install and start Nginx and configure it to serve the page.
The example consists of three parts:
- Preparing the web content. Creating a simple HTML file on the local machine.
- Bootstrapping the web server. Using
fileto transfer the HTML file andremote-execto install and configure Nginx. - Verifying the web server. Checking Nginx is running and serving the transferred page.
The following sections explain each part.
Prepare Web Content
Create a simple HTML file on the local machine. This is the page Nginx will serve after the bootstrap process is complete. For example:
1. Create index.html with the following content:
<!DOCTYPE html>
<html>
<head>
  <title>Terraform Provisioner Demo</title>
</head>
<body>
  <h1>Terraform Provisioner Demo</h1>
  <p>This page was deployed with Terraform provisioners.</p>
</body>
</html>
2. Verify the file contents with:
cat index.html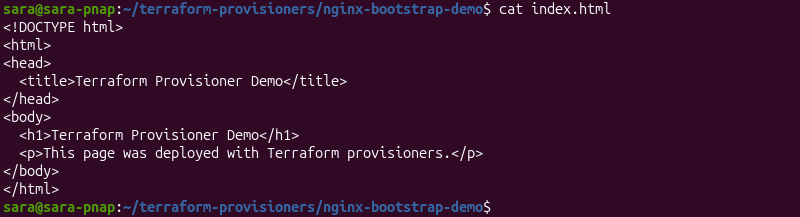
The output confirms the HTML file is ready to transfer.
Bootstrap the Web Server
Create a Terraform configuration file named nginx-bootstrap.tf. The configuration uses file to transfer the HTML file and remote-exec to install and configure Nginx on the remote machine:
1. Add the following configuration:
resource "terraform_data" "nginx_bootstrap" {
  provisioner "file" {
    source      = "index.html"
    destination = "/tmp/index.html"

    connection {
      type        = "ssh"
      host        = "REMOTE_HOST"
      user        = "REMOTE_USER"
      private_key = file(pathexpand("PATH_TO_PRIVATE_KEY"))
    }
  }

  provisioner "remote-exec" {
    inline = [
      "sudo apt update",
      "sudo apt install -y nginx",
      "sudo cp /tmp/index.html /var/www/html/index.html",
      "sudo systemctl enable --now nginx"
    ]

    connection {
      type        = "ssh"
      host        = "REMOTE_HOST"
      user        = "REMOTE_USER"
      private_key = file(pathexpand("PATH_TO_PRIVATE_KEY"))
    }
  }
}
The configuration uses the two provisioners for different tasks:
file.Transfers index.html from the local machine to the remote machine.remote-exec.Runs commands on the remote machine to install Nginx, copy the HTML file into Nginx's document directory, and start the service.
The remote-exec commands perform the following actions:
- sudo apt update. Updates the package information on the remote machine.
sudo apt install -y nginx. Installs Nginx without requiring interactive confirmation.sudocp. Copies the transferred HTML file into Nginx's default document directory.sudo systemctl enable --now nginx.Starts Nginx and configures it to start automatically when the machine boots.
Both provisioners use the same SSH connection settings. Terraform runs the provisioners in the order they appear, so file transfers index.html before remote-exec attempts to copy it into Nginx's document directory.
2. Review the planned changes:
terraform plan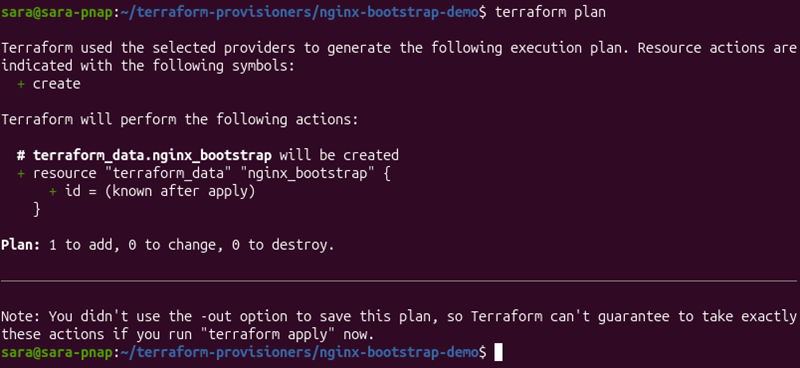
The plan shows Terraform will create one terraform_data resource. The file and remote-exec provisioners do not appear as separate resources because they run as part of the resource creation process.
3. Create the resource and run both provisioners with:
terraform apply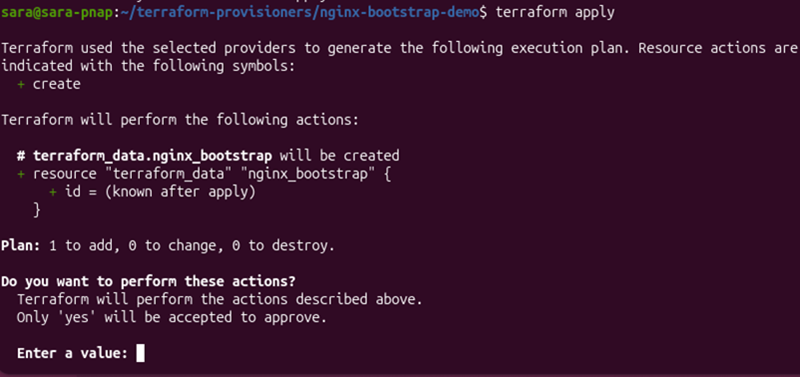
Terraform displays the execution plan and asks for confirmation. Enter yes to approve the changes.
After confirmation, Terraform runs the file provisioner and then the remote-exec provisioner.
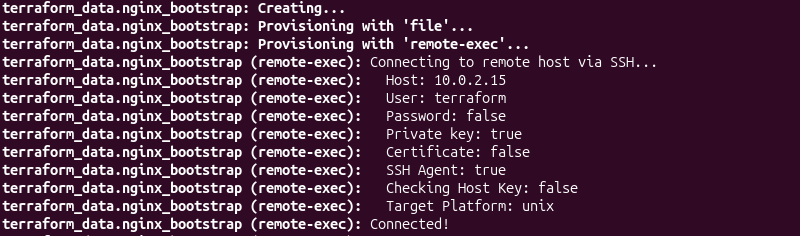
The output shows the file provisioner starting first, followed by remote-exec. Terraform then connects to the remote machine over SSH.
The remote commands install Nginx and configure it to serve the transferred HTML file.
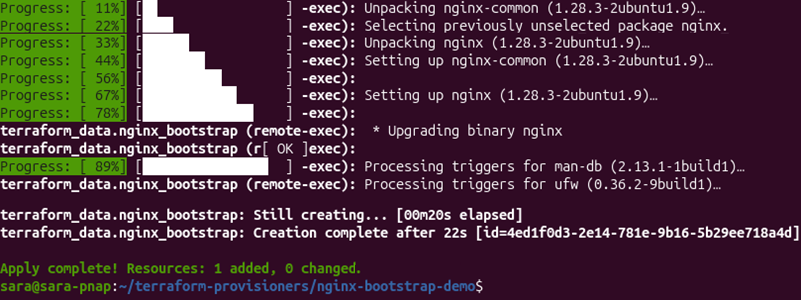
The successful output confirms the provisioning process completed. Together, the two provisioners let Terraform transfer the required file before running the commands that configure the service.
Verify the Web Server
The provisioning output confirms Terraform completed the resource creation, but we should also verify the service and the content it serves. Do the following:
1. Connect to the remote machine via SSH:
ssh -i PATH_TO_PRIVATE_KEY REMOTE_USER@REMOTE_HOST2. Check the Nginx service status:
sudo systemctl status nginx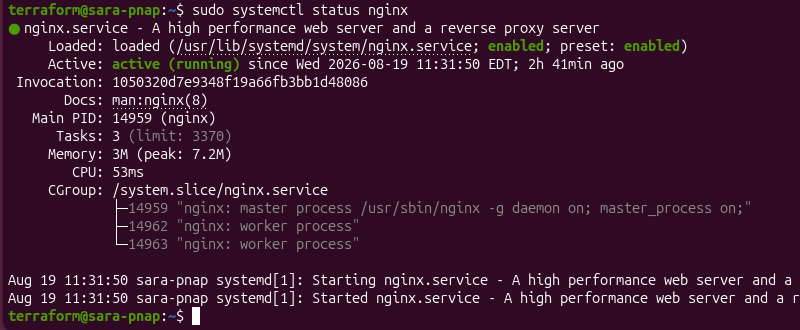
The status output shows active (running), confirming Nginx started successfully.
3. Request the page from Nginx with curl:
curl http://localhost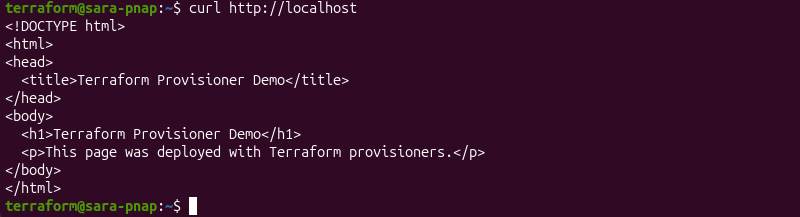
The response contains the HTML content transferred by the file provisioner. This confirms Terraform transferred the file, configured Nginx with remote-exec, and successfully started a web server that serves the deployed page.
The file and remote-exec provisioners can work together for simple bootstrap tasks such as this example. However, provisioners are generally better suited to one-time provisioning than ongoing configuration management. For more complex or repeatable server configuration, dedicated configuration management tools or image-based approaches are usually more appropriate.
Executing Destroy-Time Actions with local-exec
The local-exec provisioner normally runs when Terraform creates a resource. You can use the when argument to change when the provisioner runs. Setting when = destroy makes the provisioner run when Terraform destroys the resource.
Destroy-time provisioners are useful for cleanup tasks that must happen when a resource is removed. In this example, we reuse terraform_data from the previous examples and attach a simple cleanup command to it.
Do the following:
1. Create a configuration file named destroy-provisioner.tf:
resource "terraform_data" "destroy_demo" {
  provisioner "local-exec" {
    when    = destroy
    command = "echo 'Cleanup action executed'"
  }
}
The important arguments are:
when. Specifies when the provisioner runs. Setting it todestroymakes the provisioner run during resource destruction.command. Specifies the local command Terraform executes.
Because local-exec runs on the local machine, the cleanup command also runs there. The provisioner is tied to the lifecycle of terraform_data.destroy_demo, so Terraform runs it when that resource is destroyed.
2. Create the resource with:
terraform apply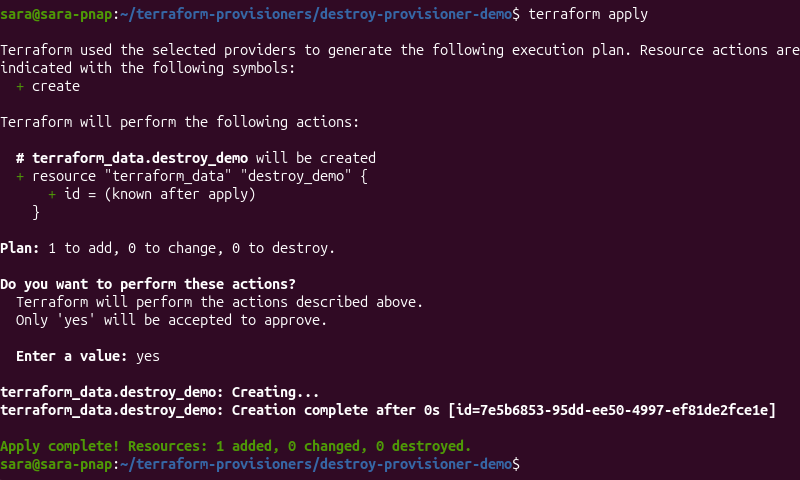
The destroy-time provisioner does not run during this step because the resource is being created.
3. Destroy the resource and trigger the cleanup action with destroy command:
terraform destroy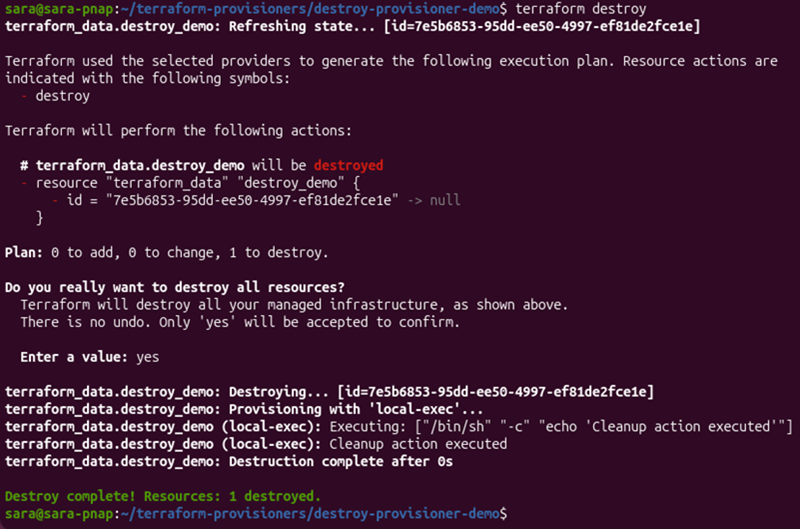
Terraform destroys the resource and runs the local-exec provisioner with when = destroy.
The output confirms the cleanup command runs as part of the resource destruction process. This makes destroy-time provisioners useful for simple cleanup actions that occur when Terraform removes a resource.
However, use destroy-time provisioners carefully. If Terraform cannot destroy the resource normally, the cleanup action may not run as expected. For more complex cleanup workflows, managing the external resource explicitly is often more predictable.
Triggering Provisioners on Variable Changes with terraform_data
Provisioners normally run when their associated resource is created. The terraform_data resource is useful when you need to attach a provisioner to a value not associated with another managed resource.
In this example, a variable controls the triggers_replace value of a terraform_data resource. When the variable changes, Terraform replaces the resource, causing its creation-time local-exec provisioner to run again.
The example consists of two steps:
- Creating the resource. Applying the configuration with the initial variable value and running the provisioner.
- Changing the value. Changing the variable and applying the configuration again. Terraform replaces the resource and runs the provisioner again.
Create the Resource
Create a configuration file named variable-trigger.tf:
variable "revision" {
  default = 1
}

resource "terraform_data" "variable_trigger" {
  triggers_replace = var.revision

  provisioner "local-exec" {
    command = "echo \"Provisioner triggered for revision ${var.revision}\""
  }
}
The important parts are:
revision. Defines the value that controls when the resource is replaced.triggers_replace. Causes Terraform to replace theterraform_dataresource when its value changes.local-exec. Runs the command on the local machine when Terraform creates the resource.
Next, apply the configuration:
terraform apply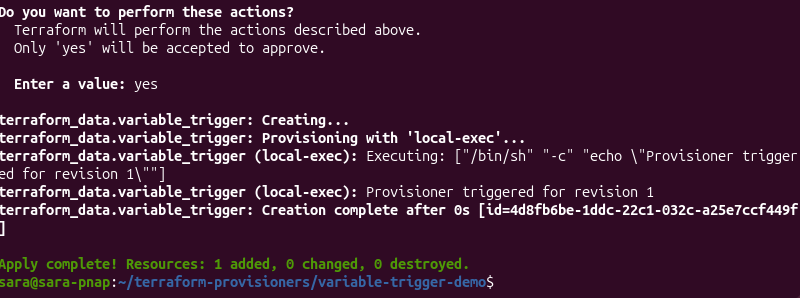
The output shows the provisioner running with the initial revision value.
Change the Variable
Change the value of revision from 1 to 2:
variable "revision" {
  default = 2
}
Apply the configuration again:
terraform apply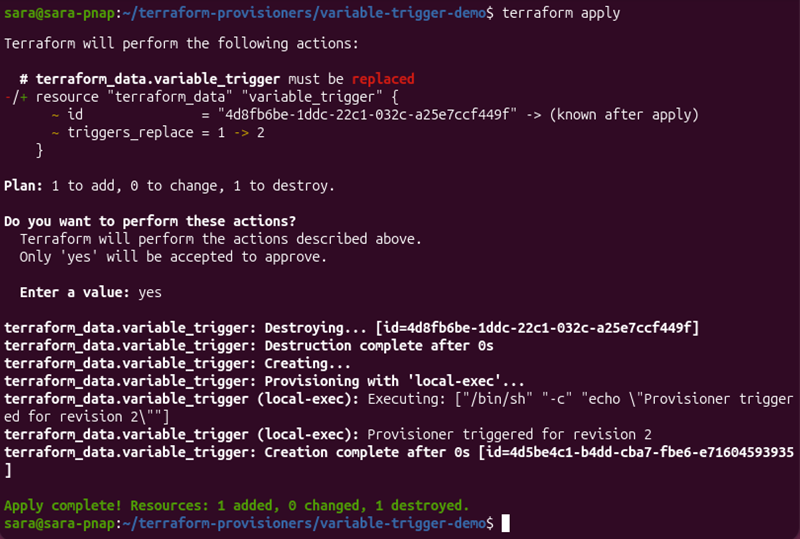
Terraform detects the changed triggers_replace value and replaces the terraform_data resource. The creation-time local-exec provisioner runs again and prints the new revision value.
This pattern allows a provisioner to run again when a specific value changes. It can trigger local actions when an external input changes while keeping the trigger under Terraform's control.
Provisioners should still be used selectively. For complex or repeatable automation, purpose-built configuration management or other automation mechanisms are generally more appropriate.
Terraform Provisioners Common Problems and Troubleshooting
Provisioners depend on external conditions that Terraform does not control directly, such as network connectivity, remote permissions, and command execution. A configuration can therefore produce a valid Terraform plan but still fail during provisioning.
The sections below cover common provisioner problems and how to identify and resolve them.
BMC Instance Marked as Tainted After Provisioner Failure
If a provisioner fails after Terraform creates a resource, Terraform can mark the resource for replacement. The next plan may show that the resource must be replaced.
This can happen when the infrastructure itself was created successfully, but a provisioning action failed. For example, a machine is available while an SSH command or installation script fails.
Review the plan before applying the configuration again:
terraform planIf Terraform proposes a replacement, first identify and fix the original provisioner failure. Otherwise, the replacement is likely to fail for the same reason.
For intentional replacement, use the -replace option with terraform plan or terraform apply rather than manually modifying the state.
SSH/WinRM Connection Timeouts During BMC Bootstrapping
Remote provisioners require a working SSH or WinRM connection. A timeout means that Terraform cannot connect to the machine within the configured period.
Common causes include:
- Slow boot. The machine has not finished starting its operating system or remote-access service.
- Incorrect address. The configured host or port is incorrect.
- Unavailable service. SSH or WinRM is not running yet.
- Authentication failure. The configured user or credentials are incorrect.
- Network restrictions. A firewall or network rule blocks the connection.
For machines that take longer to become available, set an explicit connection timeout:
connection {
  type    = "ssh"
  host    = var.host
  user    = var.user
  timeout = "10m"
}
The default connection timeout is five minutes. Set a longer value when slow boot times are expected, but do not use a large timeout to hide an actual connectivity problem.
Non-Idempotent Execution and State Untracking Issues
Terraform tracks the resource associated with a provisioner, but it does not track every change that the provisioner makes inside the machine.
For example, a provisioner that adds a configuration line every time it runs creates duplicates when the resource is recreated.
Design scripts so that running them more than once produces the same intended result:
- Check before changing. Verify whether a package, file, or configuration already exists.
- Avoid duplicate changes. Do not automatically append configuration on every run.
- Use predictable commands. Make repeated execution safe.
- Keep Terraform state in mind. Terraform knows about the resource, but not every change made inside it by a provisioner.
Permission Denied Errors on Uploaded Scripts
The file provisioner can successfully transfer a file while the following remote-exec command fails because the remote user cannot execute or access it. Check both the destination and the file permissions.
If the script needs execute permissions, grant them before running it with chmod:
chmod +x /tmp/setup.shAnother option is to explicitly invoke the appropriate interpreter:
bash /tmp/setup.shThe remote user must also have permission to write to the destination directory. Use a location where that user has the required access, or configure the remote system so the provisioning user can access the destination.
Network and Firewall Ingress Blocking SSH Connections
A remote provisioner cannot connect if the network path between Terraform and the target machine is blocked.
Check the following:
- Host and port. Confirm the configured address and port are correct.
- Firewall rules. Make sure the required SSH or WinRM port allows inbound connections.
- Network routing. Confirm the machine running Terraform can reach the target network.
- Remote service. Verify SSH or WinRM is running on the target machine.
Test the connection independently before troubleshooting the Terraform configuration. If a direct SSH or WinRM connection fails, the problem is outside the provisioner itself.
Terraform Provisioners Best Practices
Provisioners can fill gaps when Terraform or a provider cannot perform a required action, but they add dependencies on remote connections, credentials, and external commands. Use them deliberately and keep their responsibilities small.
The following practices help make provisioners more predictable, secure, and easier to maintain.
Treat Provisioners as a Last Resort (When to Avoid Them)
Before adding a provisioner, check whether a Terraform resource, machine image, cloud-init, or configuration management tool can handle the task.
Use provisioners when those alternatives do not meet the requirement or when the task is a small action that must happen as part of the resource lifecycle.
A useful division of responsibilities is:
- Terraform. Manage infrastructure and infrastructure-related resources.
- Cloud-init or machine images. Initialize new machines.
- Ansible or similar tools. Manage ongoing machine configuration.
- Provisioners. Handle small actions that cannot be managed more appropriately elsewhere.
Ensure Script Idempotency (Safe Re-execution)
Provisioner commands can run again when Terraform recreates a resource. Make scripts safe to execute more than once. Choose operations that check the current state before making a change.
For example, avoid blindly adding the same configuration every time a provisioner runs. Instead, check whether the required configuration already exists before adding it.
Idempotent scripts reduce duplicate configuration, unexpected changes, and failures during resource replacement.
Decouple Machine Bootstrapping with Cloud-Init or Ansible
Provisioners connect Terraform's resource lifecycle directly to commands running inside the machine. This can make larger provisioning workflows difficult to maintain.
Use cloud-init for first-boot initialization when the platform supports it. Use Ansible or another configuration management tool when the machine requires ongoing or more complex configuration.
This keeps infrastructure provisioning separate from machine configuration and reduces Terraform's dependency on remote connections.
Manage SSH Credentials & Secrets Securely
Remote provisioners often require credentials with access to the target machine. Protect these credentials as you would any other sensitive infrastructure data.
- Use key-based authentication. Prefer SSH keys over passwords when possible.
- Use dedicated accounts. Give the provisioning account only the permissions it needs.
- Avoid hard-coded secrets. Do not place passwords or private keys directly in Terraform configuration.
- Protect sensitive values. Use appropriate secret-management and Terraform variable mechanisms.
- Verify host identity when required. Configure SSH host-key verification when the environment requires stronger protection against connecting to an unexpected machine.
Set Explicit Connection Timeouts for Physical Hardware
Physical machines take longer to become available than typical cloud instances. Hardware initialization, operating-system startup, and network services can all delay the SSH or WinRM connection.
Set a timeout that reflects the expected startup time:
connection {
  type    = "ssh"
  host    = var.host
  user    = var.user
  timeout = "15m"
}
Use an explicit timeout when the default is too short for the environment. However, increasing the timeout does not fix an incorrect address, blocked port, failed authentication, or unavailable remote service.
Conclusion
This tutorial explained what Terraform provisioners are and how they work. It also highlighted the differences between Terraform providers and provisioners and covered provisioner syntax and configuration. The article explored practical uses of Terraform provisioners through real-world examples, along with common issues and troubleshooting techniques.
Next, learn how to provision infrastructure with Terraform.