When a Terraform project is finished, the terraform destroy command lets you free up the resources it manages. However, use it carefully, because the command also deletes data stored on the destroyed infrastructure.
In this article, you will learn how terraform destroy removes resources and how to use it to clean up your deployment.
What Is terraform destroy Command?
The terraform destroy command instructs Terraform to destroy all the resources it manages through the current configuration. This includes everything in the deployment, such as servers, databases, and networks.
terraform destroy does not delete the project directory or the configuration files on your local machine. This means you can run terraform apply later to recreate the deleted infrastructure using the same configuration.
terraform destroy vs. terraform apply -destroy vs. terraform state rm
These three commands remove resources from the Terraform state, but they do not have the same effect on actual infrastructure:
| terraform destroy | terraform apply -destroy | terraform state rm | |
|---|---|---|---|
| Main purpose | Destroys the infrastructure managed by the current state file. | The same operation as terraform destroy. | Tells Terraform to stop managing a resource. |
| Actual infrastructure | Deletes all the resources managed by the configuration. | Deletes all resources managed by the configuration. | Does not touch the resources and leaves them running. |
| Terraform state | Removes the destroyed resources from Terraform's state file. | Removes the destroyed resources from the state. | Removes the resources from the state file. |
Note: If you work with Infrastructure as Code, the terraform destroy command lets you remove resources through the same Terraform workflow you use to provision and manage them.
terraform destroy Syntax
As with most Terraform commands, the destroy syntax is straightforward:
terraform destroy [option] [target]When you run the command, Terraform displays a teardown plan and asks you to confirm that you want to destroy the resources by typing yes.
Once you confirm, Terraform sends the destroy request to the provider and stores the information in the state file.
terraform destroy Options
There are seven options you are most likely to use with terraform destroy:
| Option | Description |
|---|---|
-auto-approve | Skip the confirmation prompt and start the destroy process without having to type yes. |
-target=ADDRESS | Destroy a specific resource or module by providing its address. |
-var='NAME=VALUE' | Pass an input variable value directly from the command line. |
-var-file=FILENAME | Load input variable values from your .tfvars file. |
-input=false | Disable interactive prompts during the destroy process. |
-no-color | Remove terminal color codes from the command output. |
-lock-timeout=DURATION | Set how long Terraform should keep trying to acquire the state lock before it returns an error. |
Note: If you are looking for a platform to deploy your Terraform configuration, phoenixNAP Bare Metal Cloud lets you provision and manage physical servers as code.
terraform destroy Examples
The following sections show examples that use a Terraform configuration that provisions a phoenixNAP BMC server, but terraform destroy works the same way with resources from other providers.
Reviewing and Destroying Infrastructure for the First Time
When you are ready to remove the infrastructure for your current project, open the command line and enter:
terraform destroyTerraform first creates a destroy plan that lists all the resources it plans to remove.
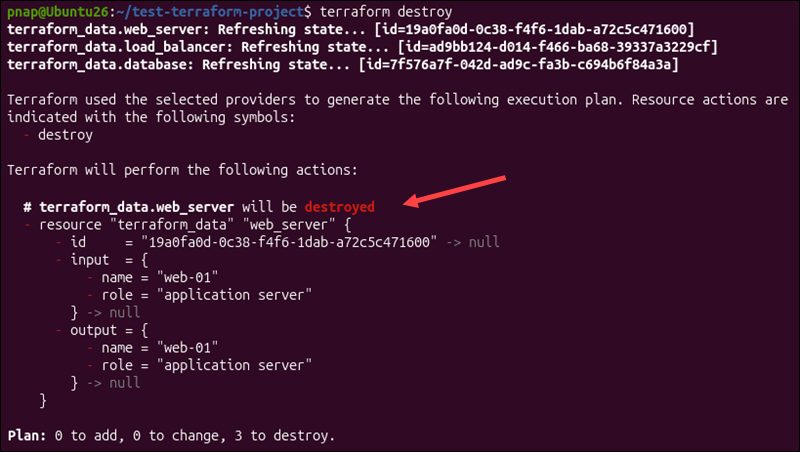
At the end of the destroy plan, Terraform asks you to confirm. If you agree with the plan, type yes in the command line.
Terraform then reaches out to the provider API and instructs it to delete the actual resources. If everything works, you will see a message that confirms the operation is complete, for example: Destroy complete! Resources: 3 destroyed.
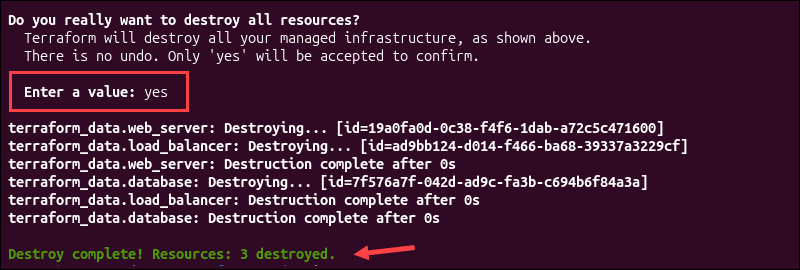
In this example, Terraform removes a BMC server, database, and load balancer, and updates the state file to reflect the change.
Auto-Approving Destruction in Non-Interactive Scripts (-auto-approve)
As you've seen in the previous example, terraform destroy asks you to confirm the destroy plan before it removes anything. If you are working in the terminal, this gives you one final chance to review the changes and opt out.
In an automated script or CI/CD pipeline, there is usually no one there to type yes. In this case, you need to skip the confirmation prompt by adding the -auto-approve option:
terraform destroy -auto-approveWhen you run this command, Terraform creates the destroy plan and applies it right away without asking for confirmation.
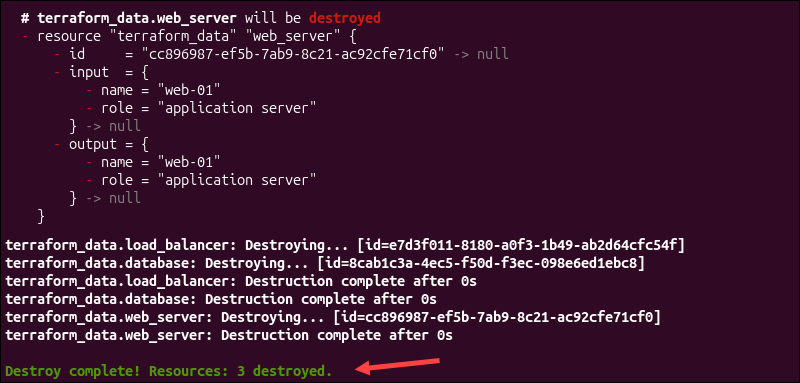
You can use this command for test or dev environments, but you should generally avoid it when destroying infrastructure manually. It might save you a few seconds, but the risks outweigh the benefits.
In automated workflows, you need another way to ensure the right infrastructure is destroyed. Developers often create and save a destroy plan first, review it, and then apply that plan with terraform apply.
Targeting Specific Infrastructure Resources for Teardown (-target)
When you run terraform destroy without a target, it removes all resources managed by the current Terraform state.
If you need to remove a specific resource, add the -target option followed by the resource address. If you are not sure about the resource address, list the resources currently stored in state:
terraform state listIn this example, the output includes three resource addresses:
terraform_data.database
terraform_data.load_balancer
terraform_data.web_server
Copy the address of the resource you want to remove and use it with the -target option. For example, to remove the web_server resource, enter:
terraform destroy -target=terraform_data.web_serverTerraform will destroy the resource you specify, along with any resources it depends on. However, it does not automatically remove resources that depend on the target:
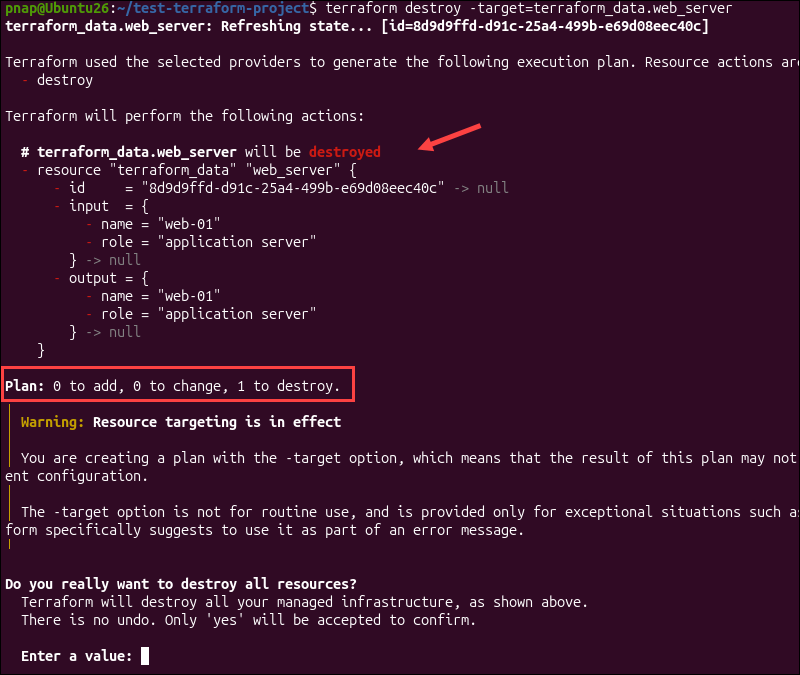
Because of this, you should only use the -target option in special cases, for example, when fixing errors or recovering from mistakes. If you remove a targeted resource, other resources that depend on it may stop working.
Passing Variable Values Directly via Command Line (-var)
When Terraform creates a destroy plan, it checks the configuration. If it can't find required input variables, Terraform will ask you to enter them. For example, this configuration needs the environment and location variables:
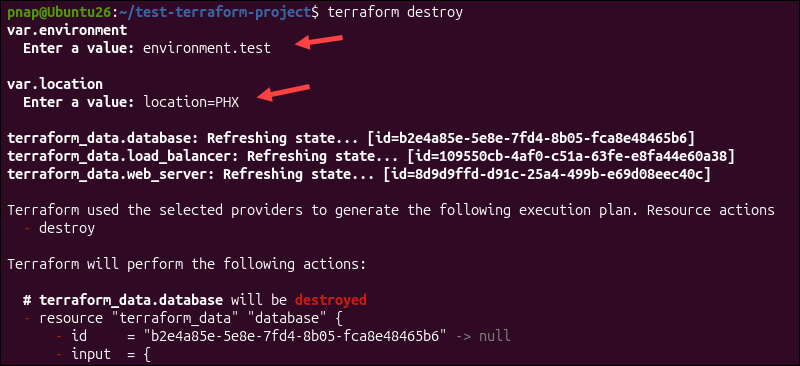
You can avoid the prompt by passing the variable values with the -var option:
terraform destroy -var='environment=test' -var='location=PHX'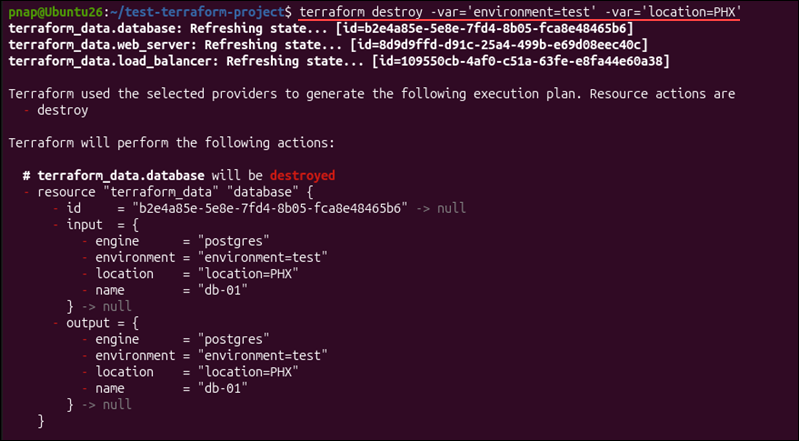
The destroy command lets you pass one or more values with -var, but if you need to pass lots of different variable values, a variable file is usually easier to manage.
Destroying Infrastructure Using Variable Files (-var-file)
If you store variable values in a separate .tfvars file, you can use -var-file instead of typing each value one by one with the -var option. For example, use a text editor to create a dev.tfvars file in the project directory and add values required for the configuration:
environment = "dev"
location = "PHX"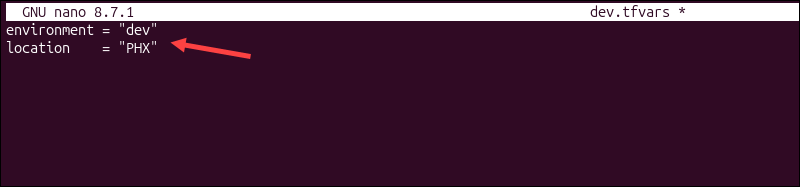
To use these values when destroying infrastructure, add the -var-file option followed by the file name:
terraform destroy -var-file='dev.tfvars'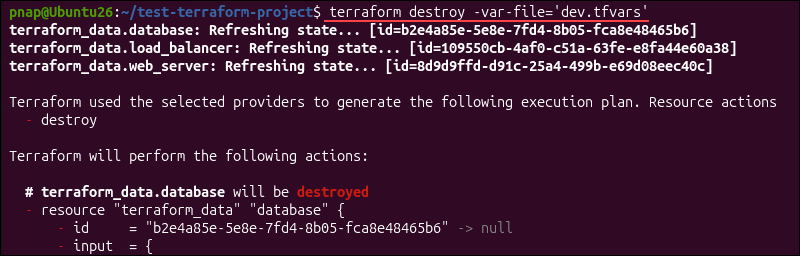
Terraform reads the variable values from the file and uses them when creating the destroy plan.
Executing terraform destroy in CI/CD Pipelines Without Color Formatting (-no-color)
When automating tasks, remove any prompts or obstacles that could interrupt the process. You can combine several options to make terraform destroy work smoothly in automated setups. For example:
terraform destroy -auto-approve -input=false -no-colorHere's what each option does:
-auto-approve. Skips the confirmation step and lets Terraform start applying the plan immediately.-input=false. Prevents Terraform from asking for input during the process. Make sure any needed variable values are set elsewhere, like in a .tfvars file.-no-color. Removes color codes from the output, making it easier to read and process in pipeline logs.
In automated workflows, you need another way to make sure the right infrastructure is destroyed. Developers often do this by creating and saving a destroy plan first:
terraform plan -destroy -out=destroy.tfplanThe -destroy option tells Terraform to create a destroy plan, while -out saves that plan to the destroy.tfplan file. You can then review the plan, and once it's approved, apply that exact plan with:
terraform apply -input=false -no-color destroy.tfplan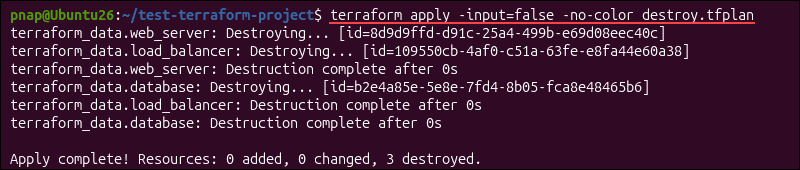
Because the saved plan has already been reviewed and approved, you do not need to use the -auto-approve option.
terraform destroy Common Mistakes
This section covers some of the most common issues you may run into when using the destroy command, along with tips on how to solve them.
Handling Resources Protected by prevent_destroy
Developers often protect important resources from being deleted by mistake by adding the prevent_destroy lifecycle rule to the resource block. For example, the following configuration creates a database resource and protects it from deletion:
resource "terraform_data" "database" {
  input = {
    name        = "db-01"
    engine      = "postgres"
    location    = "PHX"
    environment = "test"
  }

  lifecycle {
    prevent_destroy = true
  }
}
If you run terraform destroy, Terraform detects that the resource is protected and returns the Instance cannot be destroyed error:
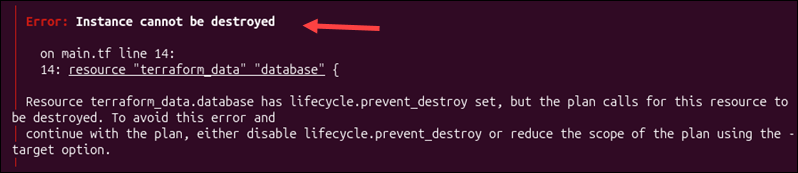
This is expected behavior. When prevent_destroy is set to true, Terraform will not let you delete the resource. To delete it, you need to either remove the lifecycle rule or set prevent_destroy to false.
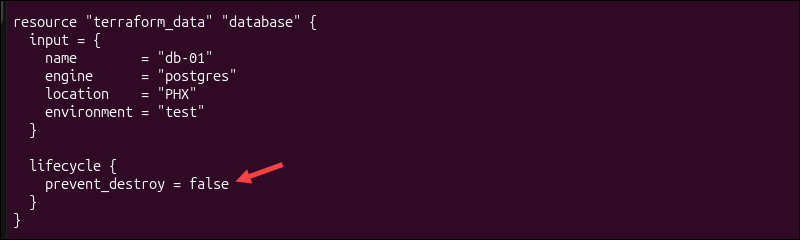
Save the configuration and run the destroy command again:
terraform destroyTerraform can now run the plan as usual and remove all the resources in the configuration.
Fixing Resource Dependency Order and Teardown Sequence Failures
Terraform looks at how resources depend on each other to decide the order in which to destroy them. For example, if a server depends on a network, Terraform will delete the server first, then the network.
Problems can occur when an external platform has a dependency that Terraform does not know about. In these cases, you may see an error saying a resource is still in use or cannot be deleted.
First, create and review a destroy plan:
terraform plan -destroyCheck which resources Terraform plans to remove and see if any depend on each other. If one resource already uses an attribute from another, Terraform usually finds the dependency and figures out the right order on its own.
However, sometimes a resource depends on another even though no values are being passed between them. In that case, you need to use depends_on to make the dependency explicit. For example:
resource "terraform_data" "network" {
  input = {
    name = "test-network"
  }
}

resource "terraform_data" "server" {
  input = {
    name = "web-01"
  }

  depends_on = [
    terraform_data.network
  ]
}
The depends_on argument tells Terraform that the server depends on the network, even if the server block does not directly reference any of the network values.
Terraform uses this relationship to decide the order of resources. When creating, it sets up the network before the server. When destroying, it does the opposite and removes the server before the network.
Handling Missing Cloud Credentials and Provider Authorization Failures
Before Terraform can delete infrastructure, the provider must authenticate with the platform it manages. If your credentials are missing, expired, or do not have the right permissions, the terraform destroy command will not work.
For example, the phoenixNAP provider needs to authenticate with the BMC API before it can delete BMC resources. If you use phoenixNAP environment variables to authenticate, start by checking that your client ID is set in your current shell:
echo $PNAP_CLIENT_IDIf necessary, set your environment credentials again:
export PNAP_CLIENT_ID="your-client-id"
export PNAP_CLIENT_SECRET="your-client-secret"
Run the destroy command again:
terraform destroyIf the authentication works, Terraform will create the destroy plan and ask you to confirm the operation.
Debugging Invalid Resource Target Syntax
The -target option needs a valid Terraform resource address, which means you need to include the resource type and name. If the address is incomplete or does not match the resource you want to destroy, Terraform cannot target it.
To see which addresses Terraform currently recognizes, run:
terraform state list
In this example, the addresses are straightforward:
terraform_data.load_balancerterraform_data.databaseterraform_data.web_server
Copy the address directly from the output you get to avoid typing it incorrectly. For example:
terraform destroy -target=terraform_data.load_balancerResource addresses get more complex when you use count or for_each to create multiple instances. If you want to target a specific instance created this way, you also need to include its index or key.
For a resource created with count, a specific instance may have the following address:
terraform_data.database[0]To destroy this instance, you need to include the [0] index in the address:
terraform destroy -target=' terraform_data.database[0]'If you use for_each, it uses its key instead:
terraform_data.database["test"]To target this specific instance, use this command:
terraform destroy -target= 'terraform_data.database["test"]'It is a good idea to put the full address in single quotes if it has brackets or quotation marks. This helps prevent the shell from misinterpreting those characters.
Resolving State Locking Deadlocks and Stale Locks
Terraform locks the state during operations so that two processes cannot modify the state at the same time.
If another operation already holds the lock, terraform destroy stops to avoid conflicting changes. When this happens, check if another operation is still running and let it finish so it can release the lock.
If you expect the other operation to finish soon, you can use -lock-timeout to tell Terraform how long it should keep trying:
terraform destroy -lock-timeout=5mThis command tells Terraform to keep trying to acquire the lock for up to 5 minutes before it shows an error.
Sometimes, processes end abruptly and leave a stale lock. If you are sure other processes are not using the state, you can remove the lock manually with the following command:
terraform force-unlock [LOCK_ID]You can find the LOCK_ID in the error message that stopped the destroy operation.
Be careful when using force-unlock. If you remove a lock that belongs to an active Terraform process, several processes will be able to modify the same state and cause problems.
terraform destroy Best Practices
Follow these best practices when using terraform destroy:
- Use
prevent_destroyfor important resources. Add thislifecyclerule to essential resource blocks, as it will stop you from accidentally deleting them. But do not overuseprevent_destroy, because it can also block valid destroy actions. - Use
-auto-approveonly for automated workflows. Keep the default confirmation prompt when running destroy operations manually. If your setup is automated and you have other safeguards in place, such as reviewing a destroy plan, it's safe to use-auto-approve. - Use
-targetsparingly. Terraform works best when it can look at the entire dependency graph. Target specific parts of your infrastructure only when fixing an error or recovering from a failure. - Store provider credentials outside the configuration. Use environment variables or a secret management tool to supply API credentials. If you put them in .tf or .tfvars files, they could end up in version control.
- Do not disable state locking just to fix an error. First, check why the state is locked. Use
-lock-timeoutif another operation might finish soon and only useforce-unlockwhen you are sure the lock is stale. - Make sure the state file is available when destroying resources. Terraform uses state to track what it manages. Do not remove resources from state before destroying them, or those resources will stay in place, and Terraform will lose track of them.
- Save destroy plans in automated workflows. The
terraform plan -destroy -out=tfplanlets you review and save the exact teardown plan before applying it. When you apply the saved plan, Terraform does not ask for confirmation. - Read the final output. Make sure Terraform confirms that the resources you expected were destroyed. If the process stops halfway, fix the error and run
terraform destroyagain to see if anything else needs to be removed.
Conclusion
This guide helped you learn how the terraform destroy command works in both manual and automated workflows, with practical examples and tips for handling common issues.
Terraform uses state to track the infrastructure it manages. To learn where the state is stored and how to configure it, see our Terraform backends guide.