Terraform manages infrastructure by continuously aligning real-world resources with the user-provided configuration files. From initial provisioning to eventual removal, every infrastructure element Terraform manages moves through a specific sequence of states.
This article details the fundamental mechanics, configuration arguments, validation mechanisms, and operational practices of the Terraform resource lifecycle.
Understanding Terraform Resource Lifecycle
Terraform manages infrastructure resources in phases and ensures that drift does not occur at any point in the lifecycle. Understanding Terraform lifecycle stages is critical for maintaining reliable Infrastructure as Code practices and retaining control over deployment.
The following sections explain the lifecycle management in more detail.
Core Lifecycle Phases: Create, Read, Update, and Destroy
Terraform resource lifecycle consists of four operations, often abbreviated as CRUD:
- Create. When configuration introduces a new resource block that Terraform cannot detect in the active state file, the platform issues API calls to the resource provider to provision the physical or virtual entity. If successful, the provider sends unique identification metadata, which Terraform stores in the local or remote state file.
- Read. Before planning or applying changes, Terraform retrieves the current physical state of all resources defined in the configuration. This operation updates internal state representations to reflect the real-world state.
- Update. When a user modifies an existing configuration block, Terraform compares the declared attributes with the refreshed state. If the target API allows parameter changes without terminating the resource, Terraform performs an in-place update.
- Destroy. When a user removes a resource block from the configuration, or commands a full teardown using execution flags, Terraform issues API calls to delete the infrastructure element from the provider environment and then purges the reference from the state file.
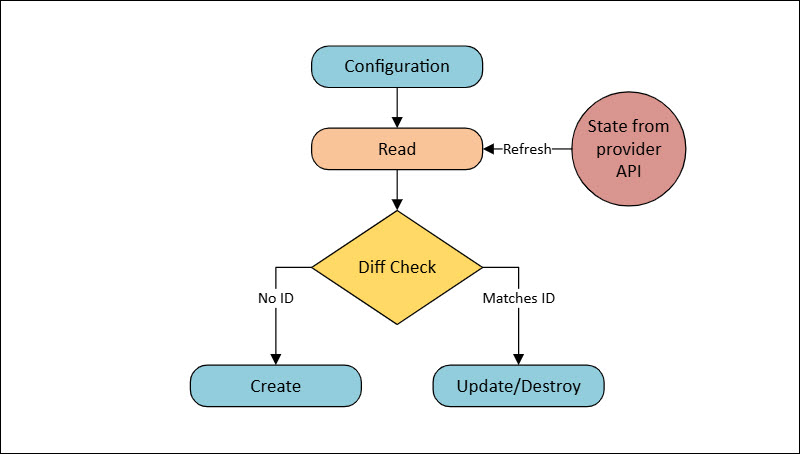
How Terraform Detects Drift Between Code and Real-World State
Configuration drift occurs when infrastructure state changes through out-of-band modifications, such as manual adjustments using provider web consoles, direct API calls, or automated third-party tools.
During the execution of terraform plan or terraform apply, Terraform attempts to perform a structured reconciliation that consists of the following steps:
- Looking for the stored resource identifiers in the active state file.
- Using the identifiers to query the upstream provider API and fetch the real-time properties for each object.
- Performing a structural three-way comparison:
- Desired state declared in the configuration code.
- The record of the last known configuration execution in the state file.
- Actual current state returned by the provider API.
If differences exist between the real-world infrastructure and the state file, Terraform updates the state file. If the new information in the state file diverges from the configuration code, Terraform reports the drift and plans to return the infrastructure to the desired state.
In-Place Updates vs. Destructive Recreation Behavior
Some resource attribute changes interrupt continuous operation. Schema attributes can be either mutable or immutable based on the following API constraints:
- Mutable attributes (such as display names, tags, or some firewall rule lists) permit in-place updates. Terraform submits an API patch or update request while the target resource continues operating without identity reassignments or network interface teardowns.
- Immutable attributes (such as physical architecture choices, MAC addresses, primary subnets, or bare metal instance types) cannot be modified after initial provisioning. If such an attribute is modified in code, Terraform schedules a two-stage destructive recreation plan: destroying the existing resource, followed by creating a new instance with the new attributes.
Destructive recreations carry risks of data loss on ephemeral volumes, IP address reassignment, and service outages. In execution plan outputs, forced recreation is marked with the prefix (~) accompanied by the inline comment # forces replacement.
Controlling Lifecycle Behavior with lifecycle Meta-Arguments
Terraform provides a lifecycle block in resource declarations section of its configuration file, allowing users to modify the default sequence of operations.
create_before_destroy: Preventing Downtime During Instance Swaps
By default, when an attribute change forces a resource replacement, Terraform destroys the resource before creating the replacement. This ensures the old resource name and address space are released so the new resource can request them. However, this pattern causes temporary service downtime.
Using create_before_destroy = true within a resource block reverses this sequence:
resource "bare_metal_server" "app_node" {
  hostname      = "node-primary-01"
  instance_type = "c3.large"

  lifecycle {
    create_before_destroy = true
  }
}
In the code example above:
- Terraform provisions the new
bare_metal_serverresource first. - Server-reliant dependencies like load balancer target groups can incorporate the new instance while the old instance remains active.
- Once Terraform successfully provisions the replacement resource and reports it healthy, it decommissions and destroys the legacy resource.
Note: If the infrastructure provider requires unique resource names or explicit primary address assignments, provisioning the replacement prior to destroying the original may cause naming collisions unless names include unique suffixes or dynamic variables.
prevent_destroy: Safeguarding Mission-Critical Bare Metal Resources
Accidental deletion of core infrastructure elements like bare metal hypervisors, primary database nodes, or persistent storage arrays may severely impact the infrastructure operation. Setting the prevent_destroy argument to true introduces a useful safeguard:
resource "bare_metal_database_host" "production_db" {
  server_id = "bm-db-prod-001"
  storage_gb = 4096

  lifecycle {
    prevent_destroy = true
  }
}
If an execution plan requires deleting this resource through a terraform destroy command, a configuration removal, or a replacement-forcing immutable attribute modification, Terraform stops execution and outputs an error before modifying any infrastructure.
Decommissioning a resource protected by prevent_destroy requires removing the meta-argument from the configuration file or setting it to false before running the destroy pipeline.
ignore_changes: Managing External Drift and Dynamic Parameters
External processes often dynamically assign or update resource attributes, such as autoscale capacity adjustments and dynamically assigned hardware IDs outside of Terraform's control. By default, Terraform repeatedly attempts to revert the modifications to the values declared in code.
The ignore_changes argument allows the user to list attribute paths that Terraform must ignore during drift evaluation:
resource "bare_metal_server" "edge_compute" {
  hostname = "edge-01"
  tags     = var.server_tags

  lifecycle {
    ignore_changes = [
      tags["last_inspected_timestamp"],
      boot_firmware_version,
    ]
  }
}
Assigning ignore_changes = all instructs Terraform to create the resource, but to ignore all attribute drift across the entire resource lifecycle.
replace_triggered_by: Forcing Re-Creation Based on Upstream Dependency Changes
Resources often need to be fully re-provisioned if a supporting dependency changes, even if the resource's declared attributes are not modified. The replace_triggered_by meta-argument allows the user to list references to other resources or resource attributes:
resource "bare_metal_network_config" "core_vlan" {
  vlan_id = 204
}

resource "bare_metal_server" "compute_node" {
  hostname = "compute-worker-01"

  lifecycle {
    replace_triggered_by = [
      bare_metal_network_config.core_vlan.vlan_id
    ]
  }
}
In the example above, if bare_metal_network_config.core_vlan.vlan_id is updated or replaced, Terraform automatically marks bare_metal_server.compute_node for replacement, enforcing coupled lifecycle updates.
Preconditions, Postconditions, and Custom Lifecycle Checks
Terraform allows for custom condition checks within the lifecycle block to ensure reliable execution before resource modification or after resource provisioning.
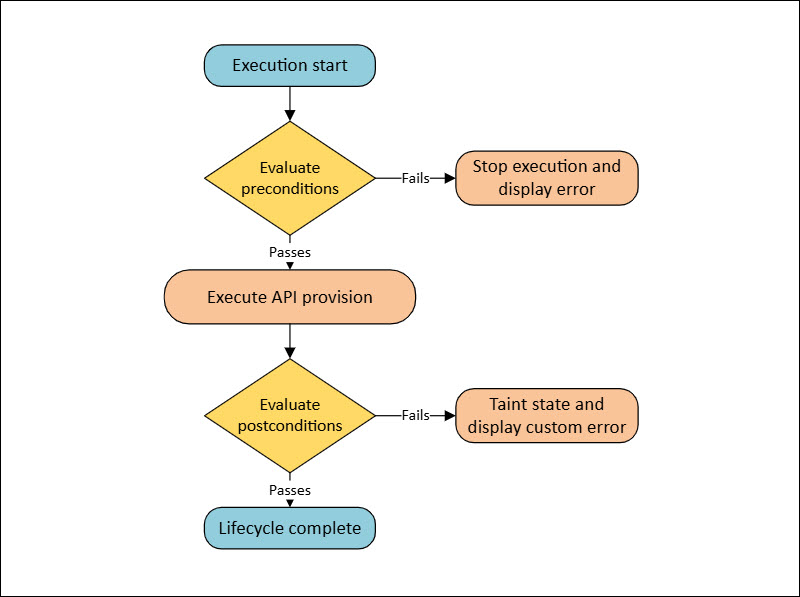
Validating Input Assumptions Before Provisioning (precondition)
A precondition block contains a boolean expression that Terraform evaluates before the creation or update phase for a resource. If the expression is false, provisioning stops, preventing invalid resource configurations from submitting API requests.
resource "bare_metal_server" "app_host" {
  instance_type = var.node_size

  lifecycle {
    precondition {
      condition     = contains(["bm.c1.large", "bm.m1.xlarge"], var.node_size)
      error_message = "Selected node_size must be an enterprise-certified bare metal SKU."
    }
  }
}
Preconditions can include upstream resource attributes, variable values, or local calculations.
Verifying Resource Health and State After Creation (postcondition)
A postcondition block contains an expression that Terraform evaluates after the provider API provisions or updates the target resource. Preconditions let Terraform query attributes that were unknown before execution, such as assigned IP addresses, telemetry values, or hardware status flags.
resource "bare_metal_server" "storage_node" {
  hostname = "store-01"

  lifecycle {
    postcondition {
      condition     = self.hardware_status == "HEALTHY"
      error_message = "The bare metal host was provisioned, but initial POST diagnostics reported a hardware fault."
    }
  }
}
If a postcondition fails, Terraform throws an error and stops execution that relies on the faulty resource.
Raising Custom Error Messages for Failed Lifecycle Checks
Both precondition and postcondition blocks require an error_message attribute. When writing custom error messages:
- State the condition that failed.
- Provide details about the observed or prohibited value if possible.
- Identify next steps for the operator.
Terraform
lifecycle {
  precondition {
    condition     = var.allocated_gb >= 500
    error_message = "Provisioning rejected: Allocated storage must be at least 500 GB for RAID-10 configuration compliance."
  }
}
Practical Examples with Bare Metal Cloud Rollouts
Constraints such as network interface bindings, location-specific availability zones, and immutable hardware configurations are specific to bare metal cloud deployments. The following examples show how to execute some Terraform functions in this environment.
Note: phoenixNAP Bare Metal Cloud offers high-performance, non-virtualized compute with native Terraform provider support for automated server and network provisioning.
Provisioning Bare Metal Cloud Instances with create_before_destroy
When upgrading hardware firmware profiles or network interface bindings on phoenixNAP Bare Metal Cloud instances, simple in-place modifications are rarely supported by the underlying physical controller. Use create_before_destroy to preserve availability across a bare metal cluster:
variable "target_os" {
  type    = string
  default = "ubuntu-2204"
}

resource "pnap_bare_metal_server" "web_worker" {
  hostname    = "web-metal-01"
  os          = var.target_os
  type        = "s1.c1.medium"
  location    = "PHX"
  description = "Production Web Server"

  lifecycle {
    create_before_destroy = true
  }
}
When var.target_os or type is updated:
- Terraform requests a new server instance from the API in the Phoenix (
PHX) location. - The new server boots, completes OS installation, and reports an active status.
- Terraform targets the original instance for deprovisioning and releases it back to the hardware pool.
Attaching Network Interfaces & Elastic IPs Without Interruption
BMC instances use private subnets and public network allocations. To ensure network connectivity when reassigning public IP addresses or network configurations across physical hardware, maintain precise execution order:
resource "pnap_public_network" "web_network" {
  name        = "Public Web Network"
  location    = "PHX"
  vlan_id     = 100
  cidr_block  = "182.16.0.0/24"
}

resource "pnap_bare_metal_server" "app_node" {
  hostname    = "app-metal-01"
  os          = "ubuntu-2204"
  type        = "s1.c1.medium"
  location    = "PHX"

  network_configuration {
    private_network_configuration {
      configuration_type = "USER_DEFINED"
      private_networks {
        server_private_network {
          id           = pnap_public_network.web_network.id
          ips          = ["182.16.0.10"]
          dhcp_assigned = false
        }
      }
    }
  }

  lifecycle {
    # Ignore dynamic cloud-side network status tags or last-inspected timestamps
    ignore_changes = [
      tags["last_inspected_timestamp"]
    ]
  }
}
Validating OS Readiness via Health Check postcondition Blocks
BMC instances require time to complete hardware POST checks, initialize RAID configurations, and execute network operating system installation scripts. An API status returning PROVISIONED indicates physical allocation, but readiness checks ensure the host is fully initialized.
Use a postcondition block to validate operating system provisioning:
resource "pnap_bare_metal_server" "database_node" {
  hostname    = "db-metal-prod-01"
  os          = "ubuntu-2204"
  type        = "d1.m1.large"
  location    = "PHX"

  lifecycle {
    postcondition {
      condition     = self.status == "POWERED_ON" && self.primary_ip_address != ""
      error_message = "Host provisioning completed, but server failed to power on or assign a valid primary IP address."
    }
  }
}
Decommissioning Legacy Bare Metal Hardware Safely
When decommissioning physical hardware, deleting storage volumes immediately risks permanent data loss. Use prevent_destroy on persistent storage attachments with explicit constraints to ensure safe decommissioning workflows:
resource "pnap_storage_network" "data_array" {
  name        = "Production Storage Array"
  location    = "PHX"
  volume {
    name      = "db-volume-01"
    capacity_gb = 5000
    path      = "/mnt/data"
  }

  lifecycle {
    prevent_destroy = true
  }
}

resource "pnap_bare_metal_server" "legacy_host" {
  hostname    = "old-metal-node"
  os          = "ubuntu-2004"
  type        = "s1.c1.small"
  location    = "PHX"

  lifecycle {
    precondition {
      condition     = var.decommission_approved == true
      error_message = "Hardware destruction halted: var.decommission_approved must be set to true prior to removing this host."
    }
  }
}
Troubleshooting Resource Lifecycle Issues
The sections below describe and offer remediation tips for the most common resource lifecycle issues in Terraform.
Resolving Dependency Cycles and Destruction Order Deadlocks
Dependency cycles occur when Resource A depends on Resource B for creation, but ordering constraints require Resource B to depend on Resource A during destruction. This is commonly caused by introducing create_before_destroy = true downstream without adding the same directive upstream.
To resolve the issue:
- Trace implicit dependencies such as
server_id = bare_metal_instance.node.id. - If a child resource contains
create_before_destroy = true, all parent resources referenced by that child need to havecreate_before_destroy = true. - Consider temporarily applying explicit execution flags, e.g.,
terraform apply -target=[target], to manually handle complex state migrations.
Handling Partial Failures and Tainted Resource States (terraform apply Errors)
If an API timeout, network drop, or postcondition failure happens halfway through execution of a resource operation, Terraform marks the resource as tainted or records a partial state. The physical resource exists in the provider environment, but its initialization script or lifecycle check failed.
During the next terraform apply, Terraform automatically schedules tainted resources for complete destruction and re-creation. If the resource is physically operational and there is no need to re-create it, remove the tainted flag manually via state management.
To force replacement if needed, use the following command:
terraform apply -replace="bare_metal_instance.worker_node"To retain the existing resource, enter:
terraform untaint bare_metal_instance.worker_node # Correct the underlying issue (such as adjusting API timeouts or fixing bootstrap scripts) before running the next plan.
Recovering from Stuck Destruction Events or Hanging API Operations
Destruction events can hang indefinitely if the upstream controller fails to release hardware locks, storage attachments, or network ports. To resolve this issue:
- Terminate the hanging execution by using Ctrl + C once to cancel gracefully. Avoid repeated SIGKILL requests to prevent state file corruption.
- Check if the provider destroyed the remote object despite the client command hanging.
- If the real-world infrastructure was deleted or requires out-of-band cleanup via vendor administrative tools, remove the dangling record from the Terraform state by using the command below:
terraform state rm bare_metal_instance.hung_node- Avoid orphaned infrastructure charges by verifying through provider control panels or direct API queries that the physical hardware is released.
Debugging Unexpected Re-Creations with terraform plan Detailed Diff Output
When Terraform unexpectedly schedules a resource for replacement, isolate the specific attribute triggering the forced replacement. Execute the terraform plan command with output generation:
terraform plan -out=tfplan.binary
terraform show tfplan.binary
In the output, search for the # forces replacement annotation on individual attributes:
 # bare_metal_server.compute_node will be replaced
  ~ resource "baremetal_server" "compute_node" {
        id            = "bm-8823194"
      ~ user_data     = "a8f3b..." -> "c9d1e..." # forces replacement
        hostname      = "worker-01"
    }
If user_data changes trigger unwanted host replacements, use ignore_changes = [user_data] within the resource block. Alternatively, break inline initialization scripts out into separate configuration management steps (such as Ansible or cloud-init external tasks) and separate server lifecycle from initial OS configuration data.
Best Practices for Resource Lifecycle Management
Below is a list of best practices for managing Terraform resource lifecycle:
- Audit replacement indicators early. Review execution plans strictly for
~ createreplacement actions before approving execution pipelines in production. - Prevent dependency cycle deadlock errors. Apply
create_before_destroy = trueconsistently up the dependency chain. - Protect immutable data layers. Place
prevent_destroy = trueon storage volumes, core database servers, and stateful hardware attachments to prevent catastrophic execution plan errors. - Apply narrow scope to drift exclusions. Limit
ignore_changesto specific sub-attributes rather than assigning all, preserving visibility over critical resource parameters. - Enforce health validation via postconditions. Implement postconditions on bare metal and network deployments to confirm true operational readiness beyond initial API HTTP 200 responses.
- Clearly document custom error messages. Write actionable error strings in
preconditionblocks to provide immediate operational context during pipeline failures. - Maintain clean separation of concerns. Eliminate unnecessary resource replacements by isolating transient node bootstrap parameters from permanent infrastructure code.
Conclusion
After reading this article, you are better acquainted with the properties of a Terraform resource lifecycle. The article showed how to control the lifecycle, introduced key arguments, and provided tips for managing it and troubleshooting potential issues.
Next, read our guide on Terraform resources.