Terraform manages infrastructure components by using abstract objects called resources. Each resource represents a physical item, like a server or a network interface, or a logical concept such as a DNS record or an email account.
This article will provide a comprehensive overview of Terraform resources, their use cases, and troubleshooting steps for common errors.
What Is a Terraform Resource?
A resource is an essential building block in HashiCorp Terraform. It represents physical or logical objects such as virtual machines, networking security groups, DNS records, or storage buckets.
Managed through HashiCorp Configuration Language (HCL) declarative code, a resource block defines the infrastructure component type and its desired state through configurable arguments like region, size, and access permissions.
The engine works with provider APIs to ensure the desired state defined in resource blocks matches the actual infrastructure. Terraform creates, updates, or destroys these components as needed, storing their metadata and current state in a persistent terraform.tfstate file. This allows users to:
- Track modifications.
- Automatically maintain relationships between resources.
- Use Infrastructure as Code to manage complex configurations.
Declarative Paradigm vs. Imperative Scripts
Imperative scripts require users to plan every deployment step. The user must write explicit code to check if a resource already exists, manage retry loops for failed API calls, and order each operation. If a script runs more than once, it can break or create duplicate resources since it only knows how to execute sequential commands, not understand the intention.
With declarative syntax, the user provides the final target infrastructure state rather than writing a step-by-step execution workflow. Declarative syntax allows the engine to calculate execution paths. Declarative blocks provide Terraform with the information to construct a Directed Acyclic Graph (DAG). Graph analysis identifies tasks for parallel creation and enforces strict creation sequences for dependent components.
How Terraform Tracks Physical vs. Desired State
Terraform manages infrastructure by assessing three layers:
- Desired state in TF configuration files containing the state for infrastructure to reach.
- Known state in the terraform.tfstate JSON file, a mapping database that connects HCL code to cloud API IDs.
- Physical/actual state, i.e., the live resources running in the cloud provider.
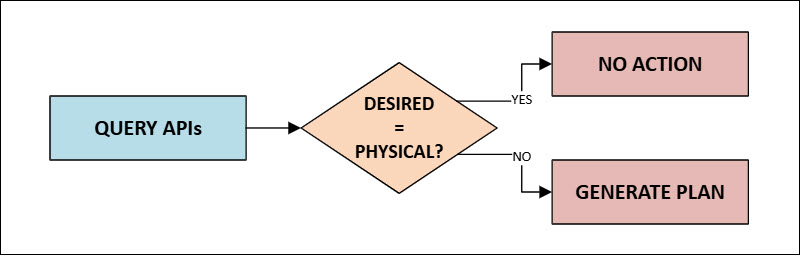
When the user runs terraform plan or terraform apply, the platform executes a 3-step reconciliation pipeline:
1. Terraform queries cloud provider APIs using the resource IDs stored in terraform.tfstate. It updates its in-memory state representation with the real live-resource configuration.
2. The platform compares the desired configuration against the in-memory state:
- If the desired configuration equals the physical configuration, Terraform takes no action.
- If desired does not equal physical (e.g., drift occurred), Terraform creates an execution plan and proposes create, update, or destroy operations.
3. Terraform calls the provider's API to perform the changes. Once the cloud API confirms the change was successful, Terraform updates terraform.tfstate to reflect the new state.
Anatomy and Syntax of a Resource Block
The resource block is the basic building block of Terraform infrastructure. Every resource block describes a piece of infrastructure (such as a bare metal server, a network, or an IP block) and specifies its target configuration using standard HCL syntax.
Every resource block starts with the resource keyword and two string parameters (the resource type and the local resource name) followed by a block body in curly braces ({}).
For example:
resource "pnap_server" "app_node" {
  hostname    = "app-node-01"
  description = "Application server node"
  location    = "PHX"
  type        = "s1.c1.medium"
  os          = "ubuntu/bionic"

  ssh_keys = [
    "ssh-rsa AAAAB3NzaC1yc2EAAAADAQABAAABAQ..."
  ]
}
Resource Types and Provider Namespaces
The resource type is the first parameter after the resource keyword. The string informs Terraform which cloud service or API entity to create and specifies which provider plugin manages it.
Resource types use the following naming convention:
[provider]_[type]For example, in the pnap_server type, pnap indicates the phoenixNAP provider plugin, while server stands for a Bare Metal Cloud server instance.
Providers are explicitly declared in the required_providers block, which maps custom namespaces to short prefixes. The prefix pnap in the example below corresponds to the declared provider name:
terraform {
  required_providers {
    pnap = {
      source  = "phoenixnap/pnap"
      version = "~> 1.0"
    }
  }
}

resource "pnap_server" "web" {
  hostname    = "web-server-01"
  location    = "ASH"
  type        = "s1.c1.small"
  os          = "ubuntu/focal"
}
The second resource block parameter is the local resource name. It exists only within HCL code and the state file and is not the hostname or server ID assigned to the bare metal server.
The resource type and local name produce a unique address for the resource (e.g., pnap_server.app_node).
Local Resource Naming Best Practices
The following tips provide advice on how to name local resources to ensure legibility and unambiguity:
- Do not reuse the resource type name inside the local name, i.e., use
resource "pnap_private_network" "db_backend"instead ofresource "pnap_private_network" "db_backend_network". Repeated types create redundant addresses likepnap_private_network.db_backend_network. - Use only lowercase letters, numbers, and underscores. Avoid hyphens (
-), spaces, or camelCase in local identifiers, since snake_case is recognized as a standard HCL convention. - If a module controls a single primary resource (such as a module designed specifically to deploy a single private network), name the resource
mainorthis(e.g.,pnap_private_network.this). - Prioritize names that show the resource's structural purpose rather than environment specifics. Use
pnap_server.primary_dbrather thanpnap_server.prod_db, since this simplifies the code reuse across staging and production environments.
Arguments vs. Attributes
Inside the resource block body, the user manages data using arguments and attributes. While both are resource properties, they have different purposes in the execution lifecycle:
An argument (e.g. type = "s1.c1.medium") is a configuration value passed into the resource block to define how to create it. The user sets arguments, or Terraform calculates them from local variables/inputs. They are available before terraform apply is executed.
An attribute (e.g. public_ip_addresses = ["182.16.0.12"]) is a value generated by the provider API after the resource is created or read. The remote API sets it as read-only, and it is not available until the API processes the creation request.
Note: You can reference attributes exported by one resource directly as arguments inside another resource block.
The Resource Lifecycle and State Transitions
Understanding how code becomes physical assets and how Terraform tracks them helps explain how Terraform manages infrastructure across its lifespan.
Core CRUD Cycle in Infrastructure as Code
Terraform manages infrastructure resources through the four standard database operations: Create, Read, Update, and Delete (CRUD). However, in IaC, the user declares these actions rather than executing them as manual API calls:
- Create. When a new resource block (e.g., pnap_server.app_node) is added to TF files, Terraform issues a
POSTrequest to the provider API to provision hardware, create IP addresses, and deploy the operating system. - Read. Before planning execution, Terraform issues
GETrequests to provider endpoints and queries the current status, IP assignments, power states, and attached networks for tracked resources. - Update. When arguments in the TF file change (e.g., server metadata or tags), Terraform issues
PATCHorPUTAPI calls to modify the live resource without taking it offline. - Delete. When a resource block is removed from TF code, Terraform sends a
DELETEAPI call to release the server or unallocate the IP block, updating state to reflect its removal.
In-Place Updates vs. Destructive Recreation
Not all changes to a TF file can be applied to a running server or network. The provider schema designates every argument as either updatable in-place or requiring replacement.
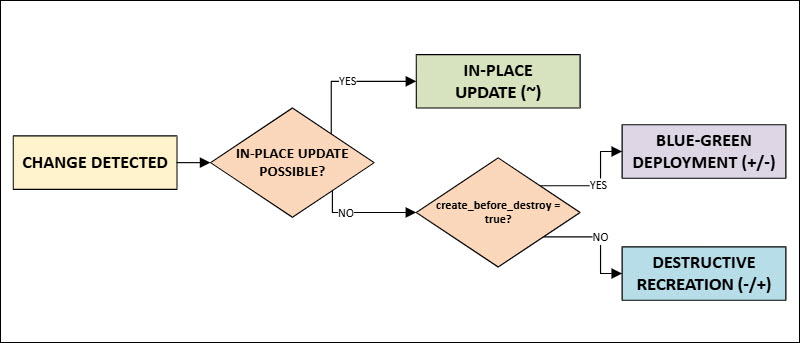
In-place updates (~) occur when fields can be modified via API calls without affecting the physical hardware (e.g., changing the description or updating network bandwidth limits).
Terraform uses the API to modify the resource directly. The server stays online, and its identifiers (like server ID and primary IP) do not change.
Destructive recreation (-/+) is performed when Terraform cannot modify physical hardware properties while the machine is running. This includes changing the location (e.g., from PHX to ASH), changing the server type (e.g., from s1.c1.small to s2.c2.large), or changing the base OS.
Since bare metal hardware cannot instantly migrate across data centers or change CPU architectures in-place, Terraform marks the resource for replacement in two steps:
- Deprovision the existing bare metal server (-).
- Provision a new server matching the new specification (+).
The process wipes data stored locally on non-persistent drives and generates new IP addresses/identifiers.
Real-World State Drift and Refreshing
Infrastructure drift happens when the physical infrastructure state deviates from the code or the terraform.tfstate file. Drift can occur due to:
- Manual changes (e.g., a user reboots or deletes a server via the phoenixNAP BMC Portal).
- External API actions or automated systems that modify resources outside of Terraform.
- Hardware failures in the data center.
Whenever the user runs terraform plan or terraform apply, Terraform executes an automatic refresh. The platform can recognize two drift-related scenarios:
- A resource has been modified outside Terraform. If a user manually modifies a server's hostname, the refresh step fetches the new value. Terraform compares it to the TF file, detects a mismatch, and produces a plan to revert the hostname back to the code definition.
- Resource has been removed outside Terraform. For a manually deleted server, the refresh step receives a 404 Not Found API response. Terraform removes the resource from its state file and plans a create operation to rebuild it.
Understanding the Resource State Ledger
The terraform.tfstate file is the definitive ledger that maps logical HCL code definitions to physical or abstract API entities. Without it, Terraform would not be able to map a server in the account to a resource.
Essential elements of a ledger are:
- id (e.g., 60a1d8c12543b35d46880142). The unique identifier assigned by the provider. The field provides Terraform with the API endpoints to query when refreshing or updating.
- Attributes mapping. Maps provider-assigned outputs (
public_ip_addresses,status) and allows other resources to reference them via expressions likepnap_server.app_node.public_ip_addresses[0]. - Resource address. The combination of type and name (
pnap_server.app_node) maps the HCL code block directly to its state entry.
Implicit and Explicit Resource Dependencies
Terraform automatically calculates the order of creating, updating, or deleting infrastructure. Instead of executing code sequentially from top to bottom, the platform processes relationships between resource blocks to ensure upstream components exist before downstream resources try to attach to them.
Automatic Dependency Mapping via Expressions
Terraform resource dependencies are mostly implicit. The platform automatically defines an implicit dependency when a resource block references an attribute exported by another resource block, then applies the following interpolation syntax:
[resource_type].[name].[attribute]When Terraform detects a reference, it concludes that the downstream resource needs output data from the upstream resource, so it forces the upstream resource to complete provisioning first.
The example below shows an upstream resource created first to generate a CIDR block and ID. The downstream resource depends on pnap_ip_block.app_ips because it references its id attribute in the argument body:
resource "pnap_ip_block" "app_ips" {
  location = "PHX"
  cidr     = "182.16.0.0/28"
}

resource "pnap_server" "app_node" {
  hostname    = "app-node-01"
  location    = "PHX"
  type        = "s1.c1.medium"
  os          = "ubuntu/focal"
  ip_block_id = pnap_ip_block.app_ips.id
}
Terraform creates pnap_ip_block.app_ips first, waits for APIs to return its assigned ID, and then sends the API request to provision pnap_server.app_node. When running terraform destroy, the platform automatically reverses the sequence, deprovisioning pnap_server.app_node before deleting pnap_ip_block.app_ips.
Overriding Order with the Depends On Meta-Argument
Some cases involve two resources that do not share direct HCL attribute references but depend on each other at an operational or networking level. Implicit mapping cannot detect the requirement, leading to provisioning race conditions or API authorization errors.
The depends_on meta-argument establishes an ordering between resource blocks. The example below uses depends_on to force Terraform to wait for the private network allocation even though no attribute of pnap_private_network is directly referenced:
resource "pnap_private_network" "backend" {
  name     = "backend-network"
  location = "PHX"
  location_default = false
  cidr     = "10.0.0.0/24"
}

resource "pnap_server" "gateway" {
  hostname = "gateway-node"
  location = "PHX"
  type     = "s1.c1.small"
  os       = "ubuntu/focal"

  depends_on = [
    pnap_private_network.backend
  ]
}
Use depends_on to:
- Wait for a private network or SSH firewall rule to finish provisioning before creating dependent servers.
- Ensure an IAM policy or API key resource is active before launching reliant services.
- Delay execution until the completion of an out-of-band bootstrap process.
Analyzing the Directed Acyclic Graph
Under the hood, Terraform builds a DAG to represent every resource, provider, and variable in the module.
Nodes stand for individual resources, data sources, or provider configurations (e.g., pnap_server.app_node). Edges show dependency relationships, pointing from dependent resources to their prerequisites.
The graph must not contain circular dependencies (e.g., Resource A depends on Resource B while Resource B depends on Resource A). If such a cycle exists, Terraform stops with a Cycle Error.
Scaling Deployments with Resource Meta-Arguments
Terraform provides built-in meta-arguments to avoid writing repetitive HCL resource blocks when creating multiple servers or networks. Using count and for_each, users can dynamically scale infrastructure pools based on lists, integer counters, or complex maps.
Iteration via count for Identical Pools
The count meta-argument takes an integer and instructs Terraform to create that many identical resources. Inside the resource block, access the zero-based index using the count.index object.
For example:
variable "worker_count" {
  type    = number
  default = 3
}

resource "pnap_server" "worker_node" {
  count       = var.worker_count
  hostname    = "k8s-worker-0${count.index + 1}"
  description = "Kubernetes worker node #${count.index + 1}"
  location    = "PHX"
  type        = "s1.c1.medium"
  os          = "ubuntu/focal"
}
The platform stores resources created with count as an ordered array in state. Address specific instances by their index position: pnap_server.worker_node[0], pnap_server.worker_node[1], etc. Capture attributes across all created instances at once using the splat expression below:
pnap_server.worker_node[*].public_ip_addressesIteration via for_each for Complex Maps
The for_each meta-argument accepts a set of strings or a key-value pair map. It creates an instance for every element in the collection and allows access to the current item via the each.key and each.value objects.
variable "server_fleet" {
  type = map(object({
    location    = string
    server_type = string
    os          = string
  }))
  default = {
    "web-frontend" = { location = "PHX", server_type = "s1.c1.small",  os = "ubuntu/focal" }
    "app-backend"  = { location = "ASH", server_type = "s1.c1.medium", os = "ubuntu/focal" }
    "db-primary"   = { location = "PHX", server_type = "s2.c2.large",  os = "ubuntu/focal" }
  }
}

resource "pnap_server" "fleet" {
  for_each = var.server_fleet

  hostname    = each.key
  location    = each.value.location
  type        = each.value.server_type
  os          = each.value.os
  description = "Node for ${each.key}"
}
Resources created with for_each are indexed by their string keys: pnap_server.fleet["web-frontend"], pnap_server.fleet["db-primary"].
Choosing Between Count and For Each for Server Fleets
While count is simpler to set up, using it for non-identical or dynamic resources can cause unplanned infrastructure destruction. The table below compares the two methods:
| count (numeric indexing) | for_each (key-based indexing) | |
|---|---|---|
| Best use case | Interchangeable worker pools (e.g., scale-out stateless web nodes). | Distinct servers with unique configurations, regions, or roles. |
| State addressing | pnap_server.node[0], pnap_server.node[1] | pnap_server.node["db-primary"] |
| Item removal risk | High. Removing an item from the middle of a list shifts all higher indices, causing Terraform to destroy and recreate remaining resources. | None. Removing a key from a map targets only the specific instance without altering other nodes. |
| Flexibility | Limited to homogeneous parameters or simple list lookups. | Supports multi-attribute maps, nested objects, and custom keys. |
Conditional Creation Logic
Use the following syntax that combines count and HCL ternary operators to create a condition for creating or skipping a resource block.
[condition] ? [true_val] : [false_val] Setting count to 1 provisions the resource, while count = 0 skips provisioning. In the example below, the variable enable_backup_server is set to false by default and acts as an on/off switch for deploying a standby node. Terraform evaluates the variable and creates a server only if it is set to true:
variable "enable_backup_server" {
  type        = bool
  default     = false
  description = "Set to true to deploy a dedicated standby bare metal node."
}

resource "pnap_server" "standby_node" {
  count = var.enable_backup_server ? 1 : 0

  hostname = "standby-node-phx"
  location = "PHX"
  type     = "s1.c1.medium"
  os       = "ubuntu/focal"
}
Given that a conditional resource evaluates to an array of length 0 or 1 in state, users can access its attributes safely using one() or splat syntax. The following code returns null if disabled, or the IP address if enabled:
output "standby_ip" {
  value = one(pnap_server.standby_node[*].public_ip_addresses[0])
}
Advanced Lifecycle Controls for Server Safety
The lifecycle block in Terraform overrides the platform's default resource execution behaviors. Lifecycle rules protect against catastrophic data loss, help achieve zero-downtime updates, and suppress false-positive drift warnings.
Preventing Accidental Server Destruction
When Terraform replaces a bare metal server, it wipes attached local storage and reprovisions it. The prevent_destroy meta-argument is a safety feature that prevents Terraform from destroying critical servers through an intentional terraform destroy or an accidental configuration change that has destructive consequences.
The example below shows syntax for applying the prevent_destroy meta-argument:
resource "pnap_server" "database_primary" {
  hostname = "db-primary-phx"
  location = "PHX"
  type     = "s2.c2.large"
  os       = "ubuntu/focal"

  lifecycle {
    prevent_destroy = true
  }
}
If a planned execution contains a destroy action for the example resource, Terraform will halt during terraform plan with an error before any changes are applied. To intentionally remove the server, the user must first set prevent_destroy = false in the HCL code (or remove the block), apply the code update, and then perform the destruction step.
Blue-Green Deployments via Create Before Destroy
By default, when a configuration change requires replacing a resource (such as when changing a server OS or physical location), Terraform's default sequence is:
1. Deprovision the existing server.
2. Provision the replacement server.
This default sequence causes inevitable downtime. The create_before_destroy rule switches the steps to support zero-downtime blue-green deployments:
resource "pnap_server" "web_node" {
  hostname = "web-frontend-v2"
  location = "PHX"
  type     = "s1.c1.medium"
  os       = "ubuntu/focal"

  lifecycle {
    create_before_destroy = true
  }
}
The resource replacement sequence is now:
1. Provision the new server.
2. Perform a health check / DNS switch.
3. Delete the old server.
The following diagram shows the decisions on the update type Terraform makes when it detects a change:
Note: If the resource depends on constrained attributes (such as fixed hostnames or static public IPs), create_before_destroy fails unless the attributes are dynamically parameterized (e.g., with random suffixes or unique hostname keys).
Ignoring Cloud Infrastructure Drift
External processes (i.e., automated maintenance scripts, emergency admin actions, or monitoring agents) frequently manage live server metadata outside of Terraform. The ignore_changes rule prevents Terraform from attempting to resolve expected drift during execution runs.
The following example tells Terraform to ignore if the last_patched tag changes:
resource "pnap_server" "app_node" {
  hostname    = "app-node-01"
  description = "Managed app node"
  location    = "PHX"
  type        = "s1.c1.medium"
  os          = "ubuntu/focal"

  tags = {
    environment = "production"
    last_patched = "2026-01-15"
  }

  lifecycle {
    ignore_changes = [
      tags["last_patched"],
      description
    ]
  }
}
The ignore_changes rule is commonly used to:
- Prevent Terraform from overwriting dynamic tags.
- Suppress changes to fields dynamically managed by external load balancers or scaling controllers.
- Lock the initial creation arguments and prevent Terraform from updating the live server, even after subsequent code changes (by passing
ignore_changes = all)
Refactoring and Moving Existing Resources
As infrastructure evolves, structural refactoring of configurations becomes inevitable. Routine operational tasks such as bringing unmanaged resources into Terraform, changing resource addresses, or detaching resources without destroying physical hardware require careful handling of the Terraform state ledger.
Importing Legacy Servers into Terraform Control
Terraform offers two main approaches to import existing infrastructure without destroying or re-creating live hardware: declarative import blocks and an imperative CLI approach.
The import block allows users to define import relationships in code. The imports are reviewable in pull requests and repeatable across team workflows.
The following example defines a resource configuration block and maps a server ID to an HCL address:
resource "pnap_server" "legacy_app" {
  hostname = "legacy-app-phx"
  location = "PHX"
  type     = "s1.c1.medium"
  os       = "ubuntu/focal"
}

import {
  to = pnap_server.legacy_app
  id = "6023d8c11543b35d84860123"
}
Running terraform plan produces a plan to bring the server into state. The terraform apply command then updates the terraform.tfstate ledger without interrupting the running server.
Alternatively, run the CLI command directly:
terraform import pnap_server.legacy_app 6023d8c11543b35d84860123After running an import, execute terraform plan immediately. If Terraform detects pending changes, update the TF argument values until terraform plan outputs the following message:
No changes. Your infrastructure matches the configuration.Refactoring Namespaces with moved Blocks
If a user renames a resource in code (e.g., from pnap_server.web to pnap_server.frontend) or moves a resource into a child module, Terraform plans a destructive recreation: destroying the old server and creating a new one.
The moved block instructs Terraform to just transfer state addresses during terraform plan.
The example below locally renames the pnap_server.web_node server block to pnap_server.frontend_primary:
resource "pnap_server" "frontend_primary" {
  hostname = "web-frontend-01"
  location = "PHX"
  type     = "s1.c1.medium"
  os       = "ubuntu/focal"
}

moved {
  from = pnap_server.web_node
  to   = pnap_server.frontend_primary
}
Alternatively, use the following code to move a standalone server into a child module:
moved {
  from = pnap_server.db_node
  to   = module.database.pnap_server.db_node
}
When terraform apply runs, Terraform updates the terraform.tfstate address bindings in-place without issuing cloud API calls, ensuring zero server downtime during code refactoring.
Removing Resources Safely Without Destroying Infrastructure
Deleting a resource block from a TF file causes Terraform to send a DELETE call during the next apply, wiping the server or unallocating the IP block. To stop Terraform from managing the resource and keep the physical infrastructure in place, remove the resource from the state file first.
The removed block allows users to safely declare infrastructure offboarding in code. For example:
removed {
  from = pnap_server.legacy_app

  lifecycle {
    destroy = false
  }
}
The destroy = false instruction guarantees that the physical server remains untouched.
Alternatively, to remove a resource binding manually via the CLI, use the following command:
terraform state rm pnap_server.legacy_appAfter executing the command, delete or comment out the resource "pnap_server" "legacy_app" block in your TF file.
Validating Resource State Safety Net
Terraform uses precondition and postcondition statements to offer a way to customize validation rules within resource lifecycle blocks. As automated guardrails, these conditions ensure inputs meet strict requirements before executing API changes, or verify that physical infrastructure works as expected after provisioning finishes.
Enforcing Rules with Preconditions
A precondition evaluates an expression before Terraform creates or updates a resource. If the precondition evaluates to false, Terraform stops execution immediately before sending any API calls.
The following example ensures database nodes are provisioned on high-performance server instances:
variable "server_type" {
  type    = string
  default = "s1.c1.medium"
}

resource "pnap_server" "database" {
  hostname = "db-master-01"
  location = "PHX"
  type     = var.server_type
  os       = "ubuntu/focal"

  lifecycle {
    precondition {
      condition     = startswith(var.server_type, "s2.")
      error_message = "Database servers must use newer generation 's2' series instance types to meet memory performance requirements."
    }
  }
}
Preconditions prevent invalid deployments and dangerous configurations, and validate cross-resource dependencies before provisioning hardware. They are evaluated during the planning phase or before the resource's execution phase and can evaluate input variables, attributes, or local values exported by upstream resources.
Guaranteeing Outcomes with Postconditions
A postcondition evaluates an expression after a resource is created or updated. Terraform sends the API call, inspects output attributes, and evaluates the condition.
If the postcondition is false, Terraform stops execution, marks the resource in state as tainted or partially configured, and prevents downstream resources from provisioning.
The example below uses postconditions to verify that the server received a valid public IP address upon allocation and that it reached an active, powered-on state:
resource "pnap_server" "app_node" {
  hostname = "app-node-01"
  location = "PHX"
  type     = "s1.c1.medium"
  os       = "ubuntu/focal"

  lifecycle {
    postcondition {
      condition     = length(self.public_ip_addresses) > 0 && self.public_ip_addresses[0] != ""
      error_message = "The server is created, but failed to allocate or assign a valid public IP address."
    }

    postcondition {
      condition     = self.status == "POWERED_ON"
      error_message = "Server provisioning completed, but the instance status is not POWERED_ON."
    }
  }
}
The postconditions are evaluated immediately after the cloud API call returns data to Terraform. They are ideal for operational health checks, IP allocation verification, or enforcing policy guarantees on API responses.
Note: Use the self object to inspect the newly exported attributes of the resource being provisioned (e.g., self.public_ip_addresses, self.status).
Troubleshooting Common Resource Errors
Managing physical bare metal via Terraform presents edge cases rarely seen in software-defined virtual environments. Targeted state management and CLI interventions are often needed to resolve provisioning deadlocks, handle partially configured hardware, and extend API execution.
Resolving Cyclical Dependency Deadlocks
A dependency cycle occurs when Terraform builds its DAG and finds two or more interdependent resources. Because Terraform cannot determine which resource to create first, execution halts immediately with a Cycle Error.
The usual causes for this deadlock include:
- Mutual cross-referencing. Resource X uses an attribute from Resource Y, while, at the same time, Resource Y references an attribute from Resource X.
- Overuse of
depends_on. Adding explicitdepends_onvalues where an implicit dependency already exists can form a loop back to an upstream resource.
Use the following troubleshooting steps to resolve the issue:
1. Read the error message carefully, as Terraform will explicitly trace the loop path.
2. Remove redundant depends_on blocks if implicit references are already present.
3. If two resources depend on each other's IDs, move the attachment into a dedicated binding resource (such as separating server creation from subnet/network association blocks).
Handling Orphaned and Tainted Resources
Bare metal server provisioning takes several minutes (allocating physical hardware, running PXE boot, setting up OS images), so execution can fail mid-provisioning due to a dropped connection, API timeout, or failed postcondition. When an operation is interrupted halfway through, the physical server may exist with the provider but be unconfigured or broken.
In older Terraform versions or when provisioner scripts fail, Terraform marks the resource as tainted in the state file. On the next terraform apply, Terraform removes and recreates tainted resources.
In modern Terraform (v0.15+), the taint CLI command is deprecated in favor of the -replace flag during planning. If a bare metal server is in a bad or orphaned state, force Terraform to recreate it on the next run by executing:
terraform plan -replace="pnap_server.app_node"If a server was marked tainted due to a network glitch, but the physical server is actually functional, untaint it to prevent Terraform from destroying it:
terraform apply -replace="pnap_server.app_node=false"Intercepting Provider API Timeout Exceptions
Bare metal operations (such as OS installation or hardware wiping during destruction) take longer than deploying lightweight cloud VMs. If the provider API takes longer to provision a server than the provider's default timeout window, Terraform aborts with an API timeout exception.
Customize time limits directly inside the resource block using the timeouts block:
resource "pnap_server" "database_cluster_node" {
  hostname = "db-node-01"
  location = "PHX"
  type     = "s2.c2.large"
  os       = "ubuntu/focal"

  timeouts {
    create = "45m"
    update = "30m"
    delete = "30m"
  }
}
This allows long-running bare metal deployments extra time to complete before Terraform raises an error.
If API calls are timing out or failing silently without error messages, set the TF_LOG environment variable to inspect raw HTTP requests and responses sent to the provider:
export TF_LOG=DEBUG
export TF_LOG_PATH="./terraform-pnap-debug.log"

terraform apply
Reviewing the log file reveals the exact HTTP status codes (e.g., 504 Gateway Timeout or 429 Too Many Requests) the API returns.
Conclusion
After reading this article, you have enough information to understand and use Terraform resources. The article discussed the structure of resource blocks, introduced important rules and arguments, and provided troubleshooting tips.
Next, learn about Terraform providers and how to use them in your workflow.