A Terraform state file is the single source of truth for dependencies, execution plans, and resource metadata. Terraform uses it to map real-world infrastructure resources to declarative configuration code.
Simultaneous attempts by users or automation pipelines to modify infrastructure may cause race conditions and metadata corruption. To keep the state file synchronized, Terraform uses a concurrency control mechanism called state locking.
This article discusses state locking, its mechanics, implementation, and troubleshooting.
What is Terraform State Locking?
State locking controls state data-modifying operations in Terraform. When a user or automated pipeline process executes a command like terraform apply, terraform destroy, or terraform import, Terraform locks the active backend. With the lock active, any other execution requests stop or terminate.
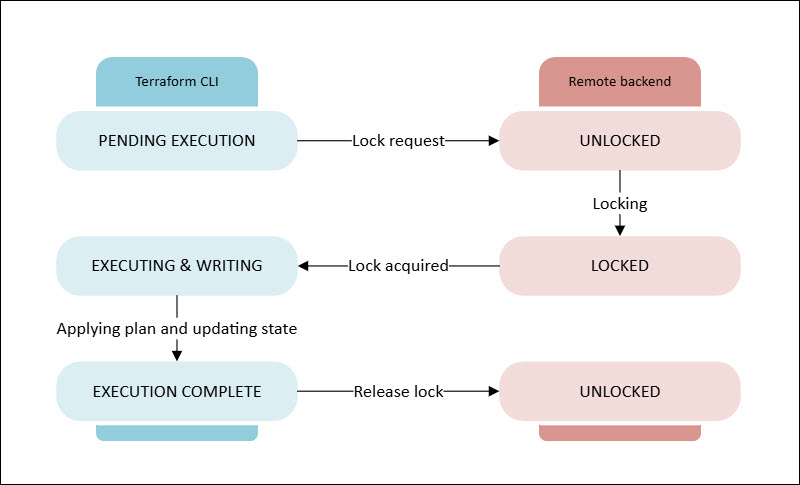
The handshake consists of the following steps:
- Terraform CLI creates a metadata payload with the details about the local execution (user, host, process ID, and timestamp). The payload is sent to the remote backend (e.g., an HTTP endpoint) to request exclusive access.
- After the backend confirms that there are no active locks for the provided state path, it creates the lock payload and sends the engine a unique Lock ID. The backend state file switches to a locked, protected status, and any concurrent operations are forced to fail or wait.
- The local engine receives exclusive access confirmation and processes the plan, i.e., it provisions or modifies resources via target cloud or bare metal APIs, and updates the local state. It waits for the API-related actions to finish, then sends the new state metadata back to the remote storage.
- The engine sends a release command with the Lock ID to the remote backend, which removes the lock object or clears the lock record and unlocks the state storage target for other users and operations.
The diagram below shows the handshake performed by the Terraform CLI execution engine running locally and the remote state storage backend.
Risks of Concurrent Execution and State Corruption
Concurrent executions of infrastructure changes without state locking may cause infrastructure drift and serious data corruption.
Two concurrent operations on the same state baseline independently process plans on resource changes. After the first process finishes, it sends its updated state to the storage backend and overwrites the baseline metadata. However, when the second process sends its data, it overwrites the changes recorded by the first process.
As a result, cloud resource state diverges from state records, and the process creates orphaned infrastructure components that are invisible to Terraform. Future operations fail or produce destructive replacement plans because active dependencies are concealed within the missing state metadata.
How Terraform Manages Lock Files Under the Hood
Terraform operates state locks via structured JSON payloads. When a user executes a command that modifies the state, the engine creates a unique lock ID based on the Universally Unique Identifier scheme. The engine creates a lock metadata payload with the lock ID, operation name, user identity, hostname, and creation time.
{
"ID": "e4a3b102-3c82-4f11-9a72-1c093a218f21",
"Operation": "OperationTypeApply",
"Info": "",
"Who": "deploy-agent@ci-node-04",
"Version": "1.7.0",
"Created": "2026-09-24T08:30:00.000Z",
"Path": "terraform.tfstate"
}
The engine sends the payload to the backend before any plan evaluations or API requests. The backend tries to write the lock to an atomic storage target that tracks lock status:
- If active lock data already exists, the backend rejects the write request and sends an error message with the details about the existing lock.
- If there is no active lock, the engine keeps the lock ID during execution and requests lock deletion in the final release step.
State Locking Mechanics Across Remote Backends
Different remote backends execute locking with different storage primitives and consensus protocols. Depending on the backend, locking may operate natively, rely on database engines, or use custom HTTP contracts.
Note: phoenixNAP's Bare Metal Cloud servers integrate seamlessly with Terraform, providing the fast, reliable disk I/O and network throughput for handling rapid state lock acquisitions and concurrent backend operations.
S3-Compatible Object Storage and Lockfile Support
Amazon Web Services S3 and compatible object storage platforms previously lacked native row-level write locking methods, forcing Terraform configurations to rely on Amazon DynamoDB tables. Today, Terraform implementations support S3 lockfile natively by using S3 conditional writes and object metadata checks.
| Feature / Backend Component | Amazon S3 (Native Lockfile) | AWS DynamoDB (Auxilliary Engine) |
|---|---|---|
| Lock storage creation | Same S3 bucket as state file (.tflock). | Dedicated DynamoDB lock table. |
| Atomic operation type | S3 conditional PutObject. | DynamoDB PutItem with attribute_not_exists. |
| Additional infrastructure | None. | Separate DynamoDB table provisioning. |
| Latency and performance | Low (Single-service interaction). | Low (Distributed key-value lookup). |
| Cost profile | Standard S3 API transaction costs. | DynamoDB read/write capacity units. |
When Terraform works with native S3 lockfiles, it writes a .tflock object that matches the state key path in the designated bucket. Before completing the upload, S3 checks whether an object exists at the lock key. If the object exists, S3 aborts the operation and prevents simultaneous state modifications.
HashiCorp Consul & Key-Value Backends
HashiCorp Consul uses distributed key-value store locks and session management to handle state locking natively. The Raft consensus algorithm guarantees strong consistency in distributed cluster nodes.
When a lock is requested, Consul intiates an active session bound to a health check mechanism. The Terraform Consul backend writes a key-value entry recording the state path and associating it with the active session ID.
Consul processes lock requests atomically through its Raft consensus engine. If a process crashes or loses network connectivity, Consul automatically cancels the session once the configurable time-to-live threshold is reached. This releases the lock and prevents permanent deadlocks across automated environments.
HTTP and Custom Remote State Endpoints
In custom remote state architectures, state locking is performed by using HTTPS to expose standardized RESTful API contracts. The HTTP backend translates lock requests into structured HTTP requests and transmits them to remote management servers. The backend server code handles the concurrency logic.
To request a lock, Terraform sends an HTTP LOCK request with the standardized lock metadata JSON string to the endpoint URL. The HTTP server checks the status of the lock:
- If no lock exists, the server returns HTTP status code
200 (OK)or201 (Created). - If another process already requested a lock, the server responds with HTTP status code
423 (Locked)and the current lock metadata payload.
To release a lock, an HTTP UNLOCK method request is sent alongside the active lock ID.
Local vs. Self-Hosted Backend Configurations
Local state storage utilizes mechanisms at the file system level to prevent concurrent file access during executions. On POSIX-compliant operating systems, the local backend uses system calls like fcntl or flock to lock the terraform.tfstate file. Local file locks prevent simultaneous state data modifications by multiple terminal sessions on the same host.
Note: Local file locking does not protect distributed teams or multiple execution hosts.
Self-hosted remote backends like enterprise Git platforms or internal S3-compatible object stores (MinIO) spread distributed locking rules across shared Infrastructure as Code workflows. To guarantee atomic conditional writes for lock files in self-hosted object stores, configure explicit consistency settings.
How to Configure and Customize Locking in Your Workflow
Use Terraform CLI options and environment variables to adjust lock-acquisition wait times, disable locks, or enable automatic retries.
Managing Waiting Queues with -lock-timeout
High-frequency execution pipelines often request state access at the same time. By default, Terraform throws an error immediately when it encounters an active lock, which can cause automated runs to fail frequently.
Use the -lock-timeout option to set up Terraform to wait for active locks to release:
terraform apply -lock-timeout=120sThe -lock-timeout=120s instructs the execution engine to periodically attempt lock acquisition for two minutes.
To prevent flooding backend endpoints, Terraform utilizes exponential backoff intervals between lock acquisition requests. If the lock is released during the configured wait time, the process acquires the lock and starts the execution. If the time expires, execution fails and Terraform throws a lock acquisition failure code.
Disabling State Locking with -lock=false
Executing commands with the -lock=false flag overrides lock acquisition checks:
terraform plan -lock=falseWarning: Disabling state locking during state-modifying operations is extremely risky. Never run state-modifying commands such as terraform apply or terraform state rm with lock=false in production.
Read-only commands like terraform plan allow temporary lock overrides when investigating deadlocks.
Configuring Automatic Retries in CI/CD Pipelines
Continuous integration platforms such as GitLab CI, GitHub Actions, and Jenkins demand structured retry strategies to prevent temporary lock contention from causing pipeline failures. Configure explicit retry limits to distinguish legitimate infrastructure errors from transient lock collisions.
The following example demonstrates retry limit configuration in GitHub Actions:
- name: Terraform Apply
  run: |
    terraform apply -auto-approve -lock-timeout=300s
  retry:
    max_attempts: 3
    delay: 10s
Use -lock-timeout with pipeline-level retry blocks to design a resilient automation workflow. The -lock-timeout option deals with brief lock overlaps, while pipeline retries resolve transient network drops between execution nodes and distributed lock tables.
Troubleshooting State Locks
Infrastructure disruptions can cause state locks to become stuck or orphaned. Read the troubleshooting tips below to diagnose and fix locked state files without risking state data corruption.
Common Causes of Orphaned Locks (Process Crashes, Network Timeouts)
Orphaned locks are caused by Terraform process terminating abruptly before executing the lock release sequence (e.g., if a process crashes, system kernel runs out-of-memory, or a terminal connection drops).
Other causes of orphaned locks are power outages and unhandled CI runner job cancellations. The backend does not receive information about the process death, so the lock object persists indefinitely until the user removes it or it auto-expires due to session time-to-live settings.
Locating the Lock ID Across CLI Output and Storage Buckets
An active lock causes execution to halt and produces an error message with full lock details. The standard error output contains LockID, which is required for manual unlock operations.
Error: Error acquiring the state lock

Error message: ConditionalCheckFailedException: The conditional request failed
Lock Info:
  ID:        e4b2b101-3c72-4e11-5a72-1c084a168d93
  Path:      terraform.tfstate
  Operation: OperationTypeApply
  Who:       deploy-agent@ci-node-04
  Version:   1.7.0
  Created:   2026-09-24 08:30:00.000000 +0000 UTC
  Info:
If access to terminal logs is restricted, find active lock records in the backend storage:
- Amazon S3 (Native). Search the target S3 bucket for a .tflock object that matches the target state key path.
- AWS DynamoDB. Check the lock table for items matching the state file path primary key.
- Consul key-value store. Query the Consul KV REST API at /v1/kv/site/state and check active session lock metadata.
- Custom HTTP backend. Inspect backend database records or query lock status endpoints directly using HTTP client tools.
Safely Executing terraform force-unlock
The terraform force-unlock command uses the specific Lock ID string to remove hanging locks from a backend. This command overrides safety locks, so verification is required prior to invocation.
terraform force-unlock e4b2b101-3c72-4e11-5a72-1c084a168d93Before running force-unlock, ensure that no underlying Terraform process is currently running against the state file. Check runner processes, active CI/CD pipeline executions, and communicate with the team.
Warning: Removing an active lock with an operation in progress causes severe state corruption and lost updates.
Manual Object Clearing and CLI Fallbacks
When terraform force-unlock fails because of corrupted backend records or network permission changes, it may become necessary to perform manual object clearing:
Warning: Direct backend intervention bypasses Terraform engine safeguards and requires extreme caution.
- Amazon S3: Delete the specific .tflock object directly using the AWS CLI or AWS Management Console:
aws s3 rm s3://my-terraform-state-bucket/env/production/terraform.tfstate.tflock- DynamoDB: Delete the lock item entry directly using the AWS CLI:
aws dynamodb delete-item
    --table-name terraform-lock-table
--key '{"LockID": {"S": "my-terraform-state-bucket/env/production/terraform.tfstate-md5"}}'- Consul: Destroy the stuck session using the Consul CLI:
consul session destroy [session_id]Note: To verify state file access and the integrity of metadata, always execute a dry-run terraform plan immediately after manual backend clearing.
Best Practices for Bare Metal Deployments
Follow the best practices below to ensure smooth state locking operation:
- Configure remote storage backends with strict serial consistency guarantees for all bare metal state management.
- Keep dedicated lock storage tables or buckets isolated from general app storage targets.
- Use
-lock-timeouton all automated CI/CD pipelines. - Utilize IAM policies to restrict manual state lock release permissions and stop accidental lock overrides.
- Create monitoring scripts to find orphaned state locks existing past defined duration thresholds.
- Maintain complete audit logs that contain state lock acquisitions, releases, and force-unlock commands.
- Use terraform plan to run automated validation pipelines after manual lock-clearing procedures.
Conclusion
This guide introduced you to Terraform state locking and provided tips for working with state locks. The article also covered backend lock mechanics, CLI configuration options, and safe force-unlock routines.
Next, read our guide on the Terraform .tf file, or learn about Terraform String Manipulation.