Windows Subsystem for Linux (WSL) is a Windows feature that allows you to run a Linux environment without a virtual machine. It provides access to a Linux shell and command-line tools and simultaneously integrates with the Windows file system.
WSL is available in two versions. WSL 1 translates Linux commands into Windows operations, while WSL 2 uses the Linux kernel and provides better performance and compatibility.
This guide will explain how to install, configure, and use WSL, and elaborate on key differences between Windows versions.
How to Install Windows Subsystem for Linux (WSL)
The installation process depends on the Windows version. In earlier Windows 10 releases, WSL was introduced as a limited feature and had to be enabled manually before installing a Linux distribution.
In newer versions, WSL is installed with a single command, and Linux distributions are installed automatically or through the Microsoft Store.
The following sections show how to install WSL on both newer and older Windows versions.
Modern Installation Method (Windows 11 and newer Windows 10 builds)
This method uses a built-in command that automates the entire setup process. It enables required system features and most often installs a Linux distribution. Therefore, no manual configuration is required before you start.
Use the following to install WSL with default settings:
wsl --install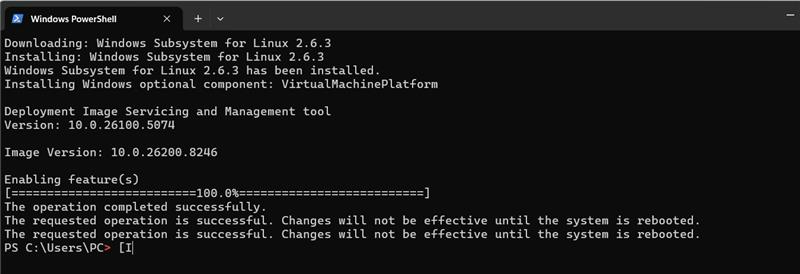
This command enables required Windows features, installs WSL 2, and attempts to install the default Linux distribution (Ubuntu).
Restart the system when prompted. After reboot, the distribution completes setup by creating a user account.
If no distribution is installed or you want to install a different distribution, first list available options.
wsl --list --online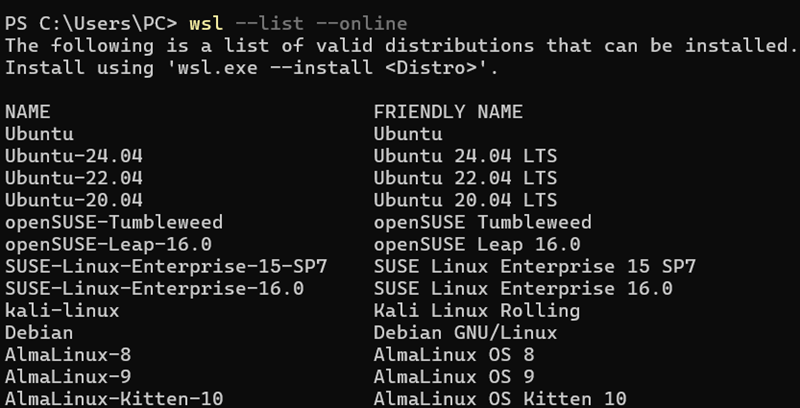
Use wsl --install -d [distribution_name] to install a specific distribution. For instance, to install Ubuntu, run:
wsl --install -d Ubuntu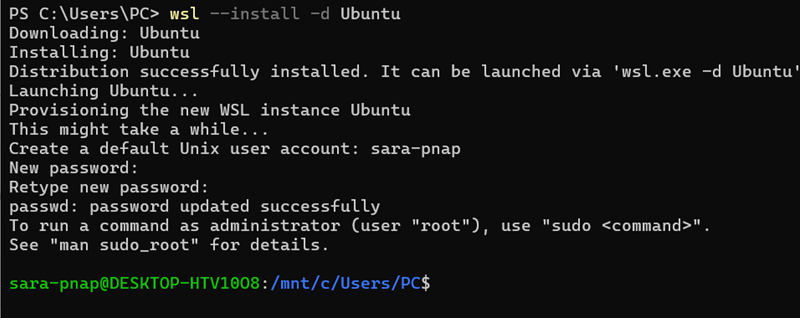
After installation, WSL opens a Linux shell where you run commands.
Alternatively, install a distribution from the Microsoft Store. Search for a Linux distribution, such as Ubuntu or Debian, and select Install.
Legacy Installation Method (Older Windows 10 versions)
Older Windows 10 versions require manual setup because WSL was not fully integrated into the system.
Take the following steps:
1. Enable the required Windows features.
Use dism.exe to enable the Windows Subsystem for Linux feature:
dism.exe /online /enable-feature /featurename:Microsoft-Windows-Subsystem-Linux /all /norestart2. Enable virtualization support:
dism.exe /online /enable-feature /featurename:VirtualMachinePlatform /all /norestartThe commands display a progress bar and confirm completion with a success message.
3. Restart the system to apply changes.
After reboot, install a Linux distribution from the Microsoft Store and launch it to complete the initial setup.
Basic WSL Configuration
After installation, configure WSL to control how distributions run and interact with the system. The following steps cover the most common configuration tasks.
1. Check installed distributions and their WSL version:
wsl --list --verbose
2. Set which distribution starts when you run WSL with:
wsl --set-default Ubuntu
3. Define the default version for new distributions:
wsl --set-default-version 2
4. Change WSL version for a distribution:
wsl --set-version Ubuntu 2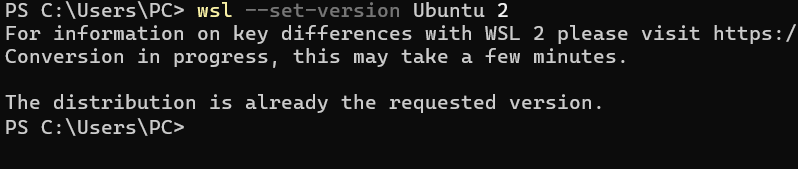
5. Update WSL:
wsl --updateBasic WSL Commands
WSL commands run either from the Windows shell (PowerShell or Command Prompt) or within the Linux environment. Commands prefixed with wsl are executed from Windows, while commands without it are run inside the Linux shell after you start WSL.
After installation, do the following to start WSL, run commands, and manage distributions. These examples show common actions when working with WSL.
1. List installed distributions with:
wsl --list
2. Start WSL and launch the default Linux distribution:
wsl
After you run the command, a Linux shell opens where you enter commands.
3. Access Windows files from WSL
WSL mounts Windows drives under the /mnt directory. For example, the C drive is available at /mnt/c. To access Windows files, navigate to a Windows directory with the cd command:
cd /mnt/c/Users
4. Run a command from Windows without opening the shell. Use the following syntax:
wsl [command]For instance, to execute the ls command directly from PowerShell, run:
wsl ls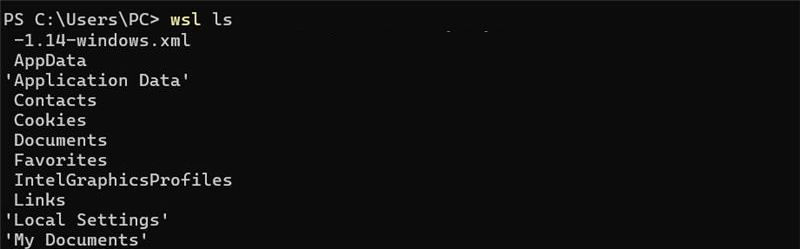
5. Stop all running WSL instances with:
wsl --shutdownThe command has no output.
6. If you want to remove an unwanted distribution and delete all associated data, use:
wsl --unregister Ubuntu
Conclusion
This tutorial explained what WSL is and how to install it. It also elaborated on the basic WSL configuration and provided command examples.
Next, learn how to run Windows apps on Linux.