A Terraform workspace is a quick and easy way to set up and manage separate environments within the same project directory. You don't have to write or duplicate code for each environment because they can all share the same Terraform configuration.
Find out how the terraform workspace command works, how to create and switch between workspaces, and when to use them.
How Do Terraform Workspaces Work?
Every initialized Terraform working directory starts in a workspace called default. You can create one or more additional workspaces in the same directory by using the terraform workspace command.
Terraform automatically creates a separate state for each workspace. This allows it to track and manage each environment individually, even though they share the same directory and configuration.
You can only work from one workspace at a time. When you run commands like terraform apply or terraform destroy, they only affect the workspace you are currently working in.
Note: If Terraform workspaces do not provide enough separation for your deployment, phoenixNAP's Infrastructure as Code solutions work with Terraform and can help you manage more complex infrastructure setups.
Where Does Terraform Store Workspace State?
If you use a local backend, Terraform stores the state for the default workspace in the terraform.tfstate file.
After you create additional workspaces, Terraform stores their state in the terraform.tfstate.d directory. Each workspace has its own subdirectory with a separate terraform.tfstate file.
For example, the state files for development and production environments might be located at:
terraform.tfstate.d/dev/terraform.tfstateor:
terraform.tfstate.d/prod/terraform.tfstateTerraform manages these files for you when you switch between workspaces.
If you use a remote backend that supports multiple workspaces, it stores each workspace's state file remotely. The exact location or naming scheme depends on the backend you use.
When To Use Terraform Workspaces?
Developers mainly use workspaces when they want to deploy the same Terraform configuration multiple times but keep the infrastructure Terraform creates based on the configuration separate.
For example, you might set up a temporary workspace to test a configuration change before applying the same change to your main deployment. Workspaces are also useful in server automation where several similar deployments use the same configuration.
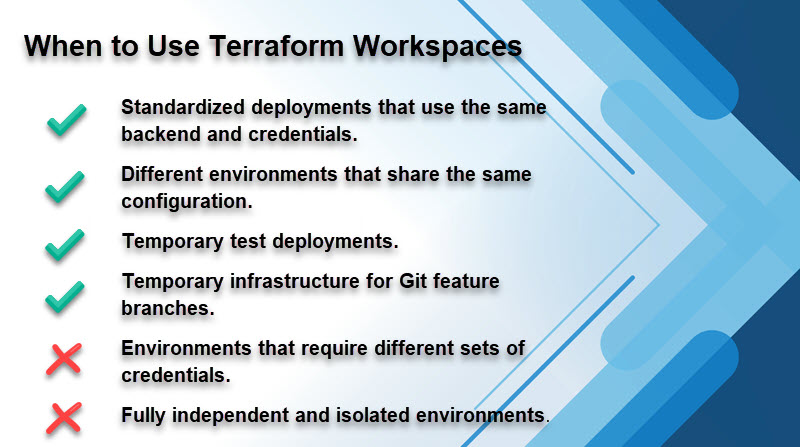
Workspaces are not designed to provide strong isolation between environments. If your environments need different credentials, backend configurations, or role-based access controls, use separate Terraform configurations or another method that offers better isolation.
For example, you can create a separate project directory for each environment or use a platform like HCP Terraform Workspaces to manage them separately.
Terraform CLI Workspaces vs. HCP Terraform Workspaces
Building a separate project directory and configuration files for each environment is an easy concept to grasp. It makes sense when you want to fully isolate different environments.
It is more helpful to look at the differences between Terraform CLI workspaces and HCP Terraform Workspaces. Many users mix them up because they both use the term workspace.
Terraform CLI workspaces are part of the Terraform CLI. They are primarily used to switch between states within the same working directory.
HCP Terraform Workspaces are part of HashiCorp's hosted Terraform platform. They act more like separate working directories, offer many more management and collaboration features, and are useful when teams need to work together to manage Terraform infrastructure.
The following table highlights their main differences:
| Terraform CLI Workspace | HCP Terraform Workspace | |
|---|---|---|
| What it is | A Terraform CLI feature for switching between separate states for the same configuration. | A workspace within HashiCorp's hosted Terraform platform that helps you manage Terraform deployments. |
| Level of separation | Workspaces share the same working directory and configuration, but each has its own state. | Each workspace can have its own configuration, state, variables, and settings. |
| Terraform runs | Runs from the machine or CI/CD system where you run the Terraform CLI. Commands run in the currently selected workspace. | You can execute and manage Terraform runs remotely through HCP Terraform. The run history is stored in the workspace. |
| Cost | This feature is included with the Terraform CLI. | Free, but paid plans offer additional features and higher limits. |
| Access control | CLI workspaces do not provide separate access controls for each environment. | Workspaces can have their own access permissions and can be assigned to different users or teams. |
This article focuses on Terraform CLI workspaces managed with the terraform workspace command.
What Is the terraform workspace Command?
The terraform workspace command is actually a set of Terraform commands that help you manage Terraform CLI workspaces.
You can use these commands to create new workspaces, switch between them, or delete the ones you no longer need.
terraform workspace Syntax
The basic syntax is:
terraform workspace [subcommand] [options] [arguments]Unlike commands like terraform fmt, terraform workspace is a command group. You add a subcommand to tell Terraform what action to take.
For example:
terraform workspace listThis command lists the workspaces available to the current Terraform configuration.
terraform workspace Subcommands
The terraform workspace command has five main subcommands:
| Subcommand | Description |
|---|---|
list | Lists the available workspaces and marks the currently selected one. |
show | Displays the name of the current workspace. |
new | Creates a new workspace and switches to it. |
select | Switches to an existing workspace. |
delete | Deletes a workspace you no longer need. |
The options available for the terraform workspace command depend on the subcommand you use.
terraform workspace Options
The following options are useful when working with different workspace commands:
| Option | Used with | Description |
|---|---|---|
-json | list | Returns the workspace list in JSON format. This format is useful for scripts and automation tools. |
-no-color | list | Removes color codes from command output. |
-or-create | select | Creates the requested workspace if it does not already exist. |
-state=path | new | Initializes a new workspace by copying an existing state file. |
-force | delete | Deletes a workspace even if its state is still tracking resources. |
-lock=false | new, delete | Disables state locking during the operation. |
-lock-timeout=[duration] | new, delete | Tells Terraform how long to keep trying if the state is locked. |
Be careful with the -force and -lock=false options. If you force-delete a workspace, you can leave existing infrastructure running without a Terraform state to manage it. Turning off locking can also cause issues if another process is using the same state.
terraform workspace Arguments
Most terraform workspace subcommands do not need additional arguments. The new, select, and delete subcommands require the name of the workspace you want to work with.
| Argument | Used with | Description |
|---|---|---|
[name] | new, select, delete | Specifies the workspace to create, select, or delete. |
For example:
terraform workspace select devIn this example, dev is the argument that tells Terraform which workspace to select. The list and show subcommands do not need a workspace name because they either list all workspaces or display the one currently selected.
terraform workspace Examples
The following examples use a Terraform configuration that provisions a phoenixNAP Bare Metal Cloud server, but terraform workspace works the same way with other providers and Terraform projects.
Separating Development, Testing, and Production Environments on BMC
If you want to use the same Terraform configuration for development, testing, and production, you can create a separate workspace for each deployment. Enter the following command in the terminal to create the dev workspace:
terraform workspace new devThe new subcommand creates the workspace and automatically switches to it.

Terraform does not automatically assign different input values to each new environment. If you want your dev, test, and prod environments to use different input values, you will need to set this up yourself.
Usually, developers create different variable files for each environment. For example, you can create dev.tfvars, test.tfvars, and prod.tfvars files that hold the values for their environments.
Terraform does not load dev.tfvars automatically when you switch to the dev workspace. To apply the values from this file, enter the following command:
terraform apply -var-file=dev.tfvarsYou can repeat the same process for the testing environment:
terraform workspace new testterraform apply -var-file=test.tfvarsDo the same for the production environment:
terraform workspace new prodterraform apply -var-file=prod.tfvarsNow you have three deployments that use the same Terraform configuration, each using different values from their respective .tfvars files, but keep their state separate. To see all available workspaces, run:
terraform workspace listOnly one workspace is active at a time, and it is marked with an asterisk (*).

When you run a Terraform command, such as terraform plan or terraform apply, it only touches the state of the workspace you are currently using.
Parameterizing BMC Server Instance Types Based on the Active Workspace
Terraform makes the currently selected workspace available through the following built-in value:
terraform.workspaceYou can use this value directly in your Terraform configuration. For instance, it makes sense to use a smaller BMC server for testing and a larger server for production.
To set up these server types, define them in a local map:
locals {
  server_types = {
    default = "s1.c1.small"
    dev = "s1.c1.small"
    test = "s1.c1.medium"
    prod = "s1.c2.large"
  }
}
Next, add terraform.workspace in the BMC server resource block in your main.tf file. This tells Terraform to look at the name of the currently selected workspace and use it to choose the matching server type for the server_types map:
resource "pnap_server" "server" {
  hostname = "bmc-${terraform.workspace}"
  os = "ubuntu/jammy"
  type = local.server_types[terraform.workspace]
  location = "PHX"
  install_default_ssh_keys = true
}
The type argument looks up the active workspace in the server_types map. For example, if the dev workspace is selected, Terraform uses the value assigned to dev.
Including ${terraform.workspace} in the hostname variable also gives the BMC server a unique name in each workspace:
bmc-dev
bmc-test
bmc-prod
This makes it easier to tell which deployment a server belongs to. Now, if you select the development workspace:
terraform workspace select devTerraform evaluates the local.server_types[terraform.workspace] value as s1.c1.small.
If you switch to the production workspace:
terraform workspace select prodThe same configuration will use s1.c2.large because that value is assigned to the prod environment.
Managing Multi-Region BMC Deployments Using Dedicated Workspaces
You can use workspaces to deploy the same BMC infrastructure in multiple locations. First, you need to define a location input variable in your Terraform configuration:
variable "location" {
  type = string
  description = "The location where the BMC server is deployed"
}
Next, use var.location for the location argument in the BMC server resource in your main.tf file:
resource "pnap_server" "server" {
  hostname = "bmc-${terraform.workspace}"
  os = "ubuntu/jammy"
  type = "s1.c1.small"
  location = var.location
  install_default_ssh_keys = true
}
This way, Terraform uses the value provided for the location variable when it creates the server. You can then create a separate variable file for each location. For example, phoenix.tfvars can contain:
location = "PHX"For the Ashburn location, use ashburn.tfvars:
location = "ASH"Create a workspace for the Phoenix deployment:
terraform workspace new phoenixThen apply the phoenix.tfvars file with the following command:
terraform apply -var-file=phoenix.tfvarsRepeat the same process for Ashburn:
terraform workspace new ashburnterraform apply -var-file=ashburn.tfvarsBoth deployments use the same configuration, but each workspace manages its own BMC resources. The phoenix workspace uses values from phoenix.tfvars, and the ashburn workspace uses values from ashburn.tfvars.
Automating Workspace Selection and Deployment in CI/CD Pipelines
You can also select workspaces automatically in a CI/CD pipeline. This way, the same pipeline and Terraform configuration can be deployed to different environments.
In this example, the pipeline stores the name of the environment in the DEPLOYMENT_WORKSPACE variable:
DEPLOYMENT_WORKSPACE=devOnce you initialize the Terraform working directory, use this value with the select subcommand:
terraform workspace select -or-create "$DEPLOYMENT_WORKSPACE"The -or-create option tells Terraform to select the workspace if it exists, or create and select it if it does not. Next, use the same DEPLOYMENT_WORKSPACE value to select the matching variable file:
terraform plan -var-file="${DEPLOYMENT_WORKSPACE},tfvars" -out=tfplanterraform apply tfplanSince this pipeline sets DEPLOYMENT_WORKSPACE=dev,Terraform will select the dev workspace, and the -var-file option will load values from dev.tfvars.
The same pipeline can also set DEPLOYMENT_WORKSPACE=prod. Here, Terraform will select the prod workspace and load prod.tfvars. You can reuse the same pipeline and Terraform setup, while each workspace keeps its own state and gets the right input values.
Terraform also provides the TF_WORKSPACE environment variable as another way to select an existing workspace in automation:
export TF_WORKSPACE=prodWhen TF_WORKSPACE is set, Terraform uses that workspace without needing a separate select subcommand.
This method is primarily intended for automated environments. If you use it in a shell, it's easy to forget that the variable is active, and you may accidentally run Terraform in the wrong workspace.
terraform workspace Common Pitfalls and Troubleshooting
The following sections describe common workspace issues and provide tips on how to fix them.
Handling Changes in the Wrong Workspace
If you run Terraform commands in the wrong workspace, you will modify a different deployment than the one you intended. Switching to the right workspace later cannot undo the changes you have already made.
You need to go back to the affected workspace and review the current state and configuration. Use the terraform plan command to see what Terraform would need to change to return that deployment to its expected configuration:
terraform planIf the plan looks correct, go ahead and apply the changes.
When working with more than one workspace, always check if you are in the right one before running Terraform commands that change your infrastructure. You can use the show subcommand to see which workspace you are in:
terraform workspace showThis command prints the name of the current workspace.

In this example, the output shows that you are currently in the prod environment. If you want to remove the development BMC server, switch to the dev workspace first:
terraform workspace select devBe especially careful with the TF_WORKSPACE environment variable. For example:
export TF_WORKSPACE=prodThis setting overrides the normal workspace selection. If you forget it is set, Terraform may keep using the production state even if you meant to work in another workspace.
Resolving State Locking and Shared Backend Conflicts
Each workspace has its own state, which means that running an operation in the dev workspace does not lock the test workspace's state. The problem occurs when more than one operation tries to work with the same workspace state.
For example, if a CI/CD pipeline is updating a BMC server tracked by the test workspace, you cannot run another operation in the same workspace because Terraform prevents both operations from changing the state at the same time. This protects the state from conflicting updates.
If another Terraform process is using the workspace you need, wait for it to finish before trying again. You can also use the -lock-timeout option to tell Terraform how long to keep trying to acquire the lock. For example, first select the workspace you want to use:
terraform workspace select test
Then run the command you initially intended with the -lock-timeout option:
terraform plan -lock-timeout=60sTerraform will keep trying to get the state lock for up to 60 seconds instead of stopping right away. This helps in automated setups where pipeline runs might overlap for a short time.
Instead of failing right away, Terraform waits for the other operation to finish and release the lock.
Managing Different Provider Credentials Across Workspaces
When you switch workspaces, Terraform does not automatically update the credentials it uses for providers or remote backends. This can be a problem if you need different credentials for each workspace.
For example, the phoenixNAP provider can read BMC credentials from the following environment variables:
PNAP_CLIENT_IDPNAP_CLIENT_SECRETIf all your workspaces use the same credential values, this setup works well.
But if your dev and prod workspaces use different BMC accounts, switching to prod does not automatically replace the development credentials for the production ones. If the wrong credentials are still set, Terraform will show an authentication error or might even connect to the wrong account.
You need another way to provide the correct credentials for each deployment.
In CI/CD pipelines, you can save credentials in the platform's secret storage instead of adding them to your Terraform files. A secret is a value that the CI/CD system keeps separate from your code and provides only when a job runs.
For example, you can store one set of BMC credentials for development and another for production. Configure the pipeline so that the development job gets the development values, like so:
PNAP_CLIENT_ID
PNAP_CLIENT_SECRET
The production job can provide different values using the same environment variable names. The phoenixNAP provider reads whichever values are available when Terraform runs.
This way, the workspace determines which state Terraform uses, and the CI/CD job decides which credentials Terraform receives.
If development and production need completely separate credentials and permissions, Terraform CLI workspaces might not be the best choice for your setup.
Recovering from Failed Workspace Deletions
You cannot delete a Terraform workspace if it is selected or still tracking resources. For example, if you are working in the test workspace and try to delete it:
terraform workspace delete testTerraform refuses because you cannot delete the workspace you are currently using.

Also, if the workspace still manages resources, you first need to remove those resources before deleting it. For example, if the test workspace tracks a BMC server and uses values from test.tfvars, enter the following command to remove the infrastructure:
terraform destroy -var-file=test.tfvarsAfter Terraform removes the resources, switch to a different workspace:
terraform workspace select defaultYou can then delete the now-empty test workspace:
terraform workspace delete test
Terraform also provides the -force option to override the resource check and delete a workspace that is still tracking resources:
terraform workspace delete -force testHowever, using -force does not destroy the BMC resources managed by the workspace. It only deletes the workspace and its state, which means the infrastructure keeps running, but Terraform can no longer track or manage it.
Use this option only if you intentionally want Terraform to stop managing those resources. In most situations, you should destroy the infrastructure first and delete the workspace afterward.
terraform workspace Best Practices
Follow these best practices when using Terraform workspaces:
- Use the
showcommand to make sure you are in the right workspace before running important Terraform commands that may change your infrastructure. - Pick clear and descriptive names for your workspaces so you and your team can easily understand their purpose.
- Load the correct .tfvars files and environment variables if you use different values for each environment. Remember that switching workspaces does not automatically load values for that workspace.
- Use
terraform.workspacein resource blocks to prevent naming conflicts and make it easier to see which workspace a resource belongs to. - Destroy managed resources before deleting the workspace. This allows Terraform to remove the infrastructure while it still has the state for tracking those resources.
- Use a remote backend if you have a team working on the same Terraform project. Remote backends give everyone a shared place for workspace states and can provide additional features you may need, such as state locking or encryption.
- Do not rely on CLI workspaces for security isolation between environments. If your environments need different credentials or access controls, you need a solution that offers better separation.
- Use
TF_WORKSPACEonly in scripts or automation tools. If you are working from the terminal, select the workspace explicitly so you always know which state you are using.
Conclusion
You have learned how the terraform workspace command works and how to use CLI workspaces to manage multiple Terraform deployments.
As your infrastructure grows, it's harder to see how all its resources fit together. These 8 Terraform visualization tools can help you map these relationships.