Running containerized applications in Kubernetes involves more than deploying Pods. Every workload consumes compute resources, and the cluster must determine where to run it while maintaining stability and efficient resource utilization. Kubernetes addresses these challenges by allowing you to define resource requirements for each workload.
This guide explains Kubernetes resources, how requests and limits work, how the scheduler places workloads, and how to configure and troubleshoot resource settings for production deployments.
What Are Kubernetes Resources?
Kubernetes resources define and manage every component in a cluster. They describe the desired state of applications, networking, storage, and other cluster objects while also specifying the compute resources workloads require to run.
Broadly, Kubernetes resources fall into two categories:
- API objects, which represent the desired state of cluster components.
- Compute resources, which define the CPU, memory, and storage available to containers.
Understanding the distinction between these resource types helps explain how Kubernetes manages workloads and allocates cluster capacity.
API Objects vs. Compute Resources
API objects are persistent entities managed by the Kubernetes API. They define what should exist in the cluster and how workloads should behave. For example, a Deployment specifies the desired number of Pod replicas, while a Service defines how applications communicate.
Compute resources describe the hardware capacity a workload requires. They determine how much CPU, memory, and ephemeral storage Kubernetes reserves for containers and the maximum amount they may consume.
The following table summarizes the differences between API objects and compute resources:
| Resource Type | Purpose | Examples |
|---|---|---|
| API objects | Define the desired state of workloads and cluster components. | Pod, Deployment, Service, ConfigMap, Secret. |
| Compute resources | Define the CPU, memory, and storage available to containers. | CPU, memory, ephemeral storage. |
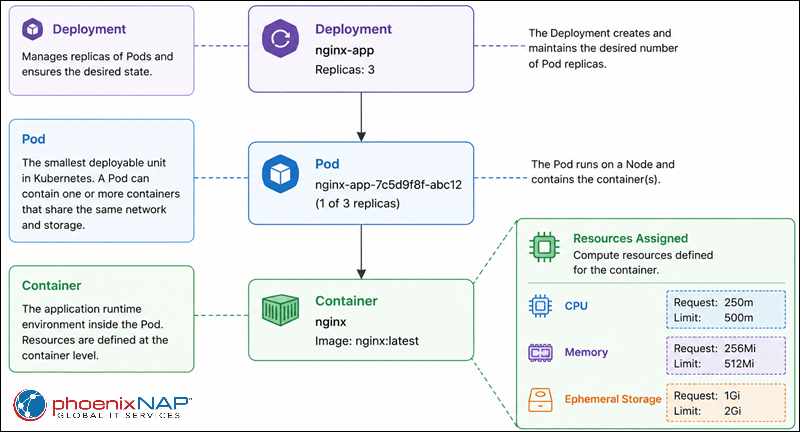
Although they serve different purposes, the two resource types work together. For example, a Deployment creates Pods, while the Pod specification includes the compute resource requests and limits that Kubernetes uses when scheduling the workload.
The following diagram shows the relationship between a Deployment, Pod, container, and the resources assigned to the container:
How Kubernetes Uses YAML to Define Objects
Kubernetes uses YAML manifests to define API objects declaratively. Instead of issuing individual commands to create or modify resources, you describe the desired configuration in a YAML file and apply it to the cluster.
Each manifest specifies information such as:
- The object type (kind).
- Metadata, including the resource name and labels.
- The desired specification (spec).
- Optional resource requests and limits for containers.
For example, a Deployment manifest contains the Deployment configuration, the Pod template, container images, networking settings, and resource requirements in a single file.
This declarative approach simplifies configuration management because the manifest becomes the single source of truth for the resource definition. You can store manifests in version control systems, review changes, and automate deployments through CI/CD pipelines.
Note: Kubernetes YAML manifests follow Infrastructure as Code (IaC) principles by defining infrastructure in reusable, version-controlled configuration files. Learn more about IaC in our Infrastructure as Code guide.
Role of the API Server in Managing Resources
The Kubernetes API server is the central management component of the control plane. Every operation that creates, updates, deletes, or retrieves Kubernetes resources passes through the API server.
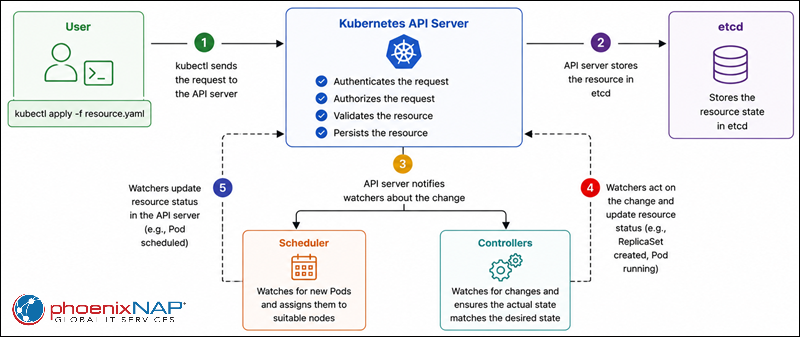
When you apply a YAML manifest using kubectl, the API server performs several tasks before the resource becomes available:
- Validates the resource definition.
- Authenticates and authorizes the request.
- Stores the object in etcd.
- Makes the updated resource available to other control plane components.
Other Kubernetes components continuously watch the API server for changes. For example, the scheduler monitors newly created Pods and assigns them to suitable nodes based on their resource requests, while controllers ensure the actual cluster state matches the desired configuration stored in the API server.
This architecture provides a centralized and consistent way to manage Kubernetes resources while allowing different control plane components to coordinate cluster operations independently. The following diagram illustrates the Kubernetes resource workflow:
Understanding Compute Resources: CPU and Memory
Kubernetes manages compute resources at the container level to ensure workloads receive the hardware they need while preventing individual applications from consuming excessive cluster capacity. The three primary compute resources are CPU, memory, and ephemeral storage. Users define these resources in a container specification, and Kubernetes uses the values when scheduling Pods and enforcing resource constraints.
Understanding how Kubernetes measures each resource is essential for configuring accurate requests and limits.
How CPU Units Work (Cores and Millicores)
Kubernetes measures CPU resources in CPU units, where one CPU unit represents one physical or virtual CPU core. Fractional CPU values are expressed in millicores, allowing you to allocate smaller portions of a core to individual containers.
One core equals 1000 millicores (1000m). For example:
- 1000m is equivalent to one CPU core.
- 500m represents half of a CPU core.
- 250m represents one-quarter of a CPU core.
- 2 represents two CPU cores.
Millicores provide precise control over CPU allocation, particularly when multiple containers share the same node. Rather than assigning an entire core to every workload, Kubernetes can distribute available CPU resources among several containers according to their configured requests and limits.
Unlike memory, CPU is a compressible resource. If a container reaches its CPU limit, Kubernetes throttles its CPU usage instead of terminating the application. As a result, applications may continue running but experience reduced performance until additional CPU resources become available.
How Memory Units Work (Megabytes vs. Mebibytes)
Kubernetes measures memory in bytes and supports both decimal (SI) and binary (IEC) units. Although they appear similar, these units represent different values.
The most commonly used memory units include:
| Unit | Type | Value |
|---|---|---|
| M | Decimal (SI) | 1,000,000 bytes |
| G | Decimal (SI) | 1,000,000,000 bytes |
| Mi | Binary (IEC) | 1,048,576 bytes (2²⁰) |
| Gi | Binary (IEC) | 1,073,741,824 bytes (2³⁰) |
Most Kubernetes manifests use binary units such as Mi and Gi because they align with how operating systems report memory.
Unlike CPU, memory is a non-compressible resource. A container cannot temporarily exceed its available memory without affecting system stability. If a container attempts to use more memory than its configured limit, the Linux kernel's Out of Memory (OOM) killer terminates the container, and Kubernetes restarts it according to the Pod's restart policy.
When configuring memory resources, use consistent units throughout your manifests to improve readability and reduce the risk of configuration errors.
What Is Ephemeral Storage?
Ephemeral storage is the temporary disk space available to a Pod while it runs. Kubernetes uses this storage for data that exists only for the lifetime of the Pod and does not persist after the Pod is deleted or recreated.
Ephemeral storage typically includes:
- Container writable layers, which store changes made after a container starts.
- Log files, including container
stdoutandstderroutput. emptyDirvolumes, which provide temporary shared storage for containers within the same Pod.- Temporary application files, such as caches, session data, or intermediate processing results.
Unlike Persistent Volumes (PVs), ephemeral storage is tied to the node hosting the Pod. If the Pod is removed or rescheduled to another node, the stored data is lost.
Applications that generate large log files or temporary data can quickly consume available disk space. To prevent a single workload from exhausting node storage, Kubernetes allows you to configure requests and limits for ephemeral storage in the same way as CPU and memory.
Managing ephemeral storage helps maintain node stability, particularly in production environments where multiple workloads share the same infrastructure.
How Resource Requests and Limits Work
Kubernetes uses resource requests and limits to manage how containers consume CPU, memory, and ephemeral storage. These settings help the scheduler place workloads on appropriate nodes while preventing individual applications from monopolizing cluster resources.
Although requests and limits are configured together, they serve different purposes. Requests determine the minimum resources a container needs to run, while limits define the maximum resources it can consume.
Resource Requests: What a Container Is Guaranteed
A resource request specifies the minimum amount of CPU, memory, or ephemeral storage Kubernetes reserves for a container. The scheduler uses these values to determine whether a node has sufficient available capacity before assigning a Pod to it.
For example, if a container requests 500m of CPU and 512Mi of memory, Kubernetes schedules the Pod only on a node that can provide at least those resources.
Resource requests influence several aspects of cluster operation:
- Scheduling decisions. The scheduler places Pods only on nodes with enough available resources to satisfy the request.
- Resource reservation. Requested resources are reserved for the Pod, reducing the chance of resource contention.
- Quality of Service (QoS). Requests contribute to the Pod's QoS classification, which affects eviction behavior during resource pressure.
Defining realistic requests improves cluster utilization. Requests that are too low may lead to resource contention, while excessively high requests can leave cluster capacity underutilized by preventing Pods from being scheduled.
Resource Limits: The Maximum a Container Can Use
A resource limit defines the maximum amount of CPU, memory, or ephemeral storage a container is allowed to consume. Limits protect cluster stability by preventing workloads from using excessive resources that could negatively impact other applications running on the same node.
The way Kubernetes enforces limits depends on the resource type:
- CPU limits throttle the container when it attempts to exceed its allocated CPU time.
- Memory limits terminate the container if it exceeds the configured memory allocation.
- Ephemeral storage limits may trigger Pod eviction when temporary storage usage exceeds the configured threshold.
Although limits improve resource isolation, setting them too aggressively can reduce application performance or cause unnecessary restarts. Review application resource usage before choosing limit values, and adjust them as workloads evolve.
How Kubernetes Decides Which Node Gets a Pod
When you create a Pod, the Kubernetes scheduler selects a node that satisfies the Pod's resource requirements and scheduling constraints.
The scheduler evaluates multiple factors before making a placement decision, including:
- Available CPU resources.
- Available memory resources.
- Available ephemeral storage.
- Node selectors and affinity rules, if configured.
- Taints and tolerations, which restrict where Pods can run.
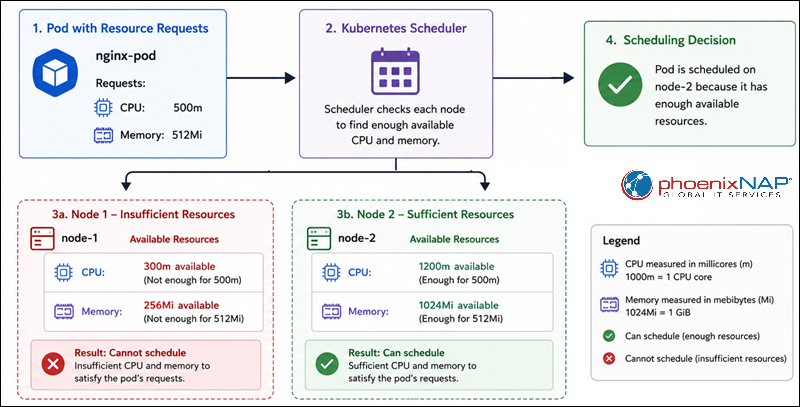
Resource requests play a central role in this process. The scheduler compares the requested resources against the allocatable capacity of each node and filters out nodes that cannot satisfy the request. The scheduler uses resource requests, not limits, when selecting a node.
If multiple nodes qualify, Kubernetes scores the remaining candidates and selects the most suitable node based on scheduling policies designed to balance workloads across the cluster.
If no node has sufficient available resources, Kubernetes cannot schedule the Pod. Instead, the Pod remains in the Pending state until resources become available or the cluster capacity increases.
The following diagram shows a Pod with CPU and memory requests being evaluated against two nodes, where one node lacks sufficient resources, and the other is selected by the scheduler:
Understanding QoS Classes: Guaranteed, Burstable, and BestEffort
Kubernetes assigns every Pod a Quality of Service (QoS) class based on the resource requests and limits configured for its containers. QoS classes help Kubernetes determine which Pods to evict first when a node experiences resource pressure.
The three QoS classes are:
| QoS class | Configuration | Typical use case |
|---|---|---|
Guaranteed | Every container has CPU and memory requests equal to their corresponding limits. | Critical production workloads that require predictable performance. |
Burstable | At least one container defines requests or limits, but requests and limits are not equal. | Most production applications with varying resource demands. |
BestEffort | No CPU or memory requests or limits are defined. | Non-critical or experimental workloads. |
During resource pressure, Kubernetes prioritizes Pods according to their QoS class:
BestEffortPods are the first candidates for eviction.BurstablePods may be evicted if reclaiming BestEffort Pods is insufficient.GuaranteedPods are the last to be evicted because they have explicitly reserved the resources they require.
For production environments, defining resource requests and limits helps Kubernetes make more predictable scheduling and eviction decisions while improving overall cluster stability.
Note that QoS classes are determined from CPU and memory requests or limits, not ephemeral storage.
Configuration Examples on Bare Metal Cloud
After learning how Kubernetes allocates compute resources, the next step is applying requests and limits to real workloads. Defining resource requirements in your manifests helps the scheduler place Pods on appropriate nodes while preventing applications from consuming excessive cluster resources.
The following examples demonstrate how to configure CPU, memory, and ephemeral storage resources, and how to monitor resource usage in a Kubernetes cluster running on Bare Metal Cloud.
Note: Resource requests and limits are especially important when running Kubernetes on dedicated infrastructure, where you control the available CPU, memory, and storage. phoenixNAP Bare Metal Cloud provides dedicated, Kubernetes-ready servers with predictable performance for production workloads.
Setting Basic CPU and Memory Requests for an App
Most production workloads should define CPU and memory requests and limits. Requests reserve the minimum resources a container needs to run, while limits prevent it from consuming excessive CPU or memory that could impact other workloads.
The following example creates a Deployment with CPU and memory requests and limits for an NGINX container. Follow the steps below:
1. Create a new deployment.yaml file and paste the following code:
apiVersion: apps/v1
kind: Deployment
metadata:
  name: nginx-app
spec:
  replicas: 2
  selector:
    matchLabels:
      app: nginx-app
  template:
    metadata:
      labels:
        app: nginx-app
    spec:
      containers:
      - name: nginx
        image: nginx:latest
        resources:
          requests:
            cpu: "250m"
            memory: "256Mi"
          limits:
            cpu: "500m"
            memory: "512Mi"
2. Apply the manifest using:
kubectl apply -f deployment.yaml3. Verify that Kubernetes created the Deployment:
kubectl get deployments4. To inspect the configured resource requests and limits, describe one of the Pods:
kubectl describe pod [pod-name]For example:
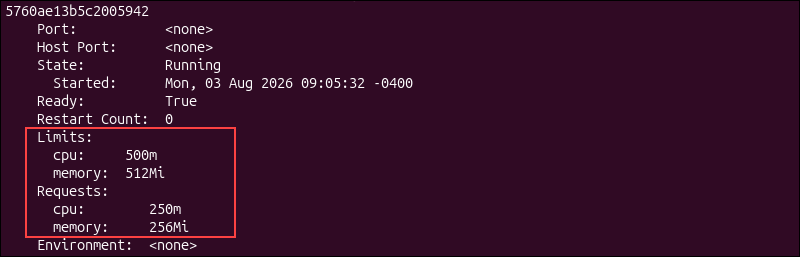
The Requests and Limits sections of the output show the configured CPU and memory values.
Configuring a Burstable App Layout
Burstable workloads are suitable for applications whose resource consumption varies over time. They define resource requests that are lower than their limits, guaranteeing a minimum amount of compute resources while allowing the application to use additional CPU or memory when the node has spare capacity.
The following example configures a Burstable container:
resources:
  requests:
    cpu: "500m"
    memory: "512Mi"
  limits:
    cpu: "1"
    memory: "1Gi"
In this configuration:
- The scheduler reserves 500 millicores and 512 MiB of memory.
- The application can use up to 1 CPU core and 1 GiB of memory when resources are available.
- The Pod receives the Burstable QoS class because the requests and limits are different.
Burstable workloads are common for web applications, APIs, and other services whose resource consumption varies depending on traffic or workload.
Limiting Ephemeral Storage to Protect Disk Space
Applications often create temporary files, caches, or log files during normal operation. Without storage limits, a single workload can consume excessive disk space and affect other Pods running on the same node. Configuring ephemeral storage requests and limits helps protect node resources while ensuring applications have sufficient temporary storage.
The following example limits ephemeral storage for a container:
resources:
  requests:
    ephemeral-storage: "1Gi"
  limits:
    ephemeral-storage: "2Gi"
This configuration:
- Reserves 1 GiB of ephemeral storage for the container.
- Allows the container to consume up to 2 GiB of temporary storage.
- Helps prevent excessive disk usage that could affect other workloads on the same node.
Ephemeral storage limits are particularly useful for applications that process temporary files, generate large caches, or produce extensive log output.
Using kubectl top to Check Real-Time Usage
Configuring resource requests and limits is only the first step. Monitoring actual resource consumption helps determine whether the configured values accurately reflect application requirements. If a workload consistently uses far less or far more resources than expected, you can adjust its requests and limits to improve cluster utilization and application performance.
After deploying an application, monitor its actual resource consumption to verify that the configured requests and limits match the workload's requirements.
The kubectl top command displays real-time CPU and memory usage collected by the Metrics Server.
Note: The kubectl top command requires the Kubernetes Metrics Server to be installed and running in the cluster.
Run the following command to view resource usage for all Pods:
kubectl top pods
To view resource usage for cluster nodes, run:
kubectl top nodes
Compare the reported resource usage with the configured requests and limits to determine whether your workloads are appropriately sized. If applications consistently consume significantly less than their requests, you can reduce the allocated resources to improve cluster utilization. Conversely, if workloads frequently approach or exceed their limits, consider increasing the limits or optimizing the application.
Common Resource Errors and How to Fix Them
Resource misconfiguration can prevent applications from starting, reduce performance, or cause unexpected Pod restarts. Kubernetes provides status information, events, and diagnostic commands that help identify the underlying cause of these issues.
The following sections describe some of the most common resource-related errors and explain how to troubleshoot and resolve them.
Fix Out of Memory (OOMKilled) Crashes
An OOMKilled error occurs when a container exceeds its configured memory limit. Since memory is a non-compressible resource, the Linux kernel terminates the container to protect system stability. Kubernetes then restarts the container according to the Pod's restart policy.
Common causes of OOMKilled errors include:
- Memory limits that are too low for the application's workload.
- Memory leaks that cause the application to consume increasing amounts of memory.
- Unexpected spikes in traffic or data processing.
- Applications that require more memory than originally estimated.
To determine whether a Pod was terminated because of an out-of-memory condition, inspect its detailed status:
kubectl describe pod [pod-name]If the container was terminated due to insufficient memory, the output contains a message similar to:
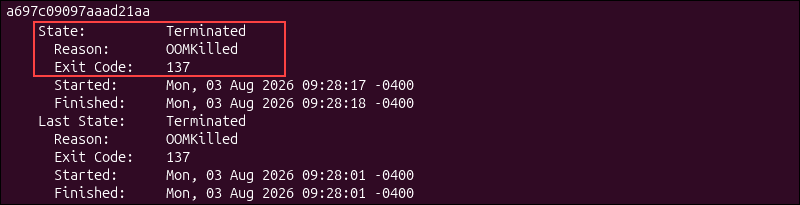
You can also review recent cluster events:
kubectl get events --sort-by=.metadata.creationTimestampDepending on the cause, you can resolve the issue by:
- Increasing the container's memory limit.
- Adjusting the memory request if the application requires more guaranteed memory.
- Optimizing the application to reduce memory consumption.
- Investigating and fixing memory leaks.
Troubleshoot Pods Stuck in Pending Status
A Pod remains in the Pending state when Kubernetes cannot schedule it onto a node. While this condition can have several causes, insufficient compute resources are among the most common.
A Pod may remain Pending because:
- No node has enough available CPU.
- No node has enough available memory.
- The requested ephemeral storage is unavailable.
- Node selectors, affinity rules, or taints prevent scheduling.
- Required Persistent Volumes are unavailable.
Start troubleshooting by describing the Pod:
kubectl describe pod [pod-name]Review the Events section near the end of the output. If resource constraints prevent scheduling, you may see a message similar to:
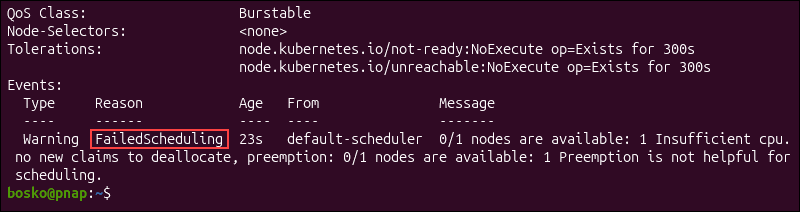
You can also check node resource usage with:
kubectl top nodesIf the cluster lacks sufficient capacity, consider one or more of the following actions:
- Reduce the Pod's resource requests if they exceed the application's actual requirements.
- Free resources by scaling down or removing unused workloads.
- Add additional worker nodes to increase cluster capacity.
- Review node affinity, selectors, and taints to ensure they do not unnecessarily restrict scheduling.
Resolving Pending Pods often requires balancing application requirements with the available resources in the cluster.
How to Deal with App Slowdowns Caused by CPU Throttling
Applications that consume CPU-intensive workloads may experience slower response times even when they continue running normally. One common cause is CPU throttling, which occurs when a container reaches its configured CPU limit.
Unlike memory limits, exceeding a CPU limit does not terminate the container. Instead, Kubernetes limits the amount of CPU time the application can use, which may reduce throughput and increase latency.
Symptoms of CPU throttling include:
- Increased response times.
- Lower request throughput.
- Higher application latency during periods of heavy load.
- Consistently high CPU utilization close to the configured limit.
Begin by checking the application's current CPU usage:
kubectl top podsIf CPU usage frequently approaches the configured limit, inspect the Pod configuration:
kubectl describe pod [pod-name]Review the configured CPU requests and limits to determine whether the application has sufficient CPU resources.
Possible solutions include:
- Increase the CPU limit to allow the application to use more processing power.
- Increase the CPU request if the workload consistently requires more guaranteed CPU resources.
- Optimize the application to reduce CPU-intensive operations.
- Scale the application horizontally by increasing the number of Pod replicas.
Monitoring CPU usage over time helps determine whether throttling occurs occasionally during traffic spikes or consistently under normal workloads.
Conclusion
This guide explained Kubernetes resources, including API objects, compute resources, resource requests and limits, and how Kubernetes uses them to schedule and manage workloads. It also showed how to configure resource settings, monitor resource usage, and troubleshoot common resource-related issues.
Properly configuring Kubernetes resources helps improve cluster stability, optimize resource utilization, and ensure applications run reliably in production environments.
Next, check out our comprehensive guide on using Terraform with Kubernetes.