


Developers use the kubectl apply command all the time to manage Kubernetes resources in production. However, the apply command can also modify existing resources.
If you want to create a new resource without accidentally changing an existing one, kubectl create is a better option.
Find out how to create resources with the kubectl create command and when it's the right tool for the job.
What Is kubectl create Command
The kubectl create command tells the Kubernetes API server to create a new resource. If a resource with the same name already exists in the same namespace, kubectl create will return an error and stop.
This makes kubectl create useful when you need to:
- Make sure you are creating a brand-new resource and not modifying an existing one by mistake.
- Set up basic resources quickly to test things out or experiment with Kubernetes.
- Create Services, ConfigMaps, or CronJobs directly from the terminal.
Note: If you need a place to run your Kubernetes cluster, you can deploy it on phoenixNAP Bare Metal Cloud in just a few minutes using servers where Rancher is already installed.
kubectl create vs. kubectl apply
The main difference is that kubectl create only creates new resources, while kubectl apply creates a resource if it does not exist or updates it to match your configuration if it already exists.
Since kubectl apply modifies resources, it is a better choice for automated deployments and for keeping Kubernetes configurations up to date.
kubectl create works best for one-time tasks. This is a quick comparison of the two commands:
| kubectl create | kubectl apply | |
|---|---|---|
| Used to | Create new resources. | Create or update resources based on your configuration. |
| Existing Resources | Returns an error if the resource already exists. | Updates the resource if its configuration needs to change. |
| Tracking | Does not save the original configuration for future runs by default. | Tracks previous settings to determine what needs to change. |
| Commands | Creates resources directly from the command line, but also supports YAML and JSON files. | Works with YAML and JSON files, standard input, or Kustomize configurations. |
| Automation | There is a high risk of CI/CD pipeline failure if you run the same command more than once. | Recommended for automated pipelines. |
Note: If you are working with Infrastructure as Code, you can use kubectl create to generate YAML files. These files are easy to store, reuse, and update as your infrastructure changes.
kubectl create Command Syntax
There are two basic ways to use the kubectl create command. One way is to place your resource definitions in a YAML or JSON file and reference the file from the command line:
kubectl create -f [filename] [flags]For example, if you have a file called payment-widget.yaml, you would run:
kubectl create -f payment-widget.yamlAnother way is to create resources directly from the terminal using subcommands. The syntax is:
kubectl create [subcommand] [name] [flags]For example, to create a namespace for an internal file-sharing app in your Kubernetes cluster, type:
kubectl create namespace file-sharing-appThe command has three parts:
kubectl createinstructs Kubernetes to create a resource.namespaceis the subcommand that defines the type of resource you want to create.file-sharing-appis the name of the new namespace.

Kubernetes will create a namespace called file-sharing-app. You can use it to organize Pods, Services, and other app resources.
kubectl create Flags
When you use the kubectl create command, you can add flags to control how and where resources are created, and which configuration files are used. Some of the most common flags include:
| Flag | Description |
|---|---|
-f | Creates resources from a YAML or JSON file, a directory, or a URL. |
-n | Allows you to choose the namespace where the resource will be created. |
-o | Lets you set how the command displays its output, such as YAML, JSON, or resource name. |
-k | You can create resources using configuration files from a Kustomize directory. |
--dry-run | You can simulate how resources are created without actually creating resources in the cluster. It accepts three values: client, server, and none. |
--save-config | Saves the resource configuration as an annotation, so you can use it later with kubectl apply. |
--validate | Lets you control how Kubernetes validates resource definitions for errors. |
kubectl create Subcommands
You can use kubectl create subcommands to create individual resources from your terminal. Common subcommands include:
| Subcommand | Used to |
|---|---|
namespace | Create a new namespace to keep resources separate from the rest of the cluster. |
deployment | Create a Deployment that manages application Pods. |
configmap | Create a ConfigMap to store application configuration data. |
service | Create a Service that provides network access to an application. |
secret | Create a Secret to store sensitive information. |
job | Create a Job that runs a one-time task. |
cronjob | Create a CronJob for running scheduled tasks. |
serviceaccount | Create a ServiceAccount that gives applications an identity within the cluster. |
kubectl create Command Examples
Before you try these commands in your terminal, check that you have the following:
- kubectl is installed and configured.
- At least one Kubernetes cluster is up and running.
- Your user has permissions to create Kubernetes resources in the cluster.
Creating Basic Resources Directly from the CLI
In this scenario, a development team uses kubectl create subcommands to set up a Kubernetes environment for testing an online store's integration with a payment processor API.
Creating a Namespace
Kubernetes namespaces are used to logically organize different sets of resources within the same cluster. This makes them a great option for keeping the online store's testing resources separate from other applications.
Use the namespace subcommand to create a dedicated namespace in your cluster:
kubectl create namespace payment-test-environmentKubernetes shows a message to confirm the payment-test-environment namespace has been created.

Now you can create Deployments and other resources in the payment-test-environment namespace to test the payment API integration.
Creating a Deployment
Deployments run and manage applications in a Kubernetes cluster. Among other things, they define which container images Kubernetes should use and how many Pods should be running.
For example, the following command creates a Deployment inside the payment-test-environment namespace:
kubectl create deployment payment-mock-api --image=stripe/stripe-mock:v0.206.0 --replicas=2 -n payment-test-environmentHere’s what each part of the command does:
kubectl create deployment. Tells Kubernetes to create a new Deployment.payment-mock-api. This is the name of the Deployment.--image=stripe/stripe-mock:v0.206.0. The Deployment uses the Stripe Mock container image, which simulates responses from the Stripe payment API.--replicas=2. Instructs Kubernetes to run two Pods. This helps distribute the load between the two pods and provides a backup if one of them fails.-n payment-test-environment. Creates the Deployment in the namespace you created earlier.

To check if Kubernetes has created the Deployment and its Pods, enter:
kubectl get deployments,pods -n payment-test-environment
Kubernetes lists the Deployment and its Pods, showing their current status as Running.
Creating a Service
Each Pod in the Deployment has its own IP address, which other applications use to communicate with it. But this address can change if Kubernetes replaces the Pod.
A Kubernetes Service can solve this problem by setting up a stable network address for accessing the Pods, even if they get replaced. Applications can communicate with the Pods through the Service without needing to know each Pod's IP address.
You can create a Service for the Deployment using the following command:
kubectl create service clusterip payment-mock-api --tcp=12111:12111 -n payment-test-environment
The command has several parts:
kubectl create service. Instructs Kubernetes to create a new Service.clusterip. This sets the Service type. ClusterIP means the Service is only reachable from inside the cluster.payment-mock-api. This is the name of the new Service. Because the Service and Deployment share the same name, the Service selector Kubernetes generates matches the labels on the Deployment's Pods. This allows the Service to direct traffic to those Pods.--tcp=12111:12111. Connects port number12111on the Service to port12111on the app containers. Stripe Mock uses this port number as its default HTTP port.-n payment-test-environment. Creates the Service in your testing namespace.
Kubernetes will create the Service and give it an internal IP address. To check the IP, enter:
kubectl get service payment-mock-api -n payment-test-envirovnment
Kubernetes displays the Service's network address, name, and port.
Create a ConfigMap
Applications usually need different settings depending on where they run. For example, an online store could use one set of settings to test its payment API integration and another to process actual payments.
Kubernetes ConfigMaps are used to store these settings separately from the application. This way, you can change settings without rebuilding the application's container image every time.
Use the following command to create a ConfigMap with two configuration values for your API test environment:
kubectl create configmap payment-settings --from-literal=APP_MODE=testing --from-literal=LOG_LEVEL=info -n payment-test environmentLet's break down the command:
kubectl create configmap. Theconfigmapsubcommand tells Kubernetes to create a ConfigMap.payment-settings. The name of the ConfigMap.--from-literal=APP_MODE=testing. This adds a setting calledAPP_MODEwith the valuetesting.- -
-from-literal=LOG_LEVEL=info. This adds a second setting calledLOG_LEVELwith the valueinfo. -n payment-test-environment. Creates the ConfigMap in the payment-test-environment namespace.
Kubernetes creates a ConfigMap named payment-settings with two entries.

To view its contents, enter:
kubectl describe configmap payment-settings -n payment-test-environmentThe output shows the details of the ConfigMap, including the APP_MODE and LOG_LEVEL values.
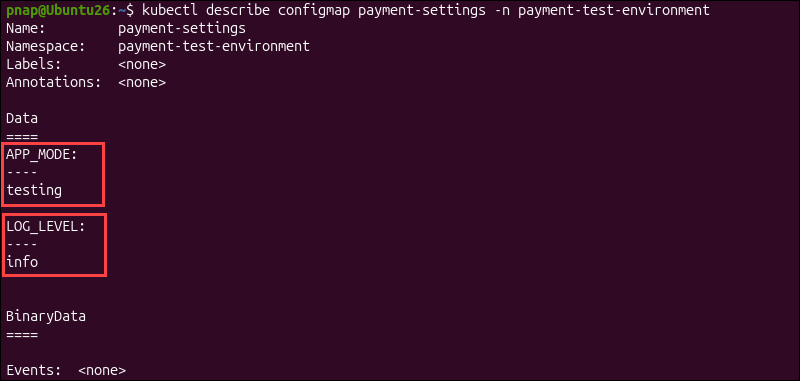
To make these settings available to an application, you need to reference the ConfigMap in the application's Pod or Deployment YAML file. The application can then read these values to decide which mode to run in and how much information to log.
Creating a Secret
Applications use credentials such as passwords or API tokens to authenticate with external services. An online store, for example, usually needs an API key or token to authenticate its requests to a payment processor.
Kubernetes Secrets let you store this information separately from your application settings and container images.
Use the following command to create a Secret that contains a sample API token for your testing environment:
kubectl create secret generic payment-credentials --from-literal=API_TOKEN=super-secret-token -n payment-test-environmentThis is what each part of the command means:
kubectl create secret. Tells Kubernetes to create a Secret.generic. This makes a general-purpose Secret for storing key-value pairs.payment-credentials. This is the name of the new Secret.--from-literal=API_TOKEN=super-secret-token. Adds anAPI_TOKENentry with the sample valuesuper-secret-token. This is just a placeholder. In a real integration, you would get the token from your payment processor. When possible, avoid entering real credentials directly in terminal commands, since they might be saved in your shell history.-n payment-test-environment. Creates the Secret in your testing environment.
Kubernetes creates the Secret and stores its value.

To check if the secret was created, enter:
kubectl get secret payment-credentials -n payment-test-environmentKubernetes shows information about the Secret but does not reveal its value.

Now you can reference the Secret in the application's Pod configuration, allowing the application to use it.
Creating a Job
A development team may want to run a payment integration test to make sure the payment processor's API responds to requests from the online store.
Kubernetes Jobs are designed for this type of task. They create and manage one or more Pods until the required task is complete. For example, to create a Job that prints a sample payment-testing message, use this command:
kubectl create job payment-test --image=busybox:1.36 -n payment-test-environment -- echo "Payment test job complete."Here's what each part of the command does:
kubectl create job. Tells Kubernetes to create a Job.payment-test. This is the name of the Job.--image=busybox:1.36. This specifies the container image used to run the task.-n payment-test-environment. Creates the Job in the testing namespace.--. Separates the kubectl options from the command that runs inside the container.echo "Payment test job complete.". Prints the message when the container runs.

Once the Job is complete, you can check its output in the logs:
kubectl logs job/payment-test -n payment-test-environmentThe terminal displays the Payment test job complete message.

This example just shows how Jobs work in Kubernetes. In a real payment integration test, you would likely use a script that sends test requests to the payment processor's API and checks for its responses.
Creating a CronJob
Applications often need to run the same task on a set schedule. For example, an online store may need to generate daily transaction reports or run regular checks. With Kubernetes CronJobs, you can set these tasks to run automatically at specific times.
This command schedules a task to generate a payments report message every day at 9:00 AM:
kubectl create cronjob payment-report --image=busybox:1.36 --schedule="0 9 * * *" -n payment-test-environment -- echo "Generating daily payment report."The command is just an example and only prints the sample message. To create a real payment report, you would need an application or script that collects transaction data and generates the reports.
The command has several parts:
kubectl create cronjob. Creates a CronJob.payment-report. The name of the new CronJob.--image=busybox:1.36. Specifies the container image used to run the task.--schedule="0 9 * * *". Schedules the task to run every day at 9:00 AM.-n payment-test-environment. Creates the CronJob in your testing namespace.--. Separates kubectl options from the command that runs inside the container.echo "Generating daily payment report". Prints a sample message each time the scheduled task runs.
Use the following command to check the CronJob:
kubectl get cronjob -n payment-test-environment
Kubernetes lists the CronJob, its schedule, and details about its most recent run.
Generating a YAML Manifest
Writing a YAML configuration file from scratch can take time, and it is easy to make mistakes. The kubectl create command lets you generate a basic YAML manifest quickly based on the resource settings you specify in the terminal.
The generated YAML has the basic structure and syntax. You can then edit the file to match your application's needs before creating the resource.
For example, you can create another Stripe Mock Deployment in the same namespace to test different settings:
kubectl create deployment payment-api-integration --image=stripe/stripe-mock:v0.206.0 --replicas=1 --dry-run=client -o yaml > payment-api-integration.yamlThe command includes three important options:
- -
-dry-run=client. Creates the resource definition but does not actually create the Deployment in the cluster. -o yaml. Formats the output as YAML.> payment-api-integration.yaml. Saves the output to a file instead of displaying it in the terminal.
You can now open the payment-api-integration.yaml file in a text editor and update the settings to fit your application.
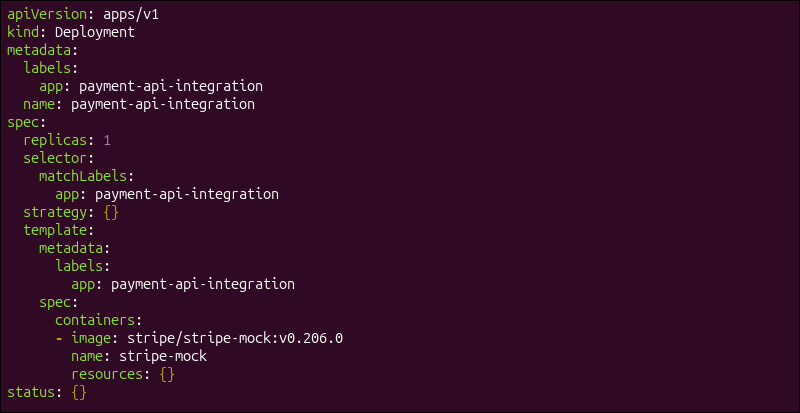
Using --dry-run=client to generate YAML is useful when preparing Kubernetes resources. However, it does not guarantee that the configuration will be accepted by the cluster. You should still validate the file before deploying it:
kubectl create --dry-run=server -f payment-api-integration.yaml -n payment-test-environmentThis checks if the server would accept the resource but does not create actual resources.

If the check succeeds and you are ready to create the Deployment, enter:
kubectl create -f payment-api-integration.yaml -n payment-test-environmentKubernetes will read the file and create the resource using your settings. You can use the same method to generate other types of configuration files too.
Creating Multiple Resources from a Single YAML File
So far, you have created Kubernetes resources one by one. In a real-world scenario, it is more likely that you would need to define several resources in one YAML file and then create them with a single command.
For example, if you are building an app that communicates with the phoenixNAP Bare Metal Cloud API, you want to check if it can access the API from inside the Kubernetes cluster.
You can set up a ConfigMap with the API address and a Job that uses it to send a test request. To do this, create a YAML file called bmc-api-check.yaml and add the following:
apiVersion: v1
kind: ConfigMap
metadata:
  name: bmc-api-settings
data:
  BMC_API_URL: https://api.phoenixnap.com/bmc/v1
---
apiVersion: batch/v1
kind: Job
metadata:
  name: bmc-api-check
spec:
  template:
    spec:
      containers:
        - name: api-check
          image: curlimages/curl:8.17.0
          command:
            - sh
            - -c
            - 'curl -sS -o /dev/null -w "HTTP status: %{http_code}\n" "$BMC_API_URL/servers"'
          envFrom:
            - configMapRef:
                  name: bmc-api-settings
      restartPolicy: Never
The YAML file includes two Kubernetes resources, separated by ---:
- A ConfigMap called
bmc-api-settings, which stores the BMC API address. - A Job named
bmc-api-check, which retrieves the address from the ConfigMap and uses thecurlcontainer image to send an HTTP request.
The envFrom field makes the ConfigMap's BMC_API_URL value available to the container. The Job then uses this address to contact the API's /servers endpoint.
To create both resources, enter:
kubectl create -f bmc.api.check.yamlKubernetes will read the file and create both the ConfigMap and the Job.

To check the Job's output in the logs, run:
kubectl logs job/bmc-api-checkThe terminal displays the HTTP status returned by the BMC API. For example, here the response is HTTP status: 401.

A 401 means that the request was rejected because it was not authorized. However, it also shows that your request reached the HTTP server and received a response.
Common Problems When Using kubectl create Command
Most kubectl create errors have clear messages and are usually easy to fix.
"AlreadyExists" Resource Conflict Error
If you try to use kubectl create to create a resource with the same name in the same namespace, Kubernetes will not allow it. To simulate this error, run the same namespace creation command from the earlier example again:
kubectl create namespace payment-test-environmentBecause the namespace already exists, Kubernetes returns an error:
Error from server (AlreadyExists): namespaces "payment-test-environment" already exists
This does not mean there is anything wrong with the namespace. Kubernetes is just letting you know it cannot create another resource with the same name. If you are not sure whether a namespace already exists, you can check by running:
kubectl get namespace payment-test-environmentIf the namespace exists, Kubernetes displays its details. You can create a new one with a different name or delete the namespace you no longer need.
Validation and Invalid Manifest Syntax Errors
Missing characters or incorrect indentation in a YAML configuration file can stop Kubernetes from creating a resource. When this happens, kubectl displays an error message that indicates which file has an issue and the approximate location of the error. For example:
error: error parsing bmc-api-check.yaml: error converting YAML to JSON: yaml: line 10: mapping values are not allowed in this contextThis error means that Kubernetes cannot read the bmc.api.check.yaml file correctly because there is a mapping issue on or around line 10.

To fix the issue, open the file in a text editor and review the indentation and configuration values near the line mentioned in the error. In this example, one of the container fields (image) had incorrect indentation.
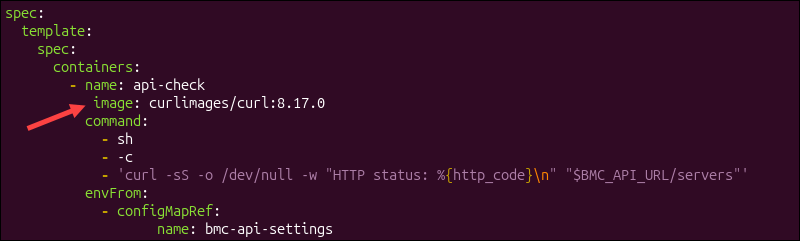
Once you correct the mistake, you can use the --dry-run=client option to check if kubectl can now read the manifest:
kubectl create --dry-run=client -f bmc-api-check.yamlYou can also use --dry-run=server with --validate=strict to check if the Kubernetes API server would accept the configuration:
kubectl create --dry-run=server --validate=strict -f bmc-api-check.yamlAfter Kubernetes accepts the manifest, you can create the resources without the dry-run options.
"Forbidden" Insufficient Permissions Error
Kubernetes admins control who can access resources in a cluster and what actions they are allowed to take. If you do not have the necessary permissions, Kubernetes is going to reject your request.
For example, if you try to create a Deployment in the payment-test-environment namespace without the right permissions, you might see an error like this:
Error from server (Forbidden): deployments.apps is forbidden: User "coolcat" cannot create resource "deployments" in API group "apps" in the namespace "payment-test-environment"The namespace exists, but your account is not authorized to perform this operation. Use the following command to see if you have permission to create Deployments in a specific namespace:
kubectl auth can-i create deployments -n [namespace]Kubernetes returns yes or no depending on your permissions.

If the answer is no, ask your Kubernetes administrator to grant you the necessary access.
Note: Learn more about how Kubernetes RBAC controls access to resources and how it fits into the wider Kubernetes architecture.
Best Practices When Using kubectl create Command
Follow these best practices when using the kubectl create command:
- Check that you are working in the right cluster and namespace before you create any new resources. You can use the
kubectl config current-contextcommand to check the active cluster and-nto specify the namespace. - Use
kubectl createwhen you need to add new resources for testing or one-time tasks. - If you plan to manage and update resources, especially in production, use
kubectl applyfrom the get-go. Or, use the--save-configflag, which saves the initial configuration as an annotation sokubectl applycan track changes later. - Try
--dry-run=clientto preview your resource definitions before deploying them. You can also add-o yamlto generate YAML files that you can edit later. - Use
--dry-run=serverif you want the Kubernetes API server to validate your configuration without actually creating the resource. - Getting a confirmation message after running
kubectl createdoes not always mean your app is working as expected. Usekubectl getorkubectl describeto check its status. - Avoid putting passwords and sensitive information in command-line arguments or plain YAML files. Use Kubernetes Secrets or an external secrets manager, and reference the credentials in your application's configuration.
Conclusion
You can now use the kubectl create command to create Kubernetes resources directly from the terminal, generate YAML files, and even create several resources from a single file.
Keep this kubectl commands cheat sheet handy whenever you're working with your Kubernetes clusters.